
In situations like severe iOS issues or disabled/unavailable iDevice screen, the need to put the device into recovery mode arises where you can choose to update or restore the device with iTunes or Finder. If you need to put your iPhone, iPad or iPod into recovery mode but don’t know the steps, then this post will be of great help to you. In case your iDevice is stuck on recovery mode, we also provide you the ways to get your device out of it.
What Is Recovery Mode?
Recovery Mode is a built-in troubleshooting environment on iPhone, iPad, iPod, and even Mac. It allows your device to connect with iTunes or Finder so you can update or restore iOS/iPadOS.
Think of it as Apple’s “last resort” fix: if your device is frozen, disabled, or won’t boot up normally, knowing how to enter recovery mode is your way out.
Why Enter Recovery Mode?
There are several situations where you may need it:
- Your iPhone is disabled/unavailable after too many wrong passcode attempts.
- iTunes/Finder doesn’t recognize your device.
- Your iPad/iPod is stuck on the Apple logo or restart loop.
- You want to factory reset your device when normal reset options don’t work.
If you’ve ever wondered how to enter recovery mode on iPhone, how to enter recovery mode iPad, or even how to enter recovery mode Mac, this guide has you covered.
How to Enter Recovery Mode on iPhone
The steps to put your iPhone into recovery mode are different, based on your phone model.
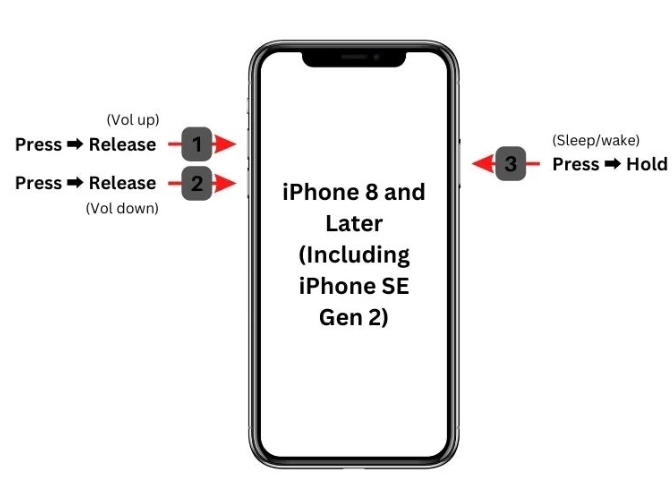
For iPhone 8 and Later
Step 1. Use a certified USB cable to connect your iPhone to your computer.
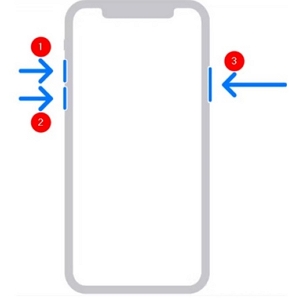
Step 2. Press and fast release the Volume Up button and apply the same operation to the Volume Down button.
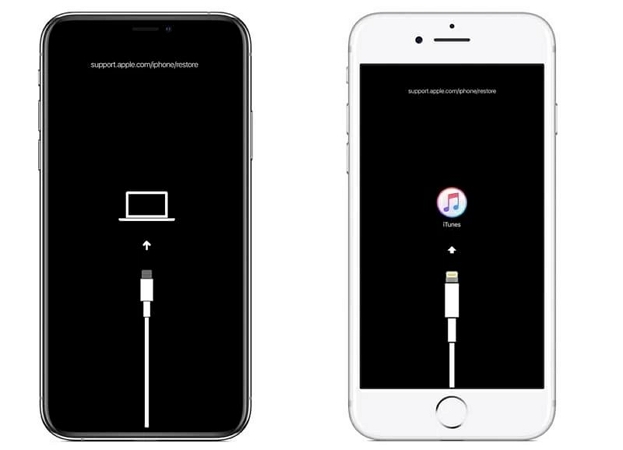
Step 3. Press and hold on the Side button until you see the connect to computer screen.
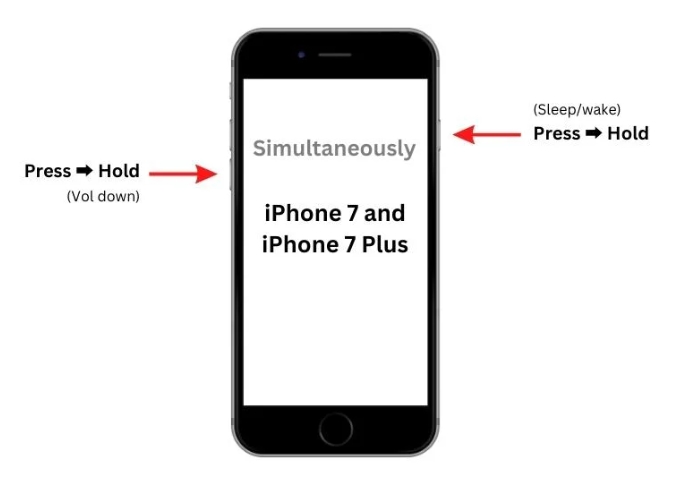
For iPhone 7 and 7 Plus
Step 1. Connect the iPhone to the Windows or Mac with a workable USB cable.
Step 2. Simultaneously hold the volume down and power button and release them when you see a cable pointing towards a computer/iTunes interface.

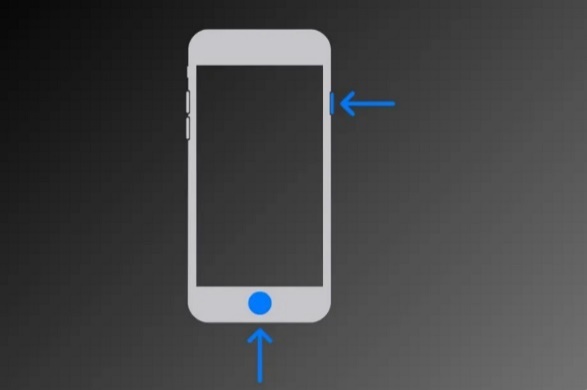
For iPhone 6S, 6, and earlier versions
Step 1. Plug your iPhone into the computer by using a USB cable.
Step 2. Press both the Home button and Side button at the same time and release them when recovery mode screen is shown on your phone.

How to Enter Recovery Mode on iPad
Let us now learn about the ways to make iPad enter recovery mode.
Step 1. First of all, connect the iPad to the computer through a USB cable.
Step 2. Put your iPad into recovery mode with the corresponding buttons.
iPad with Home Button
- Connect the iPad to your computer.
- Press and hold the Home button and the Power button at the same time.
- Release when the recovery mode screen appears.

iPad with Face ID (No Home Button)
- Connect iPad to your computer.
- Quickly press and release Volume Up, then Volume Down.
- Press and hold the Power button until the recovery mode screen is displayed.

How to Enter Recovery Mode on iPod
The recovery mode methods for iPod Models can be checked as below.
For iPod touch (6th Gen or Earlier)
- Power off the iPod.
- Hold the Home button, then connect it to your computer.
- Release when the recovery mode screen shows.

For iPod touch (7th Gen)
- Power off the device.
- Hold the Volume Down button while connecting to your computer.
- Release when the recovery mode screen appears.

How to Enter Recovery Mode on Mac & Windows
If you’re asking how to enter recovery mode Mac or wondering how the restore process works on PC, here’s what to do once your iPhone/iPad/iPod is in recovery mode:
On Mac (macOS Catalina or Later)
- Open Finder.
- Under “Locations,” select your iPhone/iPad.
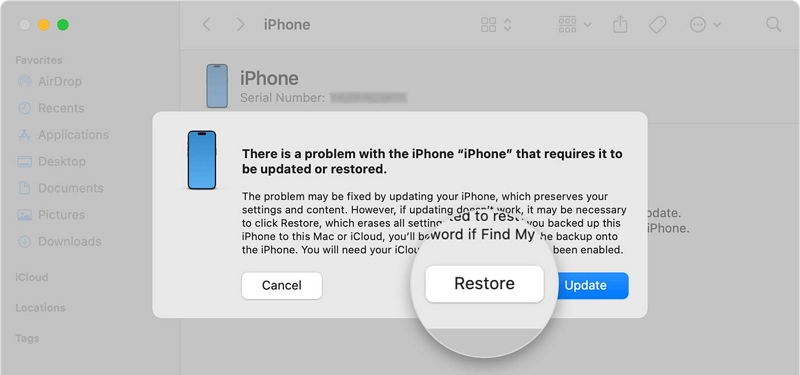
- A pop-up will ask whether you want to Update or Restore.
Choose Update first to keep your data. If that fails, select Restore.
On Windows PC (or macOS Mojave and Earlier)
- Make sure the latest version of iTunes is installed.
- Connect your device while it’s in recovery mode.
- iTunes will display a message with options to Update or Restore.
If you miss the 15-minute window, repeat the steps to re-enter recovery mode
Fixed: iPhone Stuck in Recovery Mode
iPhone getting stuck in recovery mode is not uncommon, so let’s check out the ways to deal with it.
Way 1. Force Restart iPhone
Force restart works effectively in fixing a stuck screen, including the recovery mode screen. Here is how to get it done on different models of iPhone.
Steps to Force Restart iPhone
For iPhone 8 and Later
- Press and quickly release the Volume Up button, followed by the Volume Down button. Then, press and hold the Power button till the phone restart.
For iPhone 7 Series
- Press and hold the Volume Down button along with Power button until you see the Apple logo.
For iPhone 6S and Earlier
- Press and hold both the Home button and the Power button and release them when Apple logo displayed on your phone screen.
Way 2. Restore iPhone with iTunes
This way can get rid of iPhone Recovery mode with a high success rate. However, note that it would wipe your personal data and settings from your iPhone, which could help unlock iPhone without forgotten passcode.
Step 1. Start by connecting your phone to your Windows/Mac device using a USB cable.
Step 2. Open Finder/iTunes/Apple Devices app on your computer.
Step 3. A restore or update pop-out will be shown on the app screen. Next, click Restore and follow the onscreen guide to factory reset your iPhone.
Best Way to Restore iPhone in Recovery Mode Without iTunes (Factory Reset Tool)
When your iPhone is not responding to iTunes method to come out of stuck recovery mode, Passixer iPhone Unlocker is a tool to rely on.
Passixer can factory reset iPhone on Windows or Mac, whether it’s on recovery mode or not. After reset, the settings like screen passcode and Face ID will be removed from your iPhone and thus it’s useful when you are locked out of your iPhone due to forgetting passcode, unworkable Face ID or broken screen. In addition to iPhone, it’s also compatible with iPad and iPod touch.
Steps to Restore iPhone in Recovery Mode Without iTunes
Open the installed Passixer iPhone Unlocker on your computer, then click on the Wipe Passcode option on the main interface to begin.

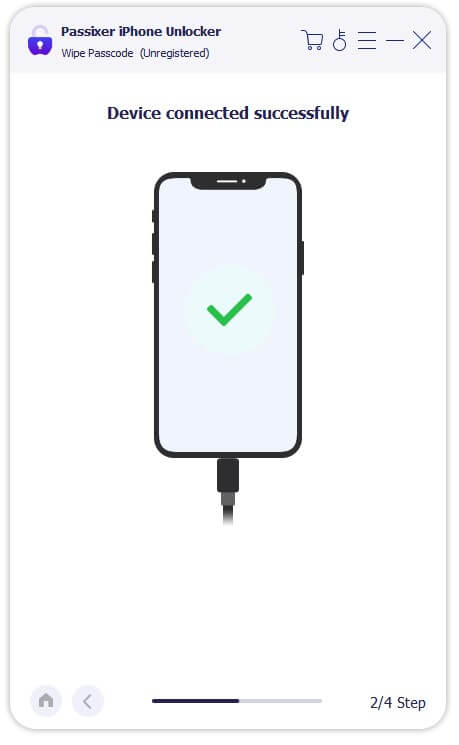
Use a USB cable to connect your iPhone to your Windows PC or Mac. The program will automatically detect your device once connected.
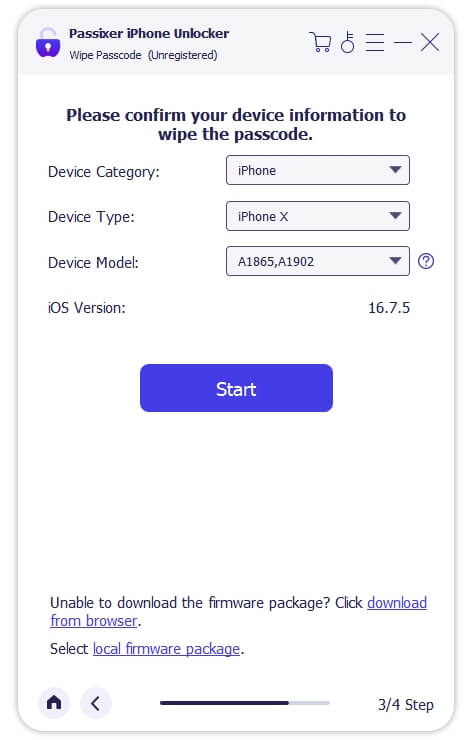
Check your device information on the screen, then click the Start button to download the firmware file required for the iPhone reset.
After the firmware download is complete, click Next. Then, enter 0000 and click Unlock. Passixer will start restoring your iPhone in Recovery Mode automatically.

FAQs
Conclusion
Getting your phone into recovery mode is annoying as well as troublesome, but there are several situations when this becomes unavoidable. Sure, you now know ways to put your different iDevices into recovery mode. If you get stuck into recovery mode, you can exit the mode by force restart, using iTunes or apply Passixer iPhone Unlocker.