
iCloud Activation Lock is effective at preventing stolen devices from being used by unauthorized people — but it becomes a problem if you buy a second-hand iPhone/iPad or forget your Apple ID. This article explains, in plain terms, what iCloud DNS Bypass is and how to temporarily access a locked device via the Wi-Fi settings (applicable to some older models and iOS versions). It also outlines the method’s limitations, legal and safety considerations, and more reliable alternatives so you can decide whether it’s worth trying.
Part 1: What is iCloud DNS Bypass?
Before attempting to unlock your device, it’s important to understand what iCloud DNS bypass is and how it works. Essentially, it’s a method to temporarily access certain features on an iCloud-locked iPhone or iPad. DNS (Domain Name Server) translates website names into IP addresses. During device activation, your iPhone or iPad normally connects to Apple’s servers via DNS. iCloud DNS bypass replaces Apple’s server with a custom third-party server, allowing partial access to the device without removing the activation lock. In simple terms, your device connects to a special server that lets you use some functions even while iCloud remains locked.
Part 2: Benefits and Limitations of iCloud DNS Bypass
Benefits of iCloud DNS bypass:
Unlocking iCloud using DNS is simpler than it may seem, and here are the benefits of using DNS iCloud Bypass.
- Easy Setup: You can do it easily in your iOS device’s Wi-Fi Settings without needing to install any software.
- Access Features: Once the device is activated through DNS, you can use various apps like the camera, web browser, games, and more.
- Free Service: The DNS Bypass iCloud Activation is completely free; you don’t have to spend any money to use this service.
Limitations of iCloud DNS bypass:
Unlocking your devices using iCloud DNS bypass is not just a saying; it’s a truth. However, this method has some limitations that you should know about before giving it a try.
- Limited Features: When you unlock iCloud activation using your Apple ID and password, you get full access to all your device features. But with iCloud DNS bypass, you can only access certain features on your phone.
- Compatibility Issues: This method doesn’t work for all iPhone and iPad models. It usually works on older iOS versions like iOS 8 and 10, and it’s unlikely to work on the latest iOS versions.
- No Guarantee: Since it’s just a bypass method, there’s no guarantee that it will work. Your device may or may not get unlocked, and you’re taking the risk by using this method.
- It’s a Workaround: Keep in mind that iCloud DNS bypass is just one of many workarounds to unlock the Activation Lock. It’s not the same as the official unlock you can get from other online services.
Part 3: How to Bypass iPhone/iPad Activation Lock via iCloud DNS
DNS bypass only provides temporary access to some device features. It is not an official or permanent unlock. You may need a SIM card inserted if the activation flow requires it, and success depends heavily on the device model and iOS version.

Step 1: Choose Country & Language on the initial setup screen and proceed until you reach the Wi-Fi selection page.
Step 2: On the Wi-Fi page, tap the “i” icon next to the network you want to use. If you cannot see the “i”, long-press the network name or return to the Wi-Fi list and try again.
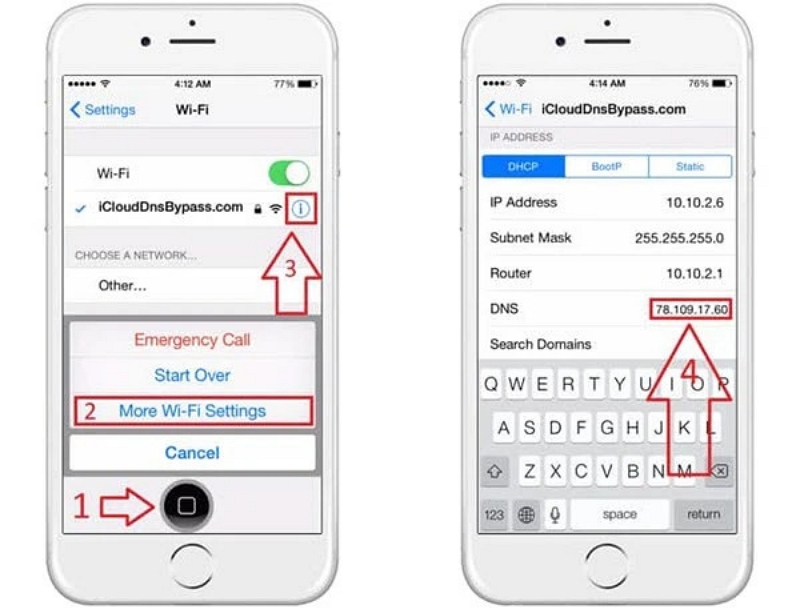
Step 3: Tap Forget This Network, then tap the “i” icon again and find the DNS field. Enter a custom DNS from the list below (choose the one for your region).
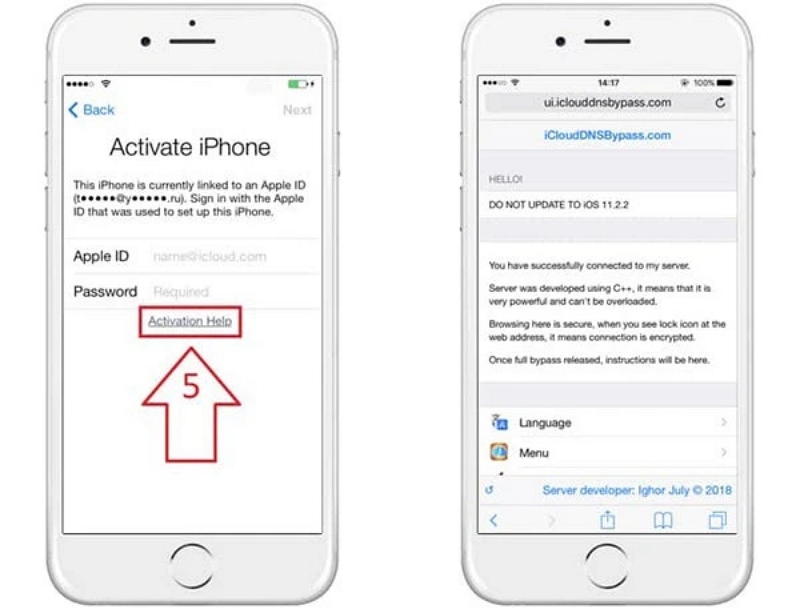
Step 4: Tap Back, re-select the Wi-Fi network, enter the password and connect. Do not tap Next — instead return to the activation page.
Step 5: If an “Activation Help” or “iCloud Bypass” screen appears, scroll down and tap it to access limited features (e.g., Camera, Safari, Music).
DNS list (region → DNS — applicability note)
- America: 104.154.51.7 — Works best on older iOS (iOS ≤ 10); lower success on iOS 12+.
- South America: 35.199.88.219 — Older devices / legacy servers; try if US DNS fails.
- Asia: 104.155.220.58 — Sometimes works on older regional builds; mixed results.
- Europe: 104.155.28.90 — Similar to Asia DNS — older iOS more likely to succeed.
- Australia & Oceania: 35.189.47.23 — Good fallback for APAC region older devices.
- Other continents: 78.100.17.60 — Generic fallback; success varies widely.
If one DNS doesn’t work, try another from the list — success rates are inconsistent across models and iOS versions.
From my experience, a few points can help with iCloud DNS bypass. If the “i” icon isn’t visible, long-press the Wi-Fi name or restart the activation flow. If the DNS field is locked, tap “Forget This Network” first, then re-select it. Switching DNS, reinserting the SIM, or restarting the activation often helps if it still fails. Note that “Activation Help” depends on iOS version and may not appear on newer devices. Remember, DNS bypass is temporary — a reboot or restore will bring back the activation lock. Treat it as a short-term workaround while seeking a permanent unlock.
Part 4: Alternative Ways to iCloud DNS Bypass for Locked iPhone/iPad
The above-mentioned DNS bypass is not the only way to remove the activation lock of the iPhone. Below, we will discuss 3 alternative ways to iCloud DNS bypass for locked iPhone/iPad.
Way 1. One Click to Remove Activation Lock with Passixer
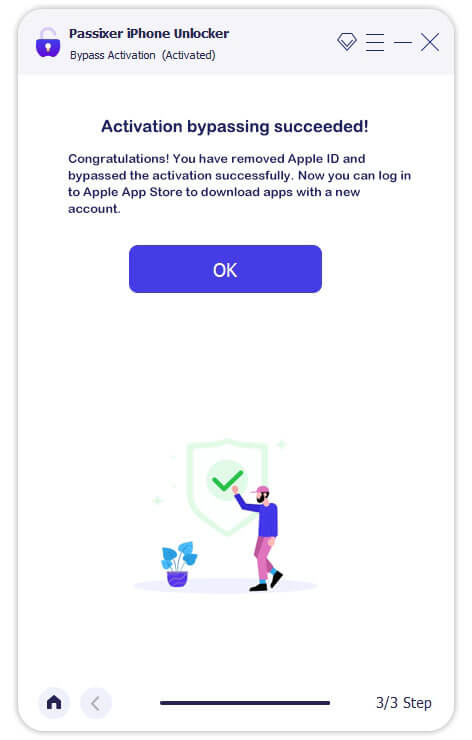
Using iCloud DNS Bypass isn’t the best way to unlock your iPhone/iPad. Whenever you restart the device, you’ll go back to the iCloud activation lock screen again. What’s more, these steps can be tricky for those not familiar with technology. Is there a simpler way to permanently unlock an iCloud-locked iPhone without affecting most features? Absolutely! Check out the latest iCloud lock removal tool – Passixer iPhone Unlocker. Passixer can help you remove iCloud activation lock even when you don’t remember the Apple ID and password. Besides, bypassing iCloud DNS, this software is also capable of removing other kinds of iOS locks.
Here are the steps to perform iCloud DNS bypass on iPhone.
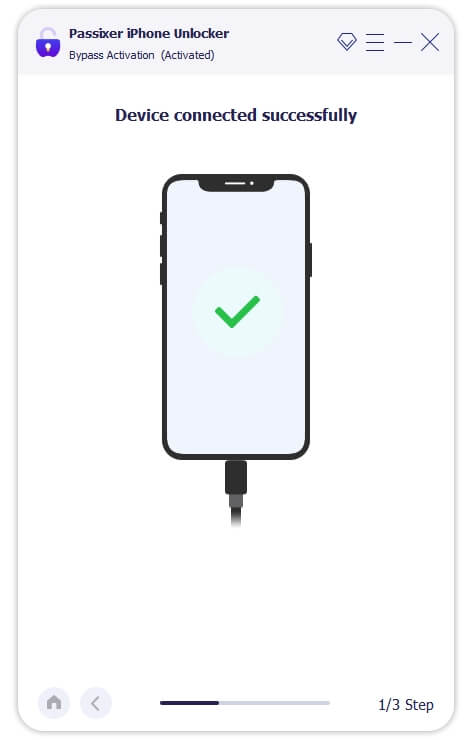
Open Passixer iPhone Unlocker on your Windows PC or Mac. From the main interface, select “Bypass iCloud Activation Lock”.

Connect your iPhone or iPad to the computer using a reliable USB cable so that Passixer can detect it.
Follow the on-screen instructions to jailbreak your iPhone or iPad. This step is required for the bypass process to work properly.
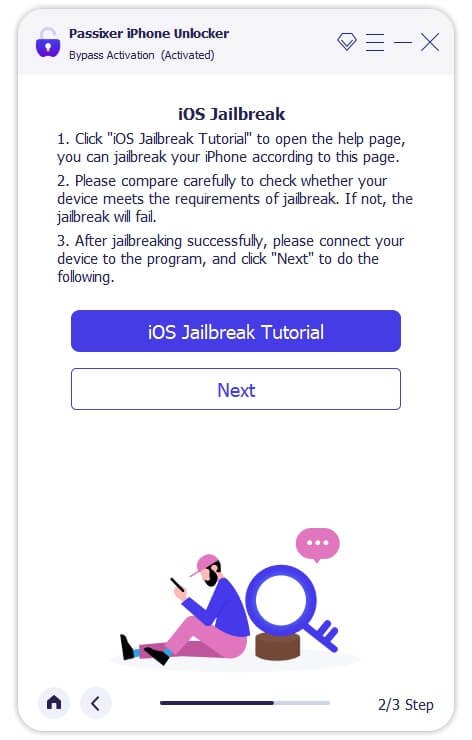
After jailbreaking, click Next. Passixer will bypass the iCloud Activation Lock, usually within a few minutes.
Cost: Typically $29.99 for a license, sometimes higher.
Best for: Users who cannot access Apple or the original owner, but are willing to accept potential risks.
Way 2. Contact Apple for iCloud Lock Removal
If you’re stuck on the iCloud activation lock, you can reach out to Apple support for help. Here are the steps to contact Apple for iCloud lock removal.
Step 1: Visit Apple’s official website and click on “Support”.
Step 2: Choose iPhone support and click “Start now”.
Step 3: Select “Call Us,” enter your phone number, and wait for Apple to call you.
Step 4: When they call, explain that you forgot your iCloud password and need help with the activation lock.
Step 5: Provide the necessary info to confirm your identity.
Step 6: Once verified, they’ll assist you in bypassing the activation lock.
Cost: Usually free (unless additional repair services are involved).
Best for: Anyone who has legal proof of ownership—this should always be your first option.
Way 3. Seek Help From the Previous Owner
Another way to bypass iCloud DNS is to seek help from the previous owner. By following this, you can perform DNS bypass iCloud in two different ways.
Ask for Passcode
If the iPhone has iOS 11 or a newer version, and the owner used the Two-factor authentication with iCloud, you can use their device’s passcode instead of the Apple ID and password to remove the iCloud Activation Lock.
To do this, go to the Activation screen and tap “Unlock with Passcode?” Then, ask them to enter the device’s passcode. You might also need to enter the two-factor authentication code Apple sends to the previous owner.
Remove the device from the old owner’s iCloud account
To make this method work, you need to ask the person who had your iPhone before to delete it from their account and remove it remotely. Once they do this, the iCloud lock on your iPhone/iPad will be bypassed, and you can easily set it up as a new phone. Wondering how to get it done? Just have the previous owner follow the below-given simple steps.
Step 1: Open the iCloud website using Chrome and log in to the iCloud account currently used on your locked iPhone.
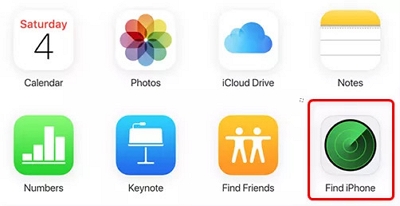
Step 2: Select “Find iPhone” to perform actions on your iPhone remotely.
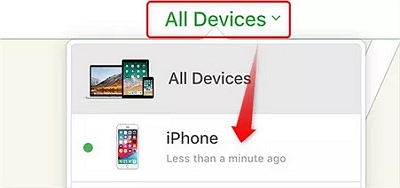
Step 3: Click on “All Devices” and choose your “iPhone” from the list.
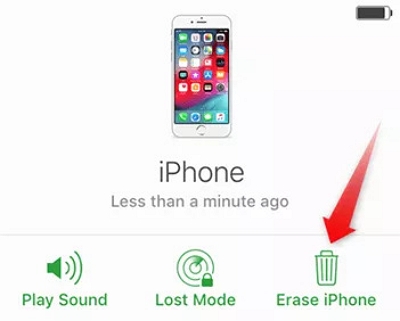
Step 4: Select “Remove from Account” after clicking on “Erase iPhone”.
Cost: Free.
Risks: If the owner refuses or cannot be reached, this path is blocked.
Best for: Buyers of second-hand iPhones who still have contact with the seller.
Compatibility Table
Check your device and iOS version before attempting DNS bypass. Success decreases significantly on newer devices and iOS releases.
Part 5: FAQ for iPhone/iCloud DNS Bypass
Optional Practical Tip: Keep your receipt scanned or in Apple Wallet — it speeds up verification when contacting Apple Support.
🔹 Information Sources & Credibility
- Apple Official Support: support.apple.com
- Passixer iPhone Unlocker Official Website: www.passixer.com
- Content & Tips Valid as of September 2025
- Technical guidance based on tested iOS devices and versions; success may vary by model & iOS version
Conclusion
iCloud DNS Bypass can serve as a temporary emergency solution on some older devices or iOS versions, allowing short-term access to certain features. However, it is not a permanent unlock method and carries legal and security risks. It is recommended to first contact the original owner or Apple Support. If you need long-term and full use of the device, opting for an official unlock or a reputable third-party tool with clear refund and support policies is a safer approach.