
Although iPad Restrictions feature is helpful, your digital habits evolve over time. And what once felt like a good digital detox can feel like unnecessary limitations. So, this guide shows you how to turn off Restrictions on iPad, regardless of the model and whether you have the passcode or not.
Note: Apple introduced Screen Time on iPads running iOS 12 and iPadOS 13 or later, with Restrictions(Content & Privacy Restrictions) included as part of the feature.
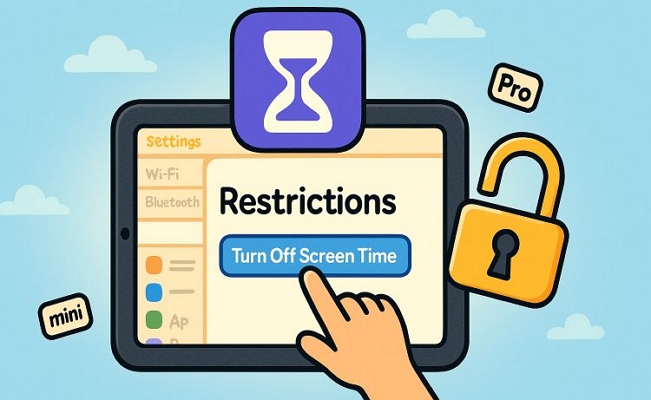
How to Turn Off Restrictions on iPad [Any Models]
These methods will help you turn off Restrictions on any iPad, whether you’re managing your own device or trying to remove Restrictions set by a parent’s iPhone (in case they have lost their device). Plus, all the ways allow you to remove Restrictions across every iPad model—new or old.
Way 1. Disable Restrictions Without Passcode [No Data Loss]
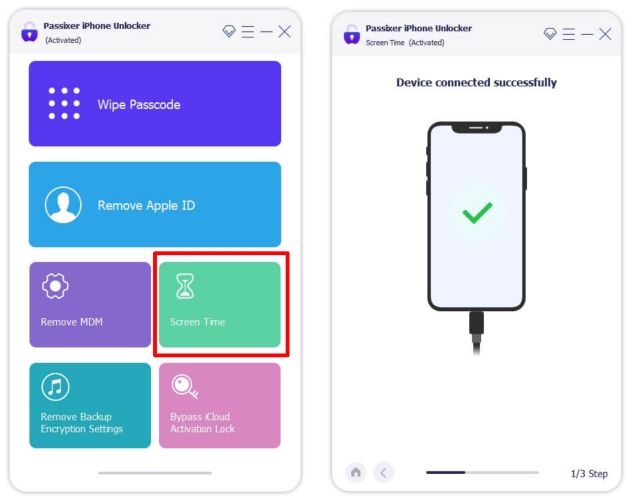
Passixer iPhone Unlocker gives you one of the easiest ways to turn off Restrictions on iDevices without wiping anything. Whether you’re using the sole Restrictions feature in old iPad like iPad Air 2 or the Content & Restrictions option of Screen Time in new iPad e.g.,iPad 9, Passixer can effectively help remove Restrictions from your device in just three simple steps. For iPad running with iOS 12, iPadOS 13 or later, Passixer directly disable Screen Time and thus its Restrictions feature is off. For iPad installed with iOS 11 or earlier, Passixer will find the Restrictions passcode for you, enabling you to turn off Restrictions with ease.
Key Features:
- Sign out of the locked or disabled Apple ID on iPad without Apple ID password.
- Bypass iCloud Activation Lock screen on second-hand iDevices without disabled Apple ID.
- Take off MDM Restrictions set by schools or organizations without reset on your iPad.
- Unlock disabled/unavailable/security-lockout iPad without passcode.
Steps to Remove Screen Time Restrictions Using Passixer
Prep: Turn off Find My feature on your iPad.
Step 1. Launch Passixer on your Mac or Windows PC. From the main screen, select the option labeled Screen Time.
Step 2. Now connect your iPad to the computer and Passixer will confirm the connection automatically.
Step 3. What happens next depends on your iPad’s software version:
If it’s running iOS 12, iPadOS 13 or later:
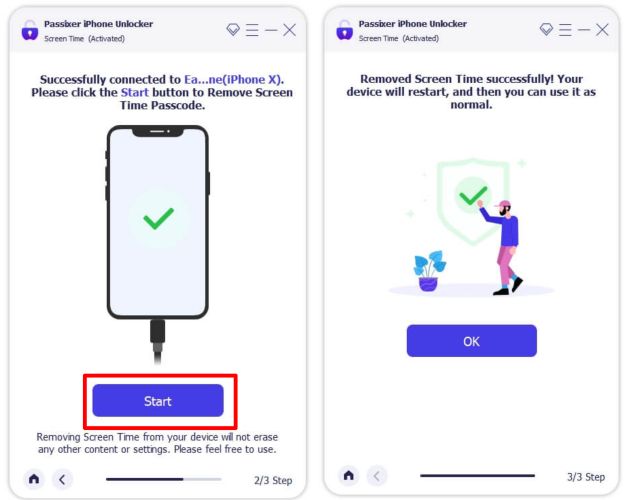
Click the Start button and Passixer will automatically remove the Screen Time passcode and settings, including Content & Privacy Restrictions. You won’t need to do anything else. All the data will remain intact.
If it’s on iOS 11 or earlier:
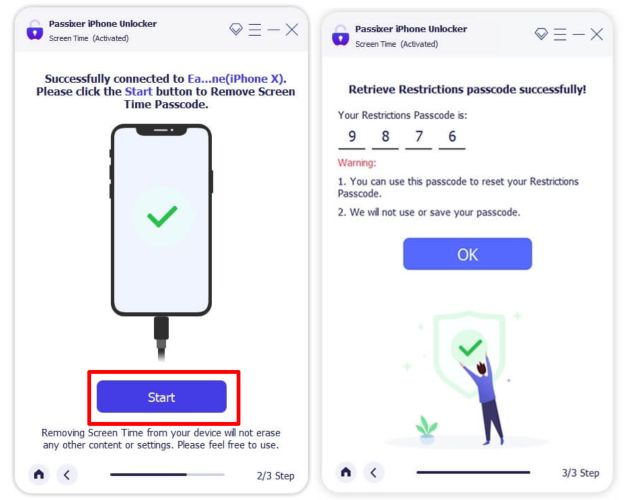
Click the Start button, Passixer will show the old Restrictions passcode from a local iTunes backup (you can create one if needed).
That’s it. You won’t lose a single thing. After finding the old passcode, just head to Settings > General > Restrictions > Disable, enter the code, and the Restrictions will be gone.
Way 2. Restore iPad in iTunes [Data Loss]
One more method to turn off Restrictions on any iPad is to restore it via iTunes, Apple Devices app, or Finder. All three work the same. You just need a computer and a cable. This will wipe your iPad completely, including Screen Time settings.
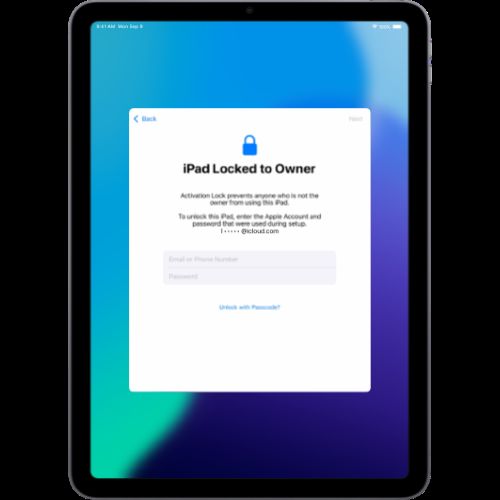
Note: if Find My iPad was on before the reset, your device will finally ask for the Apple ID and password linked to that iPad because of Activation Lock.
Steps to Remove Restrictions by Restoring Your iPad
Step 1. Connect your restriction-protected iPad to a Mac or Windows PC. Then, open iTunes, Finder, or the Apple Devices app.
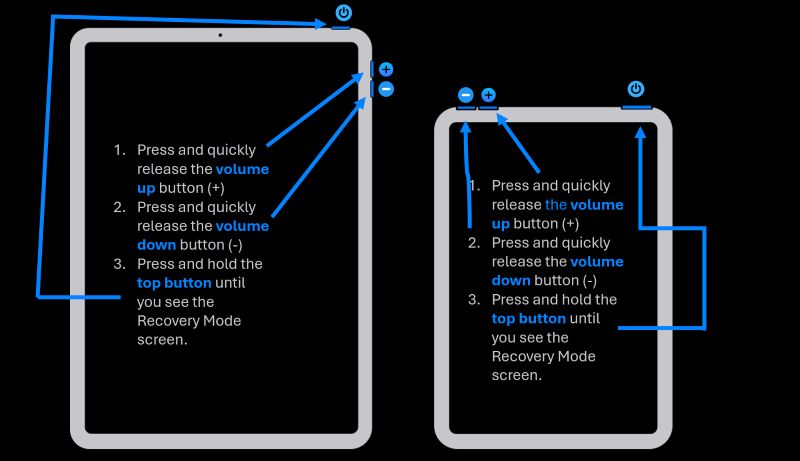
Step 2. Put your iPad into Recovery Mode. Here’s how based on the model:
- No Home button: Press and release Volume Up and then do the same for Volume Down. Now hold the Power button. Keep holding until you see a cable pointing toward a computer.
- With Home button: Press and hold both the Power and Home buttons. Don’t let go until the recovery screen appears.

Step 3. Once your iPad is in recovery mode, a prompt appears in the app(iTunes/Finder/Apple Devices). Click Restore when asked.
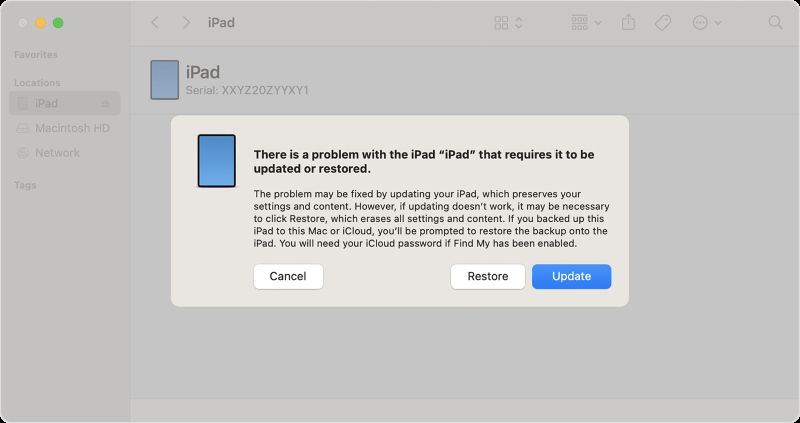
Step 4. Confirm and let the restore begin. The system will reinstall iPadOS from scratch.
Step 5. The iPad will reboot and you’ll see the Hello screen or Activation screen (depending on Find My status).
Note: To avoid the Restrictions coming back, use a new Apple ID. That’s it.
Way 3. Erase iPad via Find My Feature
The third option is to erase your iPad remotely using Find My, either from the app or through a browser. This removes all Screen Time Restrictions and downtime schedules, but data loss is guaranteed.
This way only works when the following 2 conditions are met:
- Find My was already turned on before the erase.
- You still remember the Apple ID and password linked to that iPad.
Steps to Erase iPad with Restrictions Using Find My
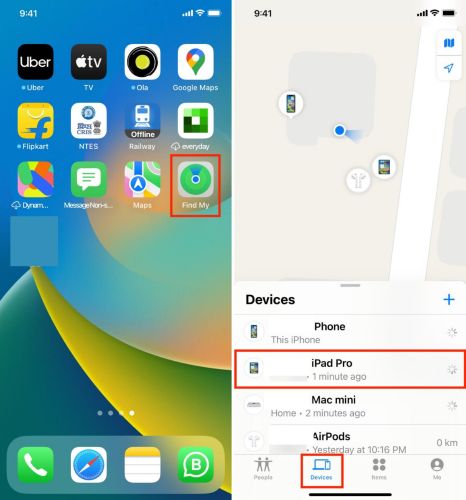
Step 1. Use Find My app on another iPhone/iPad/Mac or go to iCloud.com/find on any device with a browser. Sign in the Apple device or iCloud.com/find in the non-Apple device with the same Apple ID that’s on the restricted iPad.
Step 2. Select Devices. Pick the iPad with Restrictions from the list.
Step 3. Swipe up on the card and tap Erase This Device. Tap Continue and then confirm. You’ll have to enter your Apple ID password to start the erase and remove the Restrictions.
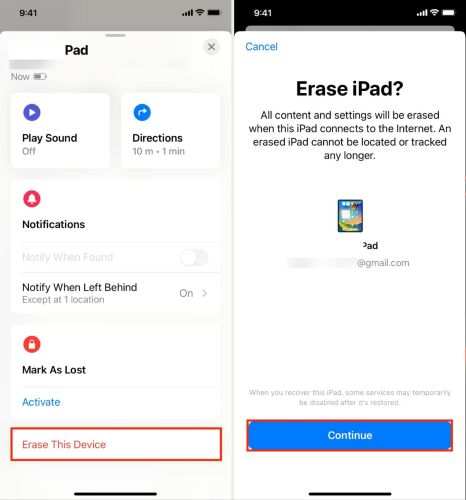
The iPad will reset and restart. You’ll see the Activation Lock screen. Enter the same Apple ID again to unlock it. You can now set up the iPad as new. Or, use a different Apple ID to avoid bringing back old Restrictions.
How to Remove iPad Restrictions [Models Running iOS 12 or Later]
If your iPad is running iOS 12 or any newer version, including models like iPad Pro, iPad Air (3rd gen and up), iPad Mini (5th gen and up) and standard iPads from the 9th or 10th generation, then your Restrictions are controlled through Screen Time.
And if you want all the app limits, content restrictions, downtime schedules to be gone without any data loss, then there are two ways to turn off Screen Time Restrictions.
Way 1. Use Screen Time Passcode
The first method works when you remember the Screen Time passcode. If that’s the case, turning off Restrictions will barely take a minute.
The steps to turn off Restrictions are as follows:
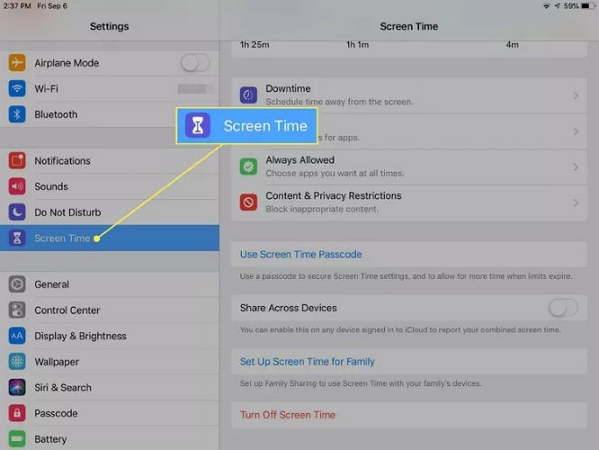
Step 1. Open Settings on your iPad and choose Screen Time from the left-hand side menu.
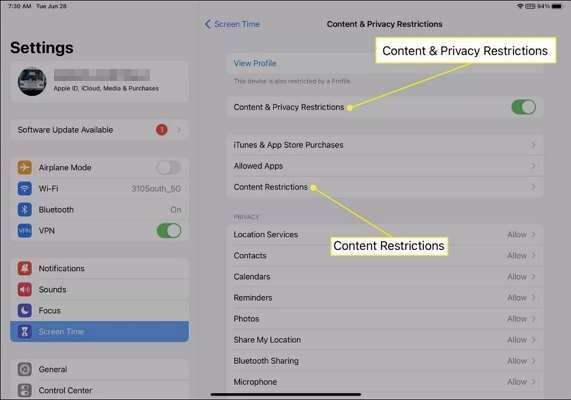
Step 2. Scroll down and tap Content & Privacy Restrictions.
Step 3. Enter your Screen Time passcode and toggle off Content & Privacy Restrictions.
Way 2. Use Apple ID Password
This method is actually available for iPad running iPadOS 13.4 or later. On these versions, Apple introduced a way to reset Screen Time using your Apple ID. With the new Screen Time passcode, you can turn off Restrictions with ease.
Step 1. Head to the same Screen Time page. Then, go to Change Screen Time Passcode > Turn Off Screen Time Passcode.
Step 2. Instead of the current passcode, tap Forgot Passcode? link in the pop-up.
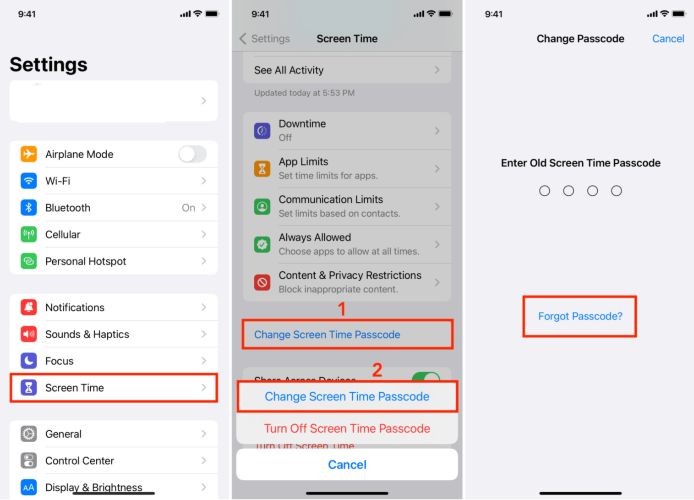
Step 3. Type in both Apple ID and password that was signed in on the iPad when Screen Time was first set up. After verifying, it will immediately request you set a new Screen Time passcode. Enter it and confirm to proceed.
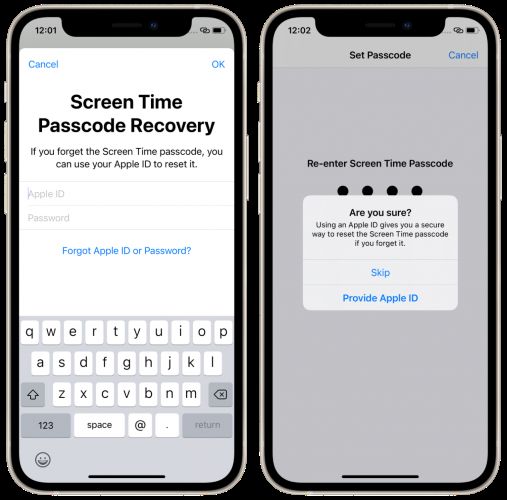
Step 4. With that new code, repeat the same steps (mentioned in Way 1 above) to finally turn off Content & Privacy Restrictions.
How to Take Off Restrictions on iPad [Models Running iOS 11 and Earlier]
The original iPad mini, iPad mini 2 or 3, or even the first or second-generation iPad Air most likely will be running on iOS 8 to iOS 11. Apple no longer pushes updates to these models and back then, the Restrictions weren’t called Screen Time yet. They were simply labeled as Restrictions.
Now here’s the thing: on these versions, there’s no Apple ID fallback. The only way to disable Restrictions without losing data is by entering the exact Restrictions passcode you had set up earlier. If you’ve forgotten it, your best bets are using Passixer’s Screen Time Remover or resetting the device entirely.
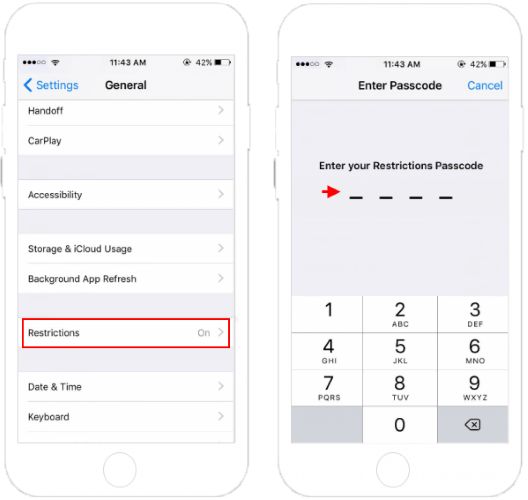
So, if you still remember the Restrictions passcode, follow these steps:
Step 1. Go to the General menu in iPadOS Settings. Scroll down and tap Restrictions.
Step 2. You’ll be asked for the passcode. Enter it to open the Restrictions menu.
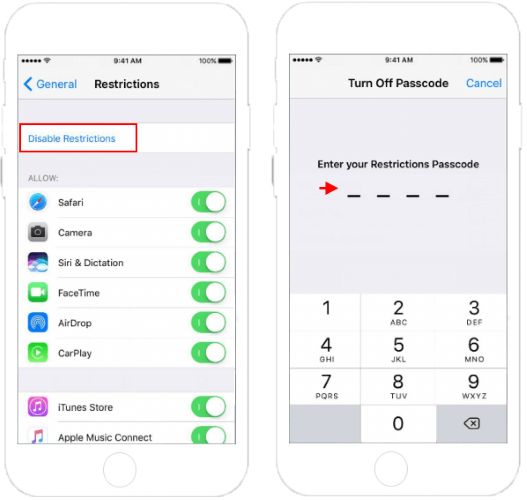
Step 3. At the top, tap on Disable Restrictions.
Step 4. Once again, enter the same passcode to confirm.
That’s it, Restrictions will be turned off instantly. Every content lock, app block, and setting limit you had in place will be removed in one go.
Final Words
And that’s how to turn off Restrictions on iPad, no matter the model or the iPadOS version. If you remember the passcode, it’s a quick fix. Even without it, we’ve shown you several ways to remove Restrictions safely.
Among them, Passixer stands out. It helps you turn off Restrictions or recover the forgotten passcode without wiping the iPad’s data.