
Imagine this: you’ve entered your iPhone passcode one too many times, and suddenly your device shows the dreaded “connect to iTunes” screen. Panic sets in—will you lose all your data?
Don’t worry. While Apple’s official solutions usually require wiping the device, there are practical ways to regain access to a disabled iPhone with minimal data loss. In this guide, we’ll reveal 6 proven techniques to safely troubleshoot a disabled iPhone, so you can unlock your device without unnecessary stress.
Part 1. Brief About Disabled iPhone
Before looking at the solutions to bypass your disabled iPhone without losing any data, here is a brief about the security challenge to expand your knowledge.
1. Why is My iPhone Disabled?
Entering the wrong passcode is the main reason your iPhone becomes disabled. The passcode is the unique code used to unlock your device, and repeated incorrect attempts trigger temporary or permanent locks. Here’s how it works:
- 5 incorrect attempts: iPhone disabled for 1 minute
- 7 incorrect attempts: iPhone disabled for 5 minutes
- 8 incorrect attempts: iPhone disabled for 15 minutes
- 9 incorrect attempts: iPhone disabled for 60 minutes
- 10 incorrect attempts: iPhone becomes permanently disabled and must be restored via iTunes or Finder
2. Can I Bypass a Disabled iPhone without Losing Data?
In most cases, no. When an iPhone is disabled, Apple’s official solutions such as iTunes or Finder will erase all content and settings. Your previous backup is usually the only way to restore your data afterward.
Some older iOS versions had workarounds using Siri or previous passcodes, but these methods are no longer reliable or supported on modern iPhones. To prevent data loss, always make regular backups via iCloud or your computer.
A Reddit user shared their concern about unlocking an iPhone 7 running iOS 12 without erasing data. They mentioned that they have a backup from 2017, but there’s a significant gap in the data. They were curious if older iPhones could be accessed or if there might be any vulnerabilities due to the age of the device. This highlights the challenges users face when trying to unlock older iPhones while preserving existing data.
Part 2. How to Bypass Disabled iPhone without Losing Data [No Computer Required]
Use the following method to bypass your disabled iPhone without losing your data.
Method 1: Use Previous Passcode (iOS 17 or Later)
Estimated Total Time: ≈ 2–3 minutes
iOS 17 and later offer a built-in solution to unlock a disabled iPhone without a computer, preserving your data. This method is ideal if you recently changed your passcode but forgot it and are facing the disabled screen.
Important: Your previous passcode must have been set within the last 72 hours. If not, this method will not work and you’ll need to try alternative solutions.
Follow these steps to apply this feature:
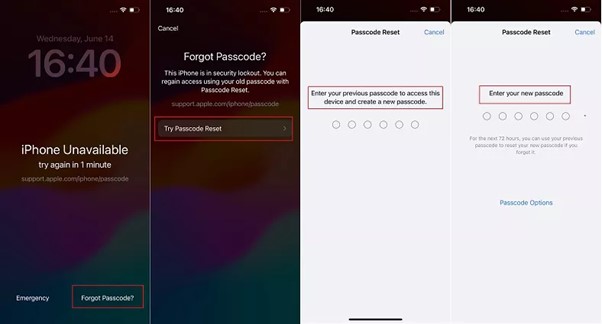
Step 1: Tap the Forgotten Passcode? button at the bottom right corner of your screen. (≈ 10–15 seconds)
Step 2: Enter your previous passcode (changed within the last 72 hours) when prompted, then set a new passcode to unlock your iPhone. (≈ 1–2 minutes)
Make sure your device is connected to Wi-Fi or cellular network, as iOS may need to verify your Apple ID before unlocking.
Method 2: Use Siri to Bypass Disabled iPhone (iOS 8.0 – 10.1)
This method leverages a Siri-based workaround available on older iPhones running iOS 8.0 to 10.1. It allows you to bypass a disabled iPhone without a computer. Note that this solution is mostly for legacy devices, as it no longer works on iOS 11 or later.
Estimated Total Time: ≈ 3–5 minutes
Important: Siri must be enabled on your iPhone, and this method may take several minutes to complete. It is not guaranteed to work on all devices.
Follow these steps to unlock your iPhone via Siri:
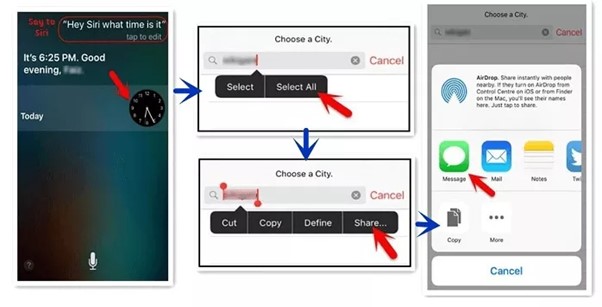
Step 1: Press and hold the Home button until Siri appears. Ask Siri, “What time is it?” and wait for the clock to appear. (≈ 10–15 seconds)
Step 2: Tap the clock to open World Clock. Tap the + icon at the top right to add a new clock. (≈ 20–30 seconds)
Step 3: Enter any word or text in the empty field and highlight it. Tap Share and select the Message app. (≈ 30–40 seconds)
Step 4: In the To field, type any text and hit Return. When the text turns green, tap the + to create a new contact, which opens the New Contact screen. (≈ 30–40 seconds)
Step 5: Tap Add Photo → Choose Photo and select an album. After a short wait, press the Home button. Your iPhone should now be unlocked. (≈ 1–2 minutes)
Ensure your device has sufficient battery and a stable environment, as this process involves multiple steps and screen interactions.
Part 3. How to Unlock Disabled iPhone without Losing Data [Backup Needed]
Here are alternative options you can try out when the aforementioned don’t work for your iPhone. Please ensure you have a backup before employing any of these to avoid complete data loss.
Method 1: Use Passixer iPhone Unlocker
Passixer iPhone Unlocker is powerful iOS unlocking software suitable for reclaiming complete control of your iPhone when you are stuck on the disabled screen. With this software, you can conveniently unlock any iPhone or iPad model without passcode from the comfort of your home, all thanks to the simplified interface. No iTunes or iCloud is required when using this versatile software. Passixer’ functionality extends beyond bypassing a disabled screen. You can also use it to unlock iTunes backup, Apple ID, bypass MDM, and many security challenges worth fixing on your device.
Stepwise Guide to Unlock Disabled iPhone without Data Loss Using Passixer iPhone Unlocker
Start by downloading Passixer iPhone Unlocker from the official website on a computer. Install it and run it to help you unlock your iPhone. Select Wipe Passcode when the quick start screen pops up. Connect your disabled iPhone to the computer using a reliable USB cable and click Start.

Passixer will detect your device, scrutinize the system, and display some details about it on your screen. Compare the details with what you have and click Start to proceed further. Next, Passixer will download a firmware package for iPhone disabled bypass.

After completing the download, tap on Unlock, and type 0000 in the empty field provided. Once done, proceed to click Unlock to commence unlocking immediately.

Estimated Total Time: ≈ 10–15 minutes (including firmware download and unlock process)
Use a stable USB connection and ensure your iPhone has at least 50% battery before starting the unlock process for best results.
Method 2: Use iCloud to Erase and Unlock a Disabled iPhone
This method leverages iCloud’s Find My iPhone feature to remotely erase and unlock a disabled iPhone. It is suitable if Find My iPhone was previously enabled and you know the Apple ID credentials associated with the device. Note that this method will erase all data on your iPhone.
Estimated Total Time: ≈ 8–10 minutes
Follow these steps to unlock your device via iCloud:
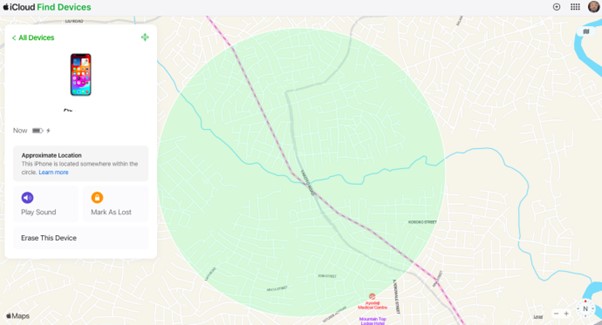
Step 1: Open iCloud official website and sign in with your Apple ID and password. (≈ 1 minute)
Step 2: If prompted, enter the 2FA code sent to your trusted Apple devices. Click on Find My iPhone once your profile loads. (≈ 1–2 minutes)
Step 3: Select the All Devices drop-down and choose your disabled iPhone. (≈ 30 seconds)
Step 4: Once iCloud locates your device, click Erase iPhone on the left-hand side. Confirm your Apple ID and wait for the process to complete. (≈ 5–7 minutes)
Ensure your internet connection is stable and that the Apple ID credentials are correct before starting to avoid interruptions or failed erase attempts.
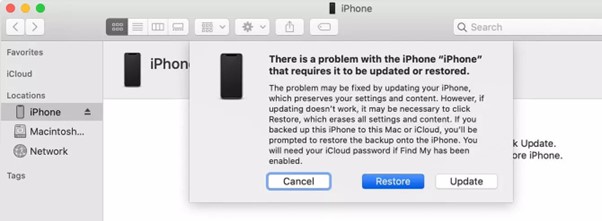
Method 3: Use iTunes to Restore and Unlock a Disabled iPhone
This method uses iTunes to restore a disabled iPhone. It is suitable for users who have access to a computer running Windows or macOS Mojave (or earlier) and want to regain access to their device. Note: This process will erase all data on the iPhone, so having a backup is highly recommended.
Estimated Total Time: ≈ 10–15 minutes (excluding backup restoration)
Follow these steps to unlock your iPhone via iTunes:
Step 1: Install the latest version of iTunes on your Windows PC or macOS Mojave (or earlier) and launch it. (≈ 2–3 minutes)
Step 2: Activate recovery mode on your iPhone:
- iPhone 8 and Later: Press Volume Up → release, press Volume Down → release, then hold the Side button until the recovery mode screen appears. (≈ 30–60 seconds)
- iPhone 7/7 Plus: Hold Volume Down + Side button simultaneously until recovery mode screen appears. (≈ 30–60 seconds)
- iPhone 6 and Older: Hold Home + Side buttons together until recovery mode screen appears. (≈ 30–60 seconds)
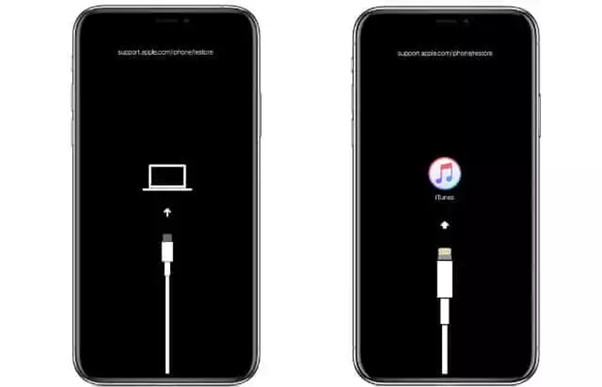
Step 3: Connect your iPhone to the computer via USB. iTunes will detect the device and show a Restore and Update prompt. Click Restore and wait for the process to finish. (≈ 5–10 minutes)
After restoration, your iPhone will be wiped like a new device. You can restore your previous backup (iCloud or iTunes) during setup if you have one.
To restore data after unlocking, choose Restore from iCloud Backup or Restore from iTunes Backup on the Apps & Data screen during iPhone setup.
FAQs
- Previous Passcode: 2–3 minutes
- Siri method: 3–5 minutes
- iCloud: 8–10 minutes
- iTunes: 10–15 minutes
- Passixer Unlocker: 10–15 minutes (including firmware download)
Conclusion
Ultimately, fixing a disabled iPhone is nothing when you have the right tutorial guide at your disposal. The 6 effective solutions recommended by iOS experts have been introduced in the guide, just select the one that suits you and your iPhone model to reclaim control of your device. However, our best solution remains Passixer. The software handles your disabled iPhone with high accuracy and caution. It’s the simplest solution to employ with no complications.