
An iPhone stuck in Recovery Mode doesn’t give you too many options. You see the PC logo with a cable on the iPhone’s screen and a progress bar inside iTunes that refuses to move. Minutes pass. Then an hour. And the screen stays the same. This usually happens during an update or restore through iTunes. Don’t worry, it’s rarely serious. In most cases, a few small actions are enough to get your iPhone out of Recovery Mode. We’ll walk you through each of them, from the simplest fixes to using Passvers iOS System Recovery.

Why Is iPhone Stuck in Recovery Mode [Case-Based Analysis]
Let’s first understand why an iPhone gets stuck in Recovery Mode. Sometimes it’s a software interruption. Other times it’s a hardware slip after a repair. And your next steps depend on which one you’re dealing with. So, let’s look at both cases closely.
Case 1. iPhone Stuck in Recovery Mode During iTunes Update
While updating with iTunes, the iPhone restarts but it never finishes. Instead, it keeps looping back to Recovery mode. This points out that the system firmware update didn’t complete because of incomplete communication between iTunes and your iPhone.
Possible Reasons:
- A version mismatch between iTunes and the iPhone’s current iOS build.
- A damaged or unstable USB cable interrupting data or power transfer.
- Third-party antivirus or firewall software cutting the connection while iTunes is restoring.
Recommended Fixes:
This issue isn’t permanent. You’ll be able to bring the phone out of Recovery Mode using simple steps, like force restarting. Or, you can repair the firmware with advanced solutions like Passvers iOS System Repair.
Case 2. iPhone Not Getting Out of Recovery Mode After Repair
You’ve replaced something on your iPhone, maybe the battery, display, or connector. After the replacement, your iPhone powered on and it won’t go past Recovery Mode when connecting to your computer.
Possible Reasons:
- Internal flex cables were left loose during reassembly.
- Error codes like 9, 4013, or 4014 in iTunes points to incomplete repair or bad reconnection.
- Displaced boot sensors, which is common after a screen or Home button replacement.
- Minor logic-board damage or micro-fractures in solder joints.
Recommended Fixes:
Start with the simplest:
- Swap the USB cable.
- Try a different Mac or PC.
- Update to the latest version of iTunes or Finder.
- Attempt a deeper software-level fix by using tools like Passvers iOS System Recovery.
- Take it back to the repair technician for a troubleshooting.
How to Fix iPhone Stuck in Recovery Mode
Now that you know what might cause it, let’s move to the solutions. Whether you have a working computer or none at all, there are ways to bring the iPhone back from Recovery Mode.
Exit iPhone Recovery Mode with Computer
You can either use your own computer or borrow one from a friend and just make sure it has the latest Apple utilities installed. Once that’s set, here are a few reliable ways to escape Recovery Mode on the iPhone.
Way 1. Update or Restore iPhone with iTunes
Outdated iTunes versions can start the Update process but fail to fully communicate with your iPhone’s latest firmware. That’s why iTunes leaves your iPhone stuck in Recovery Mode.
Errors like 4013, 4005, or 4014 often appear for the same reason. However, before blaming iTunes, check your cable because a weak or uncertified one can interrupt the process just as easily.
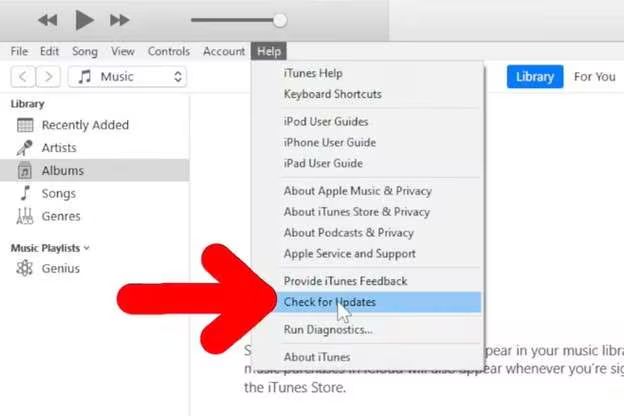
Step 1. Update iTunes
On Windows: Use the route you originally installed iTunes from.
- If you’ve downloaded from the Microsoft Store. Then, open Microsoft Store > Library > Get Updates.
- Apple site install: Open iTunes > Help > Check for Updates.
Windows 7/8 users: download iTunes 12.10.11 from Apple’s site.

On macOS: Match your system with the correct iTunes build. Use Finder on macOS Catalina and later.
| macOS/OS X Version | iTunes version (compatible) |
|---|---|
| Mojave (10.14.6) | Bundled — no separate installer |
| High Sierra (10.13.6) | 12.8.3 |
| Sierra (10.12.6) | 12.8.2 |
| El Capitan / Yosemite | 12.8.1 |
| Mavericks | 12.6.2 |
| Mountain Lion | 12.4.3 |
| Lion | no compatible iTunes — upgrade the system to OS X Mountain Lion first. |
Step 2. Re-launch and connect
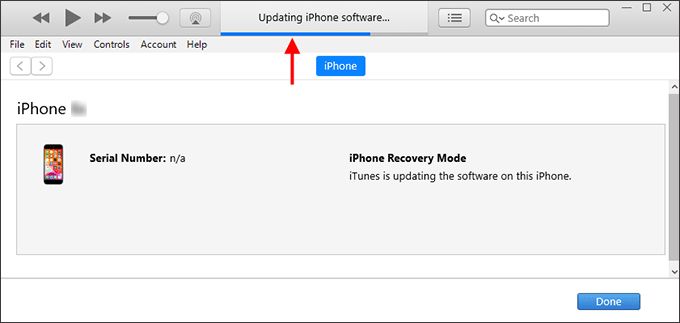
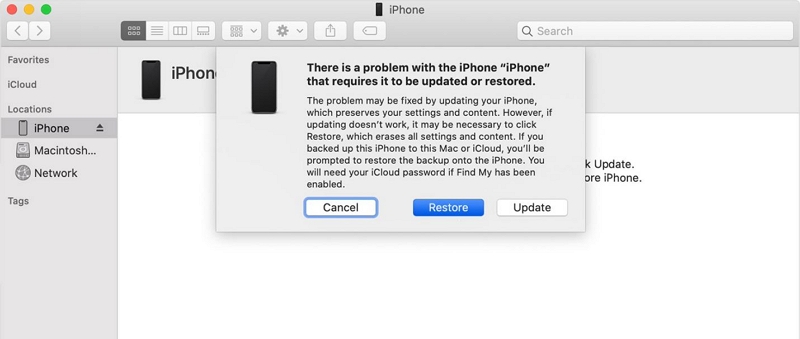
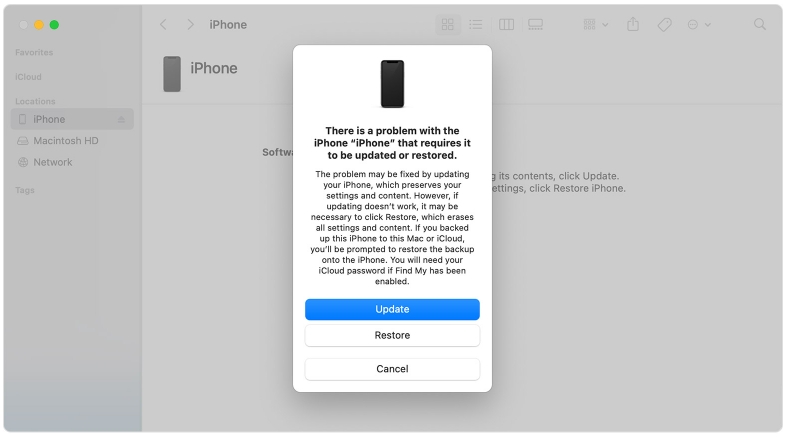
Open iTunes. Plug the iPhone in with a certified cable. A message will appear:
“There is a problem with your iPhone.” You get two choices: Update or Restore.
- Choose Update first. This reinstalls iOS while keeping your data remained.
- If Update fails, choose Restore to erase the device and install a clean iOS image.
Way 2. Use Apple Devices or Finder for iPhone Update/Restore
You don’t always need iTunes to restore your iPhone. Finder (on macOS Catalina or later) or the Apple Devices app (on Windows) can do the same job and they handle it better in many cases. These apps use the same repair protocol but talk to newer iPhones more clearly. So, the restore process can be completed.
Here’s what to do:
Step 1. Connect the iPhone to a Mac running macOS Catalina or later. Or, you can connect it to Windows 10 or newer PC after installing the Apple Devices app.
Step 2. You’ll see a pop-up with two options — Update or Restore.
- Start with Update.
- If that fails, choose Restore to rewrite the system completely.
Once the process finishes, the Apple logo will appear. That means your iPhone has started normally again.
Way 3. Repair iOS with Tools
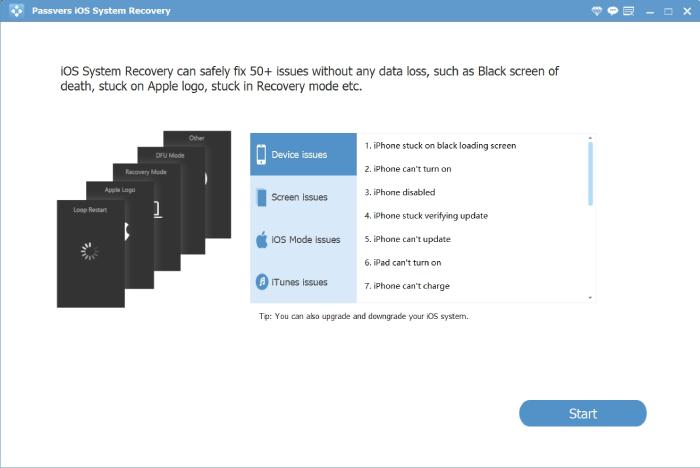
Passvers iOS System Recovery is designed to communicate with the iPhone even when iTunes/Finder or other Apple tools cannot. And it is made for moments like this: when your iPhone gets stuck in Recovery Mode and refuses to start. The troubleshooting process is simple: Passvers scans the device, identifies the fault, and repairs the iOS system automatically.
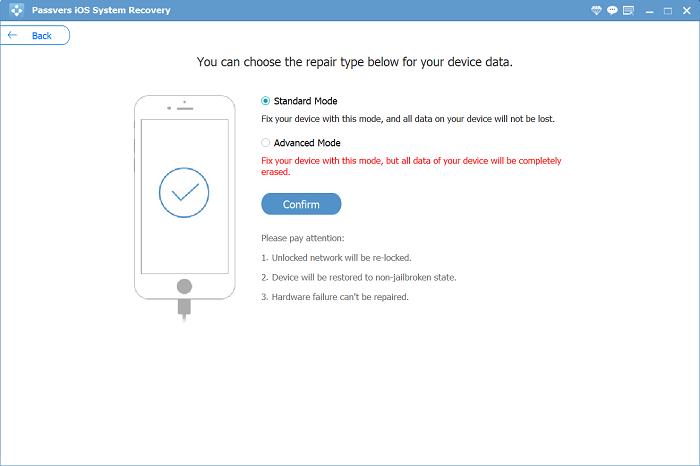
It begins with Quick Fix and Standard Mode, which fixes the iPhone stuck in Recovery Mode without deleting data. Many users have used this mode to restore their device and continue using it normally. If the issue runs deeper, you can switch to Advanced Mode. This option rebuilds the iOS from the firmware level, clearing out corrupted code and restoring the iPhone like new.
Repair iPhone Stuck in Recovery Mode Using Passvers
Start Passvers iOS System Recovery on your computer and connect your iPhone to the same PC/Mac. Then, select Start.
Passvers will check what’s causing the iPhone to remain stuck in Recovery Mode. If you see a Free Quick Fix option in the middle of the software interface, you can try to use it to get your iPhone out of Recovery Mode.
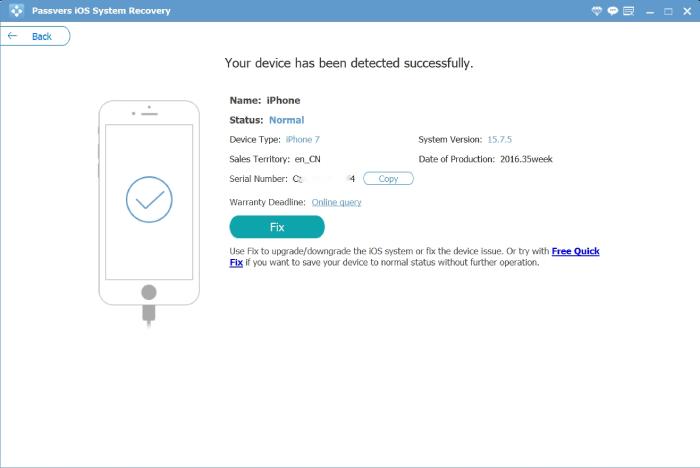
1. If you don’t, you’ll see two choices — Standard Mode and Advanced Mode.
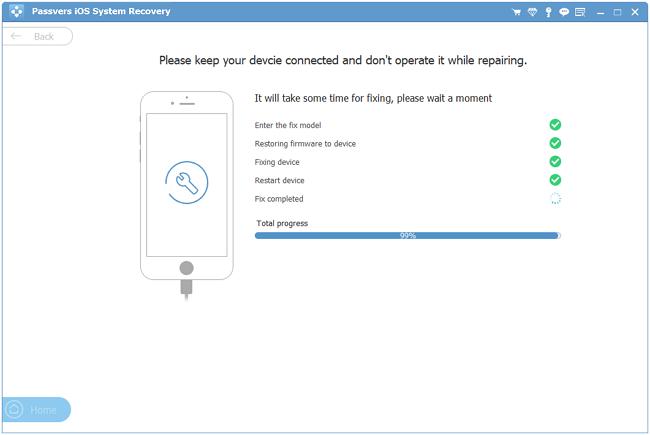
2. After detecting your iPhone in Recovery Mode, Passvers locates the exact firmware needed for your iPhone model. Confirm the version, then press Download.
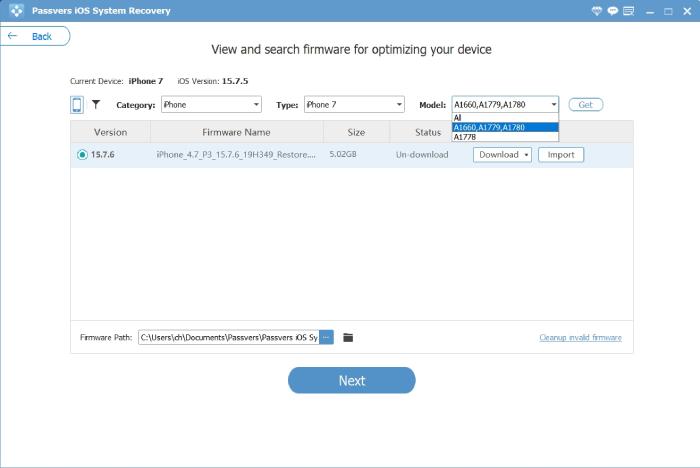
3. When the file is ready, hit Next. The repair process begins. Passvers rebuilds the firmware and restores the iOS core. Once the bar reaches 100%, your iPhone will power back on normally.
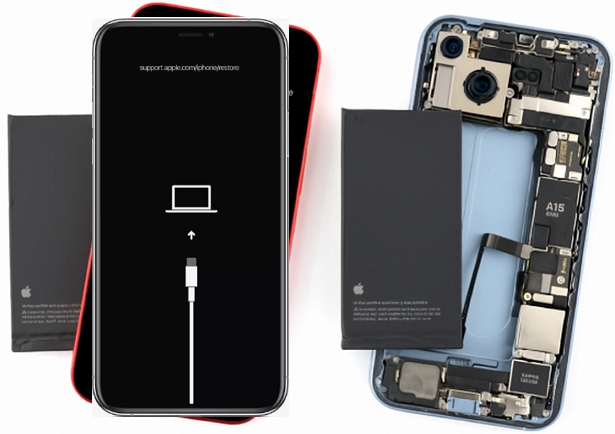
Way 4. Update iOS in DFU Mode
DFU (short for Device Firmware Update) Mode goes deeper than Recovery Mode. For one, it skips iBoot altogether and addresses the faults that Recovery Mode cannot. Put simply, this method allows you to rewrite the firmware at the very core. However, it’s not a casual step, as it will wipe everything clean. Still, when Recovery Mode loops endlessly, this is the fix that usually breaks the chain.
Follow these steps carefully:
Step 1. Update iTunes first, as shown above or use a computer with Apple Devices or Finder. Keep the app open and use a certified cable to connect the iPhone again to the computer.
Step 2. Enter DFU Mode. The process changes slightly for every iPhone model. Follow the one that fits yours.
iPhone 8 or later:
- Press and release Volume Up quickly.
- Press and release Volume Down quickly.
- Hold the Side button until the Recovery screen fades.
- Now press Side + Volume Down together for 5 seconds.
- Let go of the Side button, but keep Volume Down pressed for another 10 to 12 seconds.
If the display stays black and iTunes will pop up a message, that’s DFU. If the Recovery icon returns, you missed the timing and need to try again.

iPhone 7/7 Plus:
- Hold Power and Volume Down at the same time. Count 10 seconds.
- Release Power, keep holding Volume Down until your computer detects it.
Black screen on the iPhone means success.

iPhone 6s and earlier:
- Press and hold Power for 3 seconds.
- Now press Home too. Keep both (Power + Home) for about 10 seconds.
- Let go of Power, keep Home pressed for 10–15 seconds more.
The Recovery screen will vanish. The iPhone’s screen will stay dark.
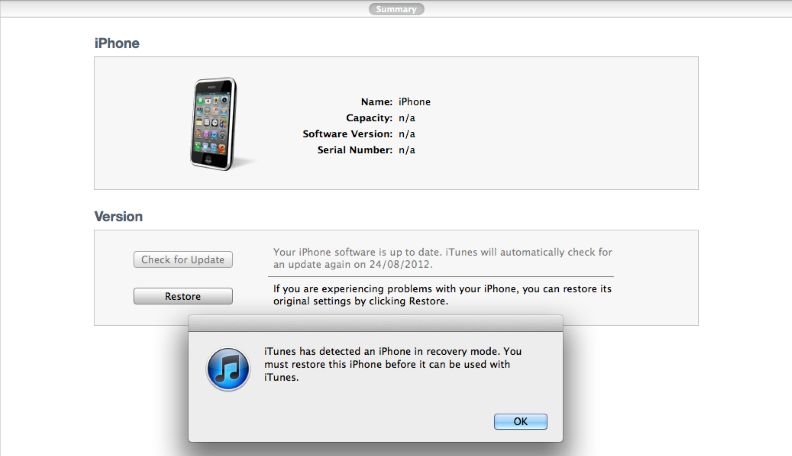
Step 3. Once DFU kicks in, iTunes (or Finder) will show this:
“iTunes has detected an iPhone in recovery mode. You must restore this iPhone before it can be used.”
Click OK. Then, hit the Restore iPhone… button.
Even in DFU mode, iTunes will say your iPhone is in “recovery mode”.
You’ll see the progress bar on your computer. Let the process finish. Once completed, the Apple logo will appear again. You’re officially out of Recovery Mode.
Turn Off iPhone Recovery Mode Without Computer
Start by unplugging your iPhone from the computer and then use these methods to load the device system normally again. These methods will work on all iPhone models.
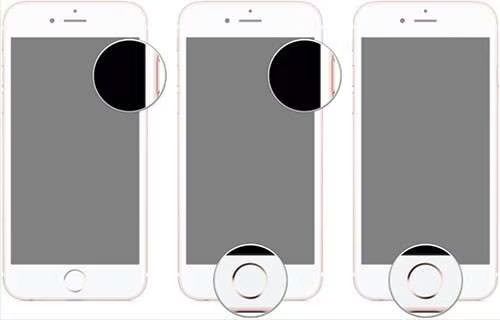
Way 1. Force Restart Your iPhone
A force restart cuts power at the hardware level and reloads iOS from a clean slate. So, it will clear the half-written iTunes process and let the system boot fresh. Here’s what to do:
On iPhone 8 or newer: press Volume Up once, then Volume Down, and hold the Side button.
![]()
On iPhone 7 or 7 Plus: hold Volume Down and Power together.
![]()
On iPhone 6s or older: press and hold the Home and Power buttons at the same time.
![]()
Keep the corresponding buttons pressed as the Recovery Mode screen fades to black. After a brief pause, the Apple logo will appear. Release the buttons and your iPhone will now start normally.
Way 2. Drain Your iPhone Battery and Recharge It
Another reason your iPhone gets stuck in Recovery Mode is unstable power. Computers don’t send steady voltage through the cable. And when that happens, the iPhone stops responding and gets stuck in Recovery Mode.
The simplest fix is to let the battery drain out completely, which will force a shutdown and cut its power. When the Recovery screen disappears, it’s fully off. Then connect it to a wall charger and let it charge. With stable power, it should boot normally.
Way 3. Take Your iPhone to the Apple Store for Repair
Even after trying the above two methods, if the iPhone still doesn’t leave Recovery Mode, take it to Apple. Apple technicians will use internal restore tools to reload iOS directly from Apple’s servers.
Here’s what they do:
- They run diagnostics to check the current hardware and firmware.
- Then they attempt an Apple restore.
- If a hardware fault is found, they’ll recommend the necessary repair.
The good thing is that these diagnostics are precise and completely safe for your device.
![]()
FAQs
Recovery Mode usually exits within fifteen minutes once the update or restore process starts.
When the iPhone remains stuck in Recovery Mode for more than an hour, it’s a clear sign that something went wrong. So, follow the fixes mentioned above to repair the iPhone.
First, you can exit Recovery Mode using the methods above. That usually brings the iPhone back to normal. Or you can use iTunes or Passixer iPhone Unlocker to remove screen lock from your iPhone. Recovery Mode will be exited during the removal.
The short answer is NO. You can only update or restore iPhone in Recovery Mode.
However, you can exit Recovery Mode using methods that keep the data safe, i.e., use Passvers’s Quick Fix or Standard Mode.
Final Words
Getting stuck in Recovery Mode isn’t unusual. Most of the time, it goes away with a few simple fixes, such as a force restart or using a proper cable. If the issue follows a repair, though, it hints at a hardware fault that needs attention.
However, when it appears during regular update or restore, Passvers iOS System Recovery can help. Passvers can detect your iPhone even when iTunes can’t. That’s why it brings devices out of Recovery Mode faster and more reliably than any manual method.