
“I entered the wrong passcode on my iPhone and now it’s disabled. I tried connecting to iTunes, but nothing works. What should I do?”
If you’re facing a similar situation, you know how stressful it can be—especially when you have urgent tasks on your phone. This post will walk you through why your iPhone is disabled and won’t connect to iTunes, and show you reliable ways to solve the issue and unlock your iPhone passcode.
Reasons Why “iPhone is Disabled and Won’t Connect to iTunes”
When your iPhone is disabled, it may also fail to connect to iTunes for several reasons. The most common causes include:
- Unstable USB Connection: If the USB cable is damaged, uncertified (non-MFi), or the port on your computer/iPhone is dusty or loose, iTunes may not recognize your device at all.
- Outdated iTunes Version: An older version of iTunes often lacks the compatibility needed to detect newer iOS devices, especially after iOS updates.
- Disabled Mode Restriction: Once an iPhone is disabled due to too many incorrect passcode attempts, it limits external connections, making it harder for iTunes to establish communication.
- Driver or System Issues on Computer: Sometimes the issue is not with the iPhone but with the computer’s USB drivers or iTunes installation, preventing the device from showing up.
Understanding these possible reasons helps narrow down the issue and choose the right fix. In the next part, we’ll walk you through quick checks and proven solutions to restore the connection or unlock your disabled iPhone without iTunes.
Part 1. Quick Fix for Disabled iPhone Not Connecting to iTunes
If your iPhone is disabled and iTunes cannot detect it, the problem may be as simple as a faulty USB cable or port. Start with basic checks by using an original Apple-certified (MFi) cable and a different USB port or computer. If the connection still fails, the fastest way to restore iTunes communication is by putting your iPhone into Recovery Mode. This allows iTunes to recognize the device and perform a complete restore.
Restoring your iPhone via Recovery Mode will erase all existing data, settings, and the passcode. If you don’t have a recent backup, you won’t be able to recover your data afterward.
Steps to Put iPhone into Recovery Mode
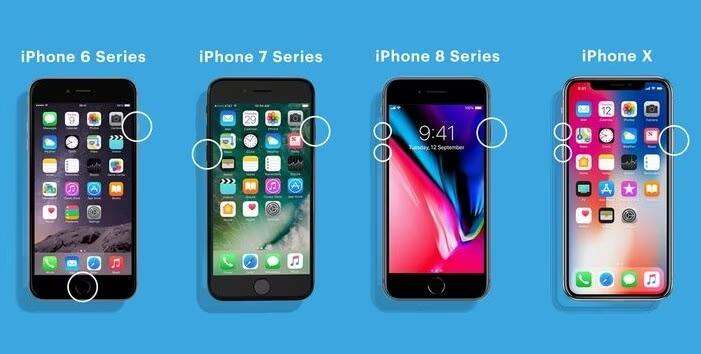
The button combination varies depending on your iPhone model. Follow the correct method below:
For iPhone 8, X, 11, 12, 13, 14, 15 and Later:
- Quickly press and release the Volume Up button.
- Quickly press and release the Volume Down button.
- Press and hold the Side button until you see the recovery mode screen.
For iPhone 7/7 Plus:
- Press and hold the Volume Down button and the Power button at the same time.
- Keep holding both buttons until the recovery mode screen appears.
For iPhone 6s, 6, and Earlier Models:
- Press and hold the Home button and the Power button together.
- Keep holding until the recovery mode screen is displayed.
Restore iPhone in iTunes
Step 2: While holding the last button from the instructions above, connect your iPhone to the computer with a USB cable. Once connected, iTunes (or Finder on macOS Catalina and later) will detect the device in Recovery Mode and display a prompt asking whether to Update or Restore.
Choose Restore to erase the device and remove the disabled screen.
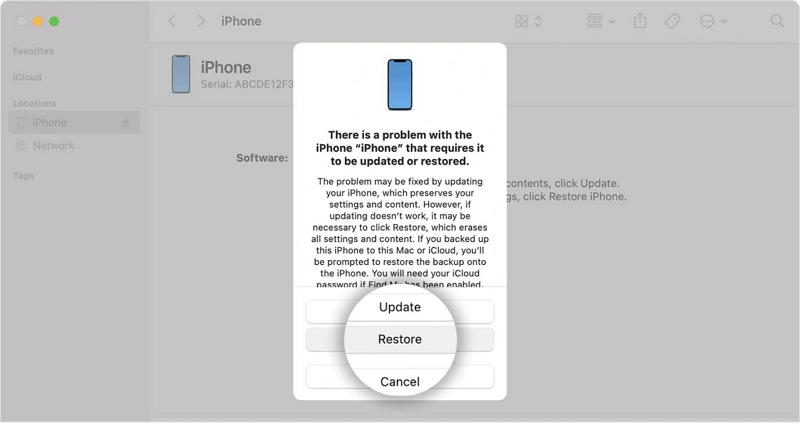
Step 3: Confirm your choice by clicking Restore again. iTunes will then download the latest iOS firmware (this may take 5–15 minutes depending on your internet speed) and reinstall it on your iPhone. Once the process completes, your iPhone will restart as a fresh device without the passcode.
⏱️ Estimated Time: 20–30 minutes .
📊 Success Rate: ~70% (works unless there’s a deeper hardware or system issue).
Part 2. 3 Effective Solutions to Unlock Disabled iPhone Without iTunes
If recovery mode fails to work, here are some alternative techniques to unlock your disabled iPhone that won’t connect to iTunes:
Way 1. Unlock Disabled iPhone without iTunes via Passixer
Passixer is one of the most efficient iOS unlockers that offers high-quality screen unlock services. With this simple software, you can deal with any security restriction issues you may run into on your iPhone or iPad, including disabled iPhone won’t connect to iTunes.
There’s no limitation to the type of screen lock you can use this software to bypass. Passixer is suitable for removing 4-digit or 6-digit code, Face ID and Touch ID security locks. You can use it for any model of iPhone, with the iPhone 15 series inclusive. This software is super easy to navigate around, so operating it isn’t a function of your tech literacy.
Steps to Unlock Disabled iPhone without iTunes via Passixer:
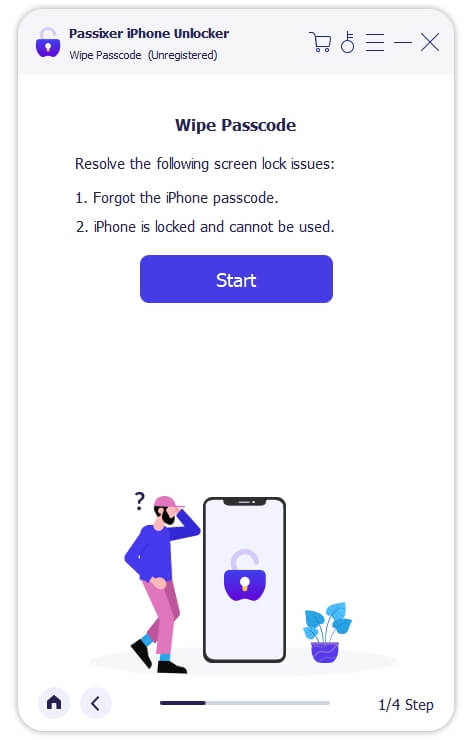
Run Passixer on a computer and click on Wipe Passcode when the quick start screen pops up.

Click the Start icon and connect your disabled iPhone to the computer via a USB cable.
Passixer will analyze your iPhone and display its information. Verify the details and click Start to download the recommended firmware package.

After the firmware download is complete, click Next. Enter 0000 in the empty space and click Unlock. Passixer will immediately unlock your iPhone without requiring passcode, Face ID, or Touch ID.

Once completed, your iPhone will be unlocked successfully.

⏱️ Estimated Time: 10–20 minutes (including firmware download).
📊 Success Rate: ~95% .
Way 2. Reset Disabled iPhone without iTunes via iCloud
Besides data storage, iCloud also provides a remote unlock option through the Find My iPhone feature. With this method, you can erase your disabled iPhone from any browser and restore it as a new device. Once erased, the passcode is removed and the phone becomes usable again.
✅ When to Use: This solution works best if your iPhone is linked to your Apple ID and Find My iPhone was enabled before the device got disabled.
This method requires the correct Apple ID and password. All data on the iPhone will be permanently erased. Without a backup, data cannot be recovered.
Estimated Time: 10–20 minutes (depending on internet speed)
Success Rate: ~80% (works if Find My iPhone and Apple ID credentials are available)
Steps to Reset Disabled iPhone via iCloud
Step 1: On another computer or mobile device, visit iCloud.com. Sign in with the Apple ID linked to your disabled iPhone.

If prompted, complete the two-factor authentication (2FA) using a trusted device connected to your Apple ID.
Step 2: After signing in, select the Find My option from the iCloud dashboard.

Step 3: A list of all devices linked to your Apple ID will appear on the left-hand panel. Select the disabled iPhone from the list.
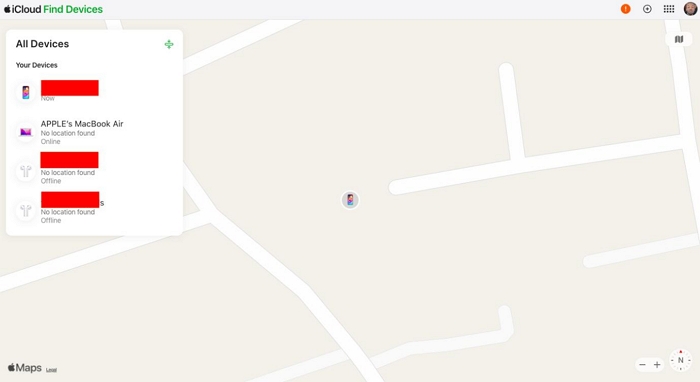
Step 4: On the device details page, click on Erase This Device. Enter your Apple ID password to confirm the action. The iPhone will be reset remotely and restored to factory settings.

Once the process finishes, your iPhone will restart as a brand-new device without any lock screen restrictions. You can then set it up again and restore your data from a previous iCloud or iTunes backup if available.
Way 3. Erase Disabled iPhone without iTunes via Find My App
The Find My app is another effective way to erase a disabled iPhone remotely. With this method, you can reset your device and remove the screen lock without plugging it into iTunes. The only requirement is that the disabled iPhone must have Find My iPhone enabled and be signed in with your Apple ID.
Here’s how to unlock your disabled iPhone using the Find My app on another Apple device (iPhone or iPad):
- Open the Find My app on another iPhone or iPad and sign in with the same Apple ID linked to the disabled device.
- Tap the Devices tab at the bottom of the screen to view all devices connected to your Apple ID.
- Select your disabled iPhone from the list.
- Scroll down and tap Erase This Device. Confirm the action to wipe your iPhone completely.

Once the erasing process finishes, your iPhone will reboot as a brand-new device. You can then set it up again and restore your data from iCloud or another backup.
The Find My App method only works if Find My iPhone was enabled beforehand and you still remember the Apple ID credentials. If Find My is turned off, or you cannot access the Apple ID, this method won’t work. In that case, you can use Passixer iPhone Unlocker as a more flexible alternative to bypass the disabled screen without iTunes.
Bonus: Prevent iPhone Disabled – Interactive Tips
Set a strong but memorable passcode, and store it safely in a password manager. Also enable Face ID/Touch ID to reduce reliance on passcodes.
Go to Settings > Face ID & Passcode (or Touch ID & Passcode) and set it up. This greatly reduces the chance of multiple failed passcode attempts.
Enable “Tap to Wake” and make sure Auto-Lock is set to 30 seconds or 1 minute. Also keep your iPhone out of children’s reach to avoid accidental inputs.
Turn on Erase iPhone after 10 failed attempts for maximum security (Settings > Face ID & Passcode). Just make sure you regularly back up your data.
To easily find this guide again, please share it on your social media!
FAQs
Even with all precautions, accidents happen. If your iPhone is disabled and won’t connect to iTunes, a trusted tool like Passixer iPhone Unlocker ensures a fast and secure solution.