
Change Carrier on iPhone to improve coverage, reduce bills, or get faster data. Your carrier controls calls, texts, and mobile data, so switching can give better plans, network performance, and roaming options. Unlike changing the carrier logo, switching your carrier actually updates your network provider and affects service.
By following the right steps, you can make the switch smoothly without losing service or data. This guide will walk you through everything you need to know in 2025.
Part 1: How to Check Your iPhone’s Carrier & Lock Status
Before you change carrier on iPhone, check your current carrier and lock status. This avoids SIM issues, roaming charges, or service interruptions.
How to Check Your Current Carrier on iPhone
You can easily see which carrier your iPhone is using:
Method 1: Status Bar
Look at the top-right corner (or top-left on older models). Your carrier, like “AT&T” or “Verizon,” appears next to the signal bars.
Method 2: Settings App
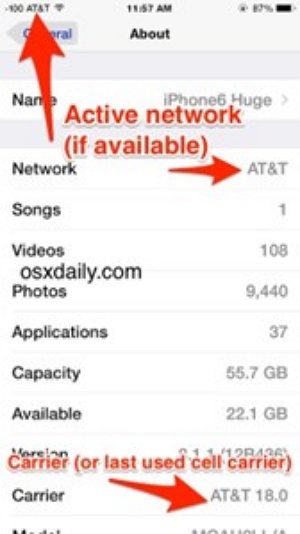
- Go to Settings > General > About.
- Scroll down to Network or Carrier – It will show the name of your wireless network service provider.
For eSIM users, go to Settings > Cellular > Tap your plan > Network Selection to see your carrier.
If you have dual SIMs or multiple eSIMs, each carrier will be listed separately.
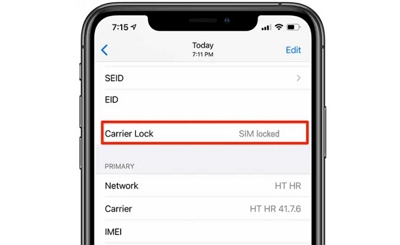
How to Check if Your iPhone is Carrier-Locked or Unlocked
Before switching carriers, you need to know if your iPhone is locked:
Step 1: Open Settings.
Step 2: Tap General > About
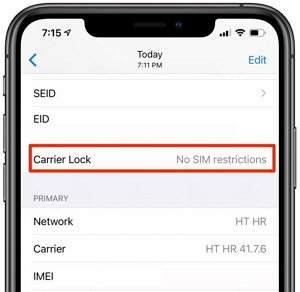
Step 3: Scroll down to Carrier Lock or Network Provider Lock
- If you view the message “No SIM restrictions,” your iPhone is unlocked.
- If it shows a specific carrier or says, “SIM locked,” it is carrier locked.
Check each line if using dual SIM/eSIM.
Why Carrier Lock Status Matters Before Switching
A locked iPhone can’t use SIMs from other providers, blocks calls/data, and rejects eSIM activation. Unlocked iPhones let you use local SIMs abroad and have higher resale value. Always check lock status first for a smooth switch.
Q. Does Changing Carriers Differ Between Locked and Unlocked iPhones?
Locked iPhones need carrier approval or unlocking. Unlocked devices can switch freely. Next, we’ll cover step-by-step instructions for both types.
Part 2: How to Change Carrier on iPhone (Unlocked Device)
Changing carriers on an unlocked iPhone is easier than on a locked device. You can switch your carrier in three ways. By default, iPhones automatically connect to available networks when traveling, but you can also turn off automatic selection to manually choose a carrier for better performance and control.
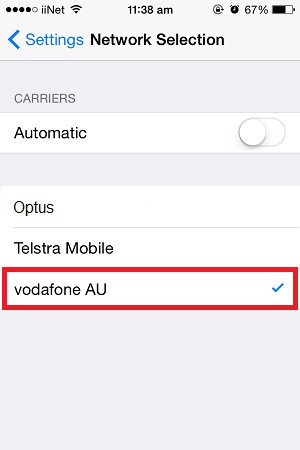
2.1 Manually Select Another Carrier
If your iPhone is unlocked, you can change carriers without swapping SIM cards by manually selecting a network.
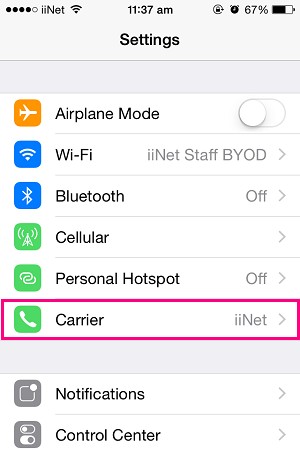
Step 1: Open Settings and tap Carrier.
Step 2: By default, Automatic is enabled—turn it off.
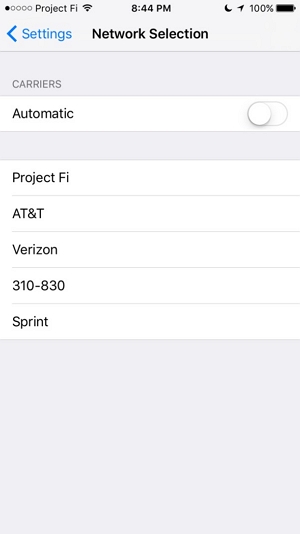
Step 3: Wait a few seconds for a list of available carriers to appear.
Step 4: Choose your preferred carrier from the list.
Why Switch Manually Instead of Using Automatic Selection?
– No manual setup needed
– Ideal for international travel – May connect to slower networks
– Less control over which carrier is used
– Avoid weak or expensive networks
– Useful for dual-SIM setups – No auto-switch if signal drops
– Must manually select carrier when moving to a new area
Manually selecting a carrier ensures you get the best network performance and control over your iPhone’s connectivity.
2.2 Switch to Another Carrier Using a Physical SIM
If you’re switching to a new carrier, replacing your SIM card is necessary. Follow these steps:
Step 1: Turn off your iPhone to avoid SIM reading errors.
Step 2: Use the SIM ejector tool (or a straightened paper clip) to remove the SIM tray, usually on the right side.
Step 3: Take out your old SIM and insert the new SIM, ensuring it’s properly aligned.

Step 4: Reinsert the SIM tray and power on your iPhone. It will automatically detect and start activating the new SIM.
Step 5: You will see the new carrier’s name in the status bar. Follow the instructions to activate the SIM.
Step 6: Go to Settings > Cellular. Please ensure the new SIM is listed and active. You can enable Data Roaming if needed.
Step 7: Try making a call or using mobile data to confirm the switch is successful.
2.3 Add or Switch to a New eSIM
For iPhones that support eSIM, you can activate a new carrier without a physical SIM card. Make sure your iPhone is unlocked and that you have the eSIM activation details ready.
Two ways to add an eSIM:
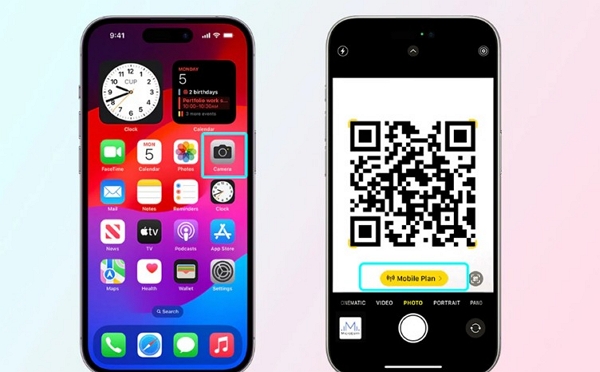
1. Scan a QR Code
Step 1: Go to Settings > Cellular > Add eSIM
Step 2: Choose “Use QR Code.”
Step 3: Scan the QR code.
Step 4: Follow the on-screen prompts to activate the eSIM.
Step 5: Confirm the activation.
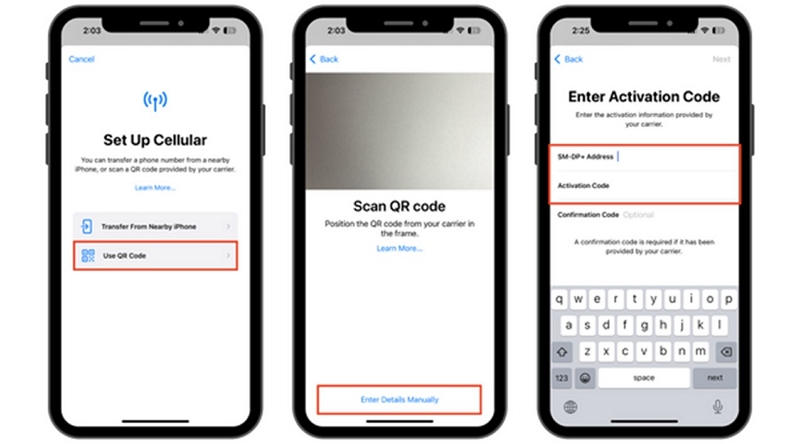
2. Manual Input: If you have activation details (SM-DP+ address, activation code, confirmation code), enter them manually under Add eSIM.
Step 1: Go to Settings > Cellular > Add eSIM
Step 2: Tap “Enter Details Manually.”
Step 3: Input – SM-DP+ Address, activation code, and confirmation code.
Step 4: Follow the prompts to activate.
Dual SIM / Multi-Carrier Setup:
Let’s discuss these two scenarios.
1. Switch between eSIMs:
Step 1: Go to Settings > Cellular.
Step 2: Tap the line you want to use.
Step 3: Toggle “Turn On This Line.”
Step 4: You can set a default line for calls and data. Go to Settings > Cellular > Default Voice Line.
2. Convert Physical SIM to eSIM
Step 1: Insert a physical SIM.
Step 2: Go to Settings > Cellular > Convert to eSIM.
Step 3: Follow the on-screen instructions.
Step 4: Once converted, remove the physical SIM.
Pro Tip for dual SIM users: You can keep one eSIM active while using a physical SIM or another eSIM. That is perfect for global roaming services.
Part 3: How to Change Carrier on Locked iPhones
If your iPhone is carrier-locked, you cannot switch to a new network until it is unlocked. Changing carriers on a locked iPhone is a two-step process: first, unlock the device, then switch the carrier.
Step 1: Check Your iPhone’s Lock Status
Go to Settings > General > About > Carrier Lock. If it says “SIM Locked”, your iPhone must be unlocked before changing carriers.
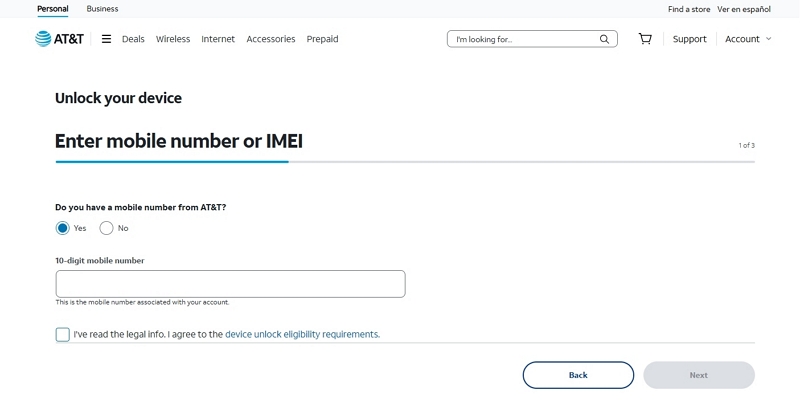
Step 2: Request an Official Carrier Unlock
To switch carriers on a locked iPhone, you first need to request an official carrier unlock. Most carriers allow unlocking once your contract is fully completed, the device is paid off, and it hasn’t been reported lost or stolen. Before submitting a request, make sure you have the following information ready:
- IMEI number: Find it in Settings > General > About.
- iPhone model: Specify the exact model for verification.
- Account details: Your registered phone number or carrier account information.
- Proof of payment or contract completion, if required by your carrier.
You can usually request an unlock through your carrier’s official website using an online form or by contacting customer support directly. After submitting your request, wait for the confirmation email or message. Unlocking typically takes a few hours up to a couple of days.
Once your iPhone is officially unlocked, you can safely switch carriers. Follow the procedures outlined in Part 2 to add a new physical SIM or eSIM and enjoy your new network without restrictions.
Official vs Third-Party Unlocking
1 Year License: $39.99–$59.99 (6 iOS devices / 1 PC)
Lifetime License: $69.99 (6 iOS devices / 1 PC)
How to Use Passixer to Unlock Your iPhone
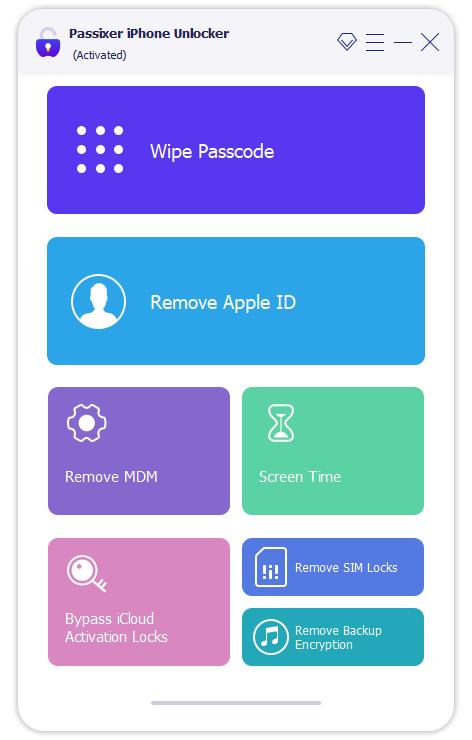
Passixer iPhone Unlocker is a powerful all-in-one solution for iOS devices. It helps you remove Screen Time passcodes, unlock iPhone screens, bypass iCloud activation locks, decrypt iTunes backups, and remove MDM restrictions. Most importantly, it can quickly and safely remove SIM locks, allowing users to switch carriers without waiting for the official process. Its simple, user-friendly interface makes it suitable for everyone, providing a fast, safe, and reliable way to regain full control of your iPhone in minutes.
Before we discuss the step-by-step procedure, here are some things to note.
- Passixer is compatible with a wide range of iPhones, from iPhone 5S to iPhone X and newer models.
- For certain network-locked devices, Passixer provides advanced unlocking solutions.
- A quick jailbreak may be required to complete the SIM unlock process.
- To maintain a SIM-free status, avoid unnecessary system resets or iOS upgrades until the unlock is confirmed.
Visit the official Passixer website to download and install the software on your PC. Open Passixer and select “Remove SIM Lock.”
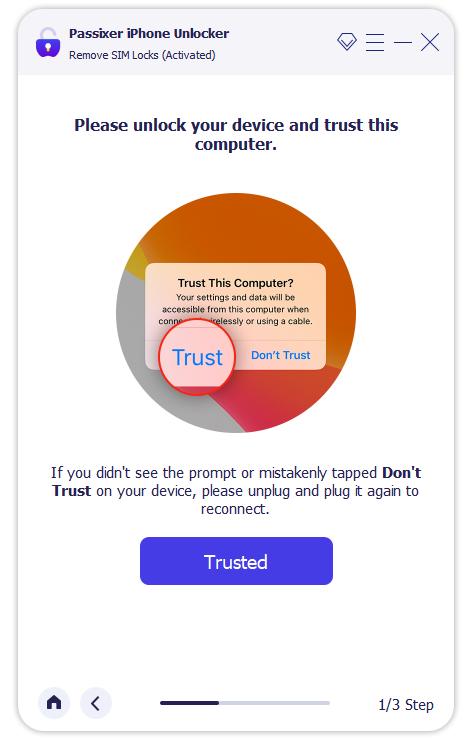
Use a compatible USB cable to connect your iPhone to the PC. On your iPhone, tap “Trust” to allow your PC to detect and configure your device.
Click “Start” and select “iOS Jailbreak.” Follow the on-screen instructions to jailbreak your iPhone, then click “Next” to continue.
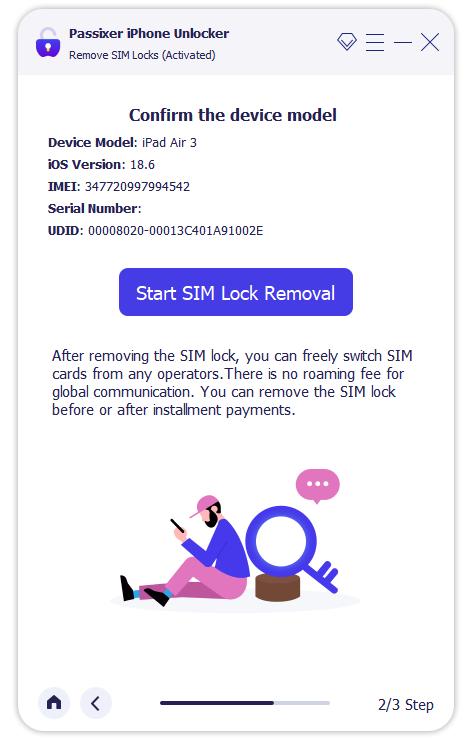
Passixer detects your iPhone and displays device details. Confirm the information and click “Start SIM Lock Removal.”
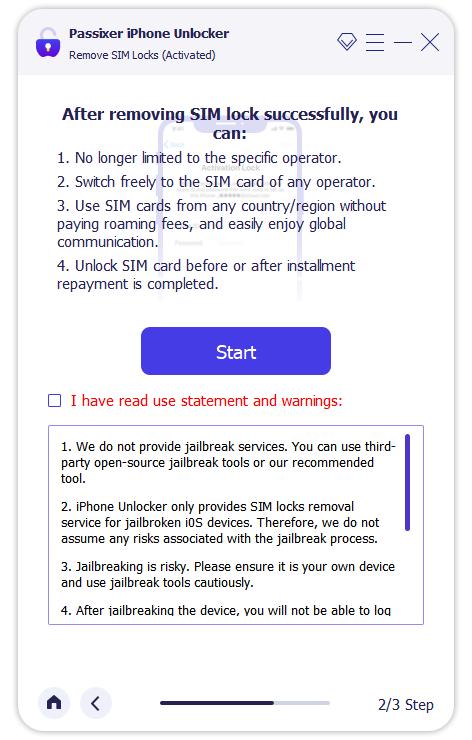
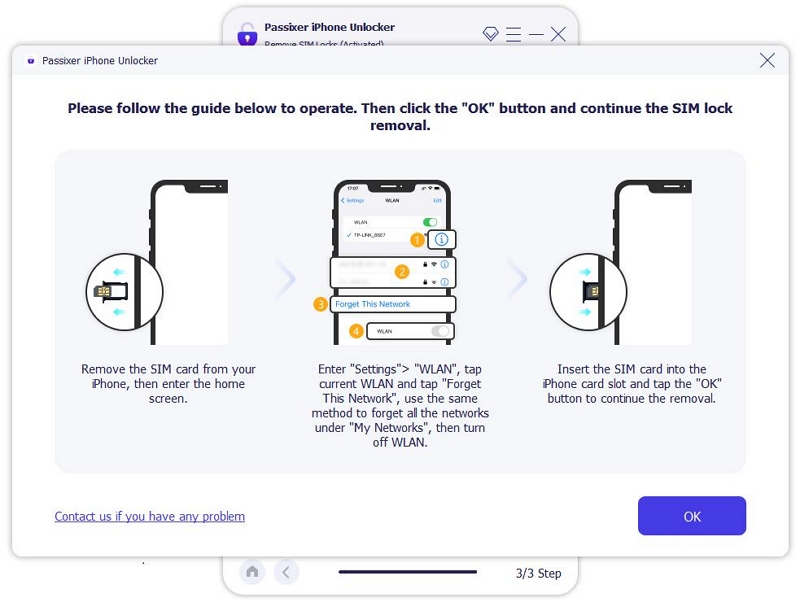
Remove all saved Wi-Fi networks and turn off Wi-Fi on your iPhone.
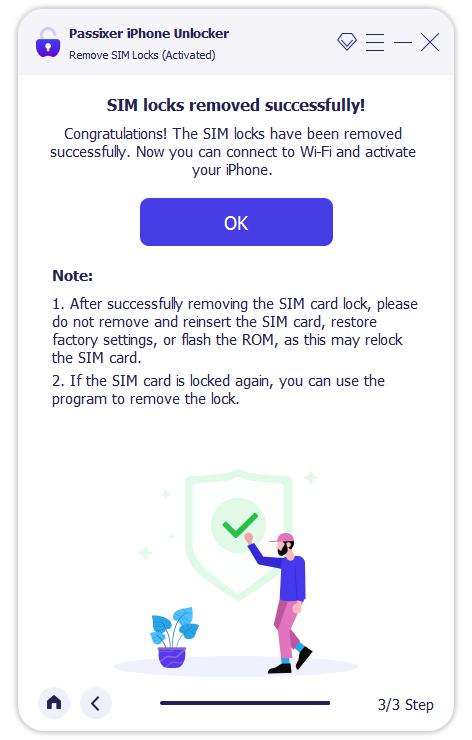
The SIM lock removal process starts automatically. Wait for it to complete. Once completed, you will see a message saying “SIM locks removed successfully.” Click “OK” to finish.
Part 4: How to Change Carrier Name/Logo on iPhone
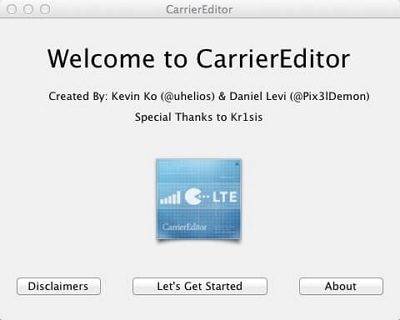
You can change your carrier’s name or logo using the Carrier Editor program after jailbreaking your iPhone.
Step 1: Download and open the Carrier Editor program. Click “Let’s get started.”
Step 2: On your iPhone, go to Settings > General > About > Carrier and note the carrier version number.
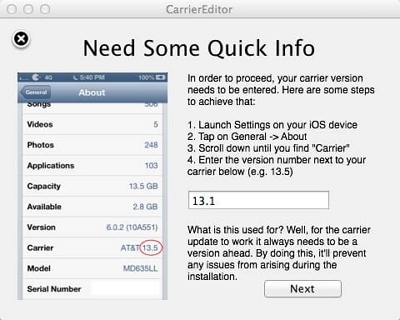
Step 3: Enter the carrier version in the program and click Next.
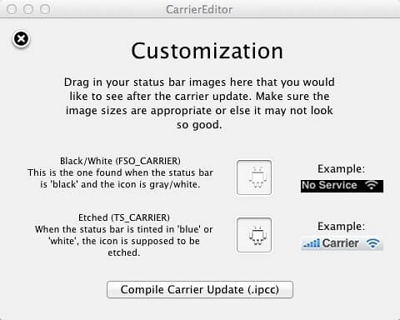
Step 4: On the Customization page, choose the logo on a white or black background.
Step 5: Click Compile Carrier Update. The program will save the original and modified logos to your desktop.
Step 6: Open iTunes, select your device, and choose Restore iPhone using the generated .ipcc file.
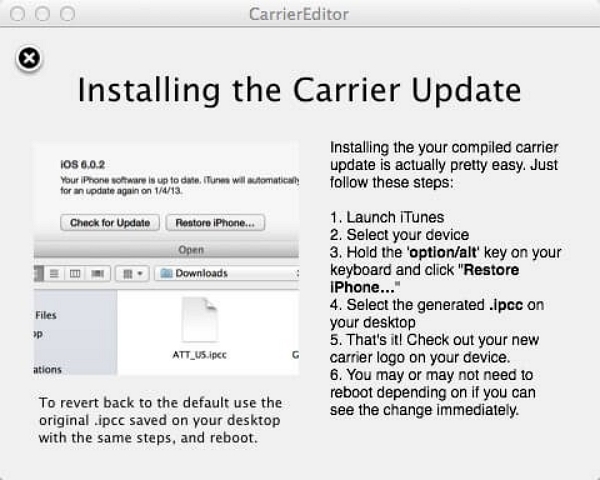
Step 7: Restart your iPhone to see the new carrier name/logo.
Risk Statement:
- Jailbreaking voids your Apple warranty and disables built-in security.
- May cause network issues, dropped calls, or failed data connections.
- Jailbroken devices may not receive iOS updates properly.
- Altering carrier settings can affect emergency call routing and location services.
- Increased vulnerability to malware, unauthorized access, and data leaks.
- Trade-ins or Apple service may be rejected.
Consider non-jailbreak alternatives like custom widgets or wallpapers that mimic carrier branding.
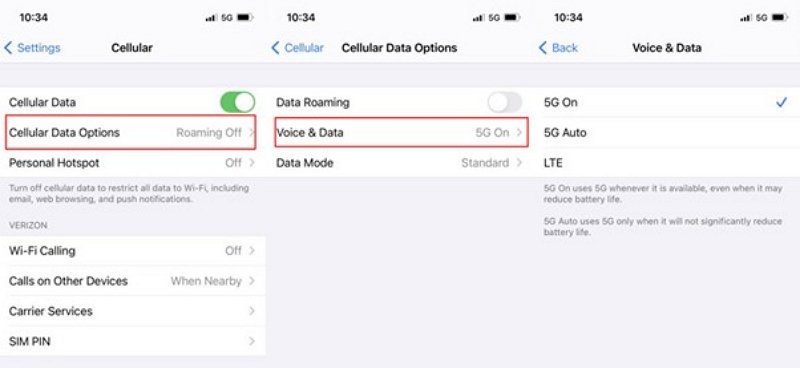
Part 5: How to Change from 4G to 5G on iPhone 12/13/14/15
All iPhones from iPhone 12 onwards support 5G. If your phone shows LTE or 4G, you can switch to 5G manually.
- Open Settings > Cellular > Cellular Data Options.
- Tap “Voice & Data.” Change from LTE to 5G auto.
Why LTE Sometimes Appears After Switching:
- Network fallback behavior in areas with weak 5G coverage.
- SIM provisioning delays or tower registration issues.
- Local tower compatibility or signal band limitations.
How to Fix LTE Fallback Issues:
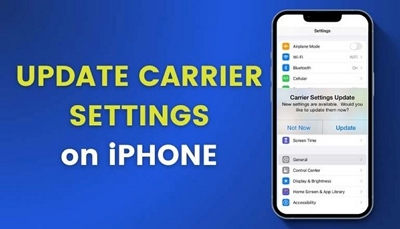
- Update Carrier Settings: Settings > General > Update > accept carrier update if prompted.
- Enable VoLTE and 5G: Settings > Cellular > Cellular Data Options > Voice & Data → LTE or 5G Auto.
- Reset Network Settings: Settings > General > Transfer or Reset iPhone > Reset > Reset Network Settings.
- Check SIM Provisioning: Contact your carrier to ensure VoLTE and 5G are active.
- Monitor Signal Bands: Dial *3001#12345#* → Call → Serving Cell Info/LTE to check band and signal strength. Compare with supported bands for your iPhone.
- Toggle Airplane Mode or Reboot: Turn Airplane Mode ON for 10 seconds, then OFF; or perform a full device reboot.
Part 6: Troubleshooting After Changing Carrier
These tips help ensure your iPhone works smoothly after switching carriers.
1. No signal or unable to make calls
- Make sure your new SIM/eSIM is correctly inserted and activated.
- Check Settings > Cellular > Cellular Data Options for the correct network mode.
- Toggle Airplane Mode ON/OFF or reboot your device.
- Confirm your iPhone is unlocked.
2. Unable to receive text messages or activate iMessage/FaceTime
- Go to Settings > Messages and Settings > FaceTime, toggle both OFF → ON.
- Ensure your phone number is listed under Send & Receive.
- Check for carrier SMS changes.
- Confirm that the Date & Time are set to automatic.
3. eSIM activation failed
- Verify your iPhone supports eSIM and is unlocked.
- Retry activation and ensure Wi-Fi or cellular data is active during setup.
- Contact your carrier to confirm the eSIM is provisioned correctly.
4. Reset network settings
- Go to Settings > General > Transfer or Reset iPhone > Reset > Reset Network Settings.
- This clears saved Wi-Fi, VPN, and cellular settings.
- Reconnect to Wi-Fi and reconfigure any custom network settings afterward.
FAQs
Conclusion
iPhone users often feel the need to switch carriers, especially when traveling abroad. Changing carriers on your iPhone should now be easy after reading this 2025 guide, where we have explored everything you must know about changing carriers on iPhones. We have also discussed how to use Passixer to unlock your SIM or carrier lock. This information should help all iPhone users immensely.