
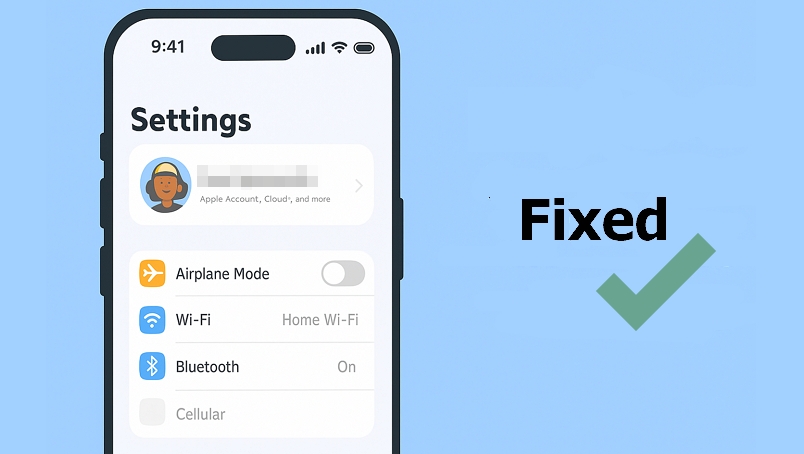
Want to change your Apple ID settings on your iPhone but find the account information greyed out? Or even worse, the Apple ID banner is greyed out and unresponsive when you tap it? You can get out of this situation by following this guide. Below, we’ll show you how to fix Apple ID greyed out in Settings on iPhone/iPad, which also applies when your Apple ID account information is greyed out.
Quick Answer: Why Is My Apple ID Greyed Out
A greyed-out Apple ID in iPhone Settings could occur due to the following reasons.
- Temporary problems on Apple’s servers may affect your ability to access or manage your Apple ID.
- Your Apple ID is locked, disabled or inactive.
- Screen Time feature prevents you from changing your account settings.
- Your iDevice is being supervised by MDM profiles, preventing unauthorized configurations.
- Temporary iOS glitches can affect feature functionality.
How to Fix Apple ID Greyed Out on iPhone/iPad
The main reason for a greyed-out Apple ID is commonly Screen Time restrictions. You can follow the corresponding fixes first to solve the issue with the highest success rate and then follow other possible solutions.
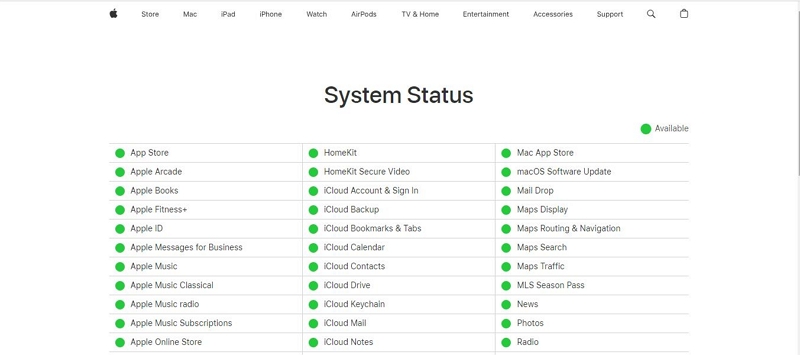
Suggestion: Check Apple System Status
Maybe Apple is running a system update or their server is experiencing downtime, causing the Apple ID option to be greyed out. So, check the Apple server status first to avoid unnecessary operations.
Step 1: Open a web browser and go to https://www.apple.com/support/systemstatus/.
Step 2: On the page, you will see a list of Apple services. Look for the Apple ID service and check if there are any reported issues or disruptions. If there are reported issues, it may be the cause of the greyed-out Apple ID. In such cases, you may need to wait until the issue is resolved by Apple.
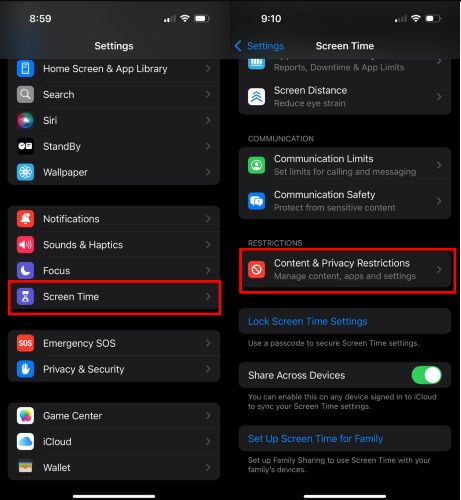
Fix 1. Allow Account Changes in Screen Time
If you have enabled Screen Time, it’s possible that account changes are restricted to protect your privacy. Follow the steps below to see if this is the reason. If it is, authorize the change and the issue should be resolved.
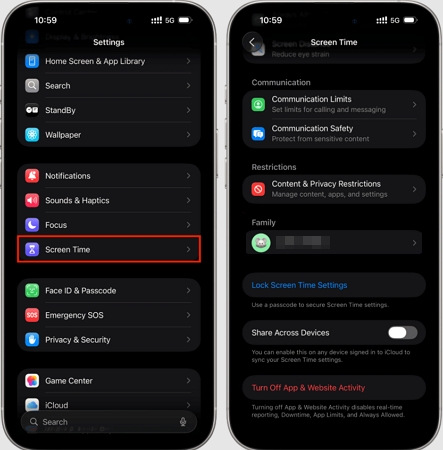
Step 1: Open the “Settings” app on your iPhone and select “Screen Time”.
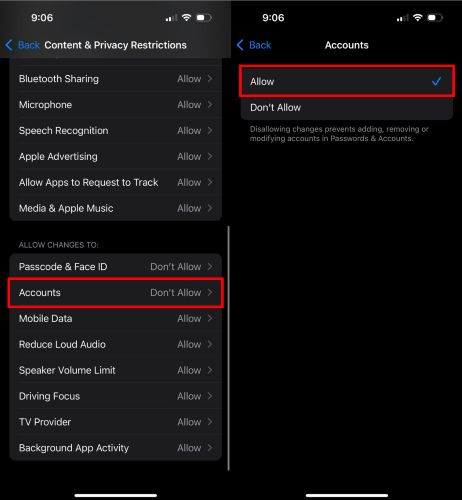
Step 2: Select “Content & Privacy Restriction”.
Step 3: Enter your Screen Time passcode when prompted. Then, select “Account Changes”.
Step 4: If the “Don’t Allow” option is selected, tap on “Allow” to unselect it.
Forgot Screen Time Passcode?
If you forgot your Screen Time passcode for your iPhone, you can follow this Reset Screen Time Passcode guide to set a new one.
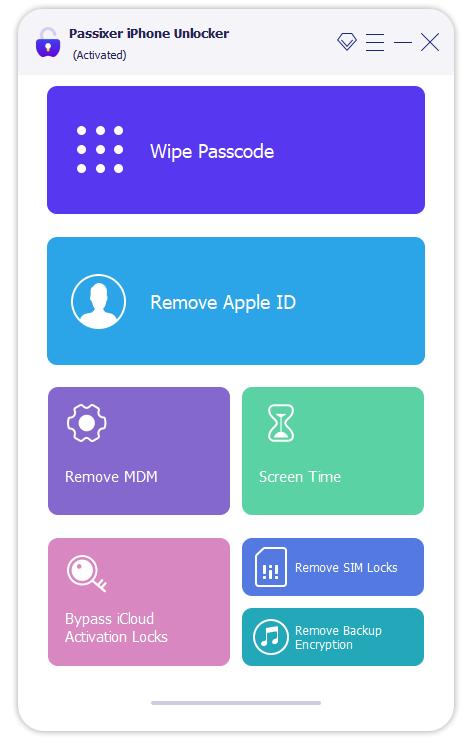
Alternatively, you can use Passixer iPhone Unlocker to turn off iPhone Screen Time passcode without losing data. Passixer can remove your forgotten Screen Time passcode, allowing you to modify Screen Time settings or disable it without credentials. It’s also a useful tool if you need to turn off Restrictions on your old iPhone or disable Screen Time on a second-hand iPad.
Steps to Remove Screen Time Passcode with Passixer
Run Passixer on your Windows or Mac and click Screen Time.
Turn off Find My iPhone on your iPhone and connect your iPhone to the computer and hit Start.
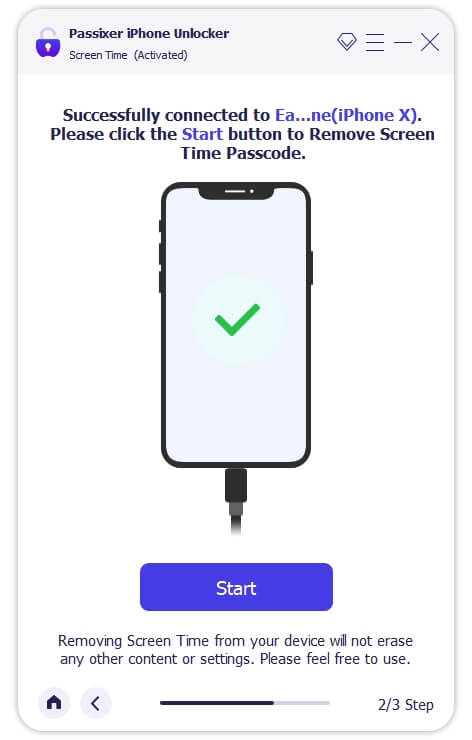
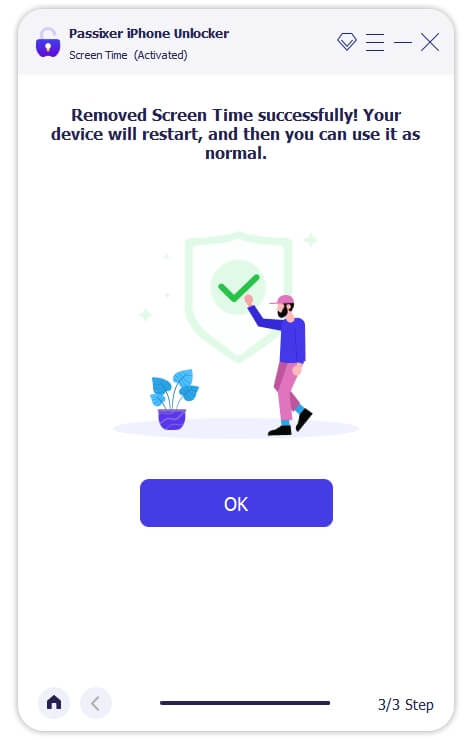
Instantly, you will see the Removed Screen Time Passcode Successfully prompt.
If you are running iOS 11 or earlier, Passixer will recover the Restrictions passcode for you instead.

You can access Screen Time and allow account changes without passcode now.
Fix 2. Turn Off Screen Time
If enabling the “Account Changes” option in Screen Time does not make the Apple ID option work again, you can try turning off the Screen Time completely. The following steps explain the process.
Step 1: Go to “Settings” and select “Screen Time”.
Step 2: Scroll to the bottom of the screen and select “Turn Off Screen Time” or "Turn Off App & Website Activity".
Step 3: Enter your Screen Time passcode when prompted.
Fix 3. Restart Your iPhone
Restarting your iPhone can also help resolve temporary glitches or issues that may be causing the Apple ID to be greyed out. You just need to follow these steps:
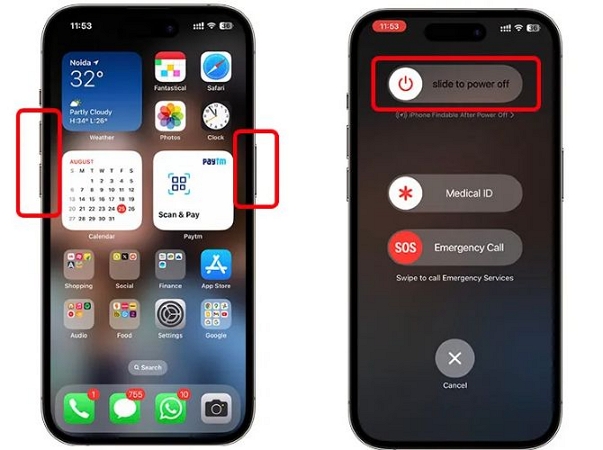
Step 1: Press and hold the Volume button and the Side button until the “Slide to power off” option appears.
Step 2: Slide to power off your iPhone.
Step 3: Wait for a few seconds and then press and hold the “Side” button again to turn it back on.
After that, check to see if your Apple ID is still greyed-out.
Fix 4. Recover Your Apple ID
If someone tries to log in or change your Apple ID without authorization, Apple will lock your Apple ID and grey out the Apple ID banner to block these actions and protect your account. You can unlock your Apple ID by resetting the password.
Step 1: Go to iforgot.apple.com and hit Reset password.
Step 2: Enter the Apple ID account and click Continue.

Step 3: A verification message will be shown on your trusted iDevice. Click Allow and input the screen passcode.

Step 4: Create a new Apple ID password. After that, your Apple ID should be unlocked and the Apple ID will no longer appear greyed out.

You May Also Like
Fix 5. Delete MDM from iPhone
If your iDevice has MDM profiles installed by your school or company, the Apple ID may also appear greyed out. You can use the device passcode to remove the supervision profile yourself or contact the MDM administrator for assistance.
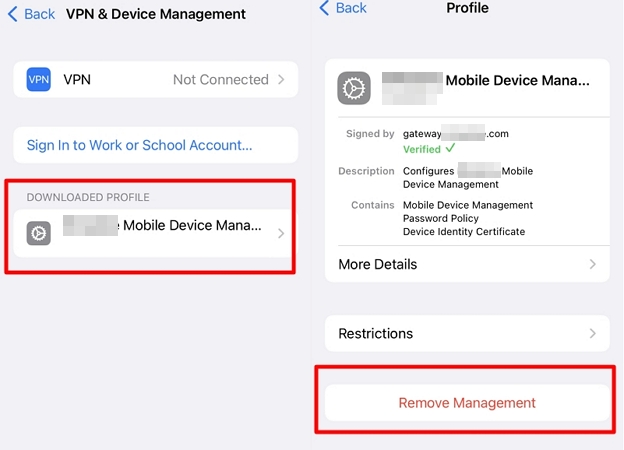
Step 1: Go to Settings > General. Then, access VPN & Device Management.
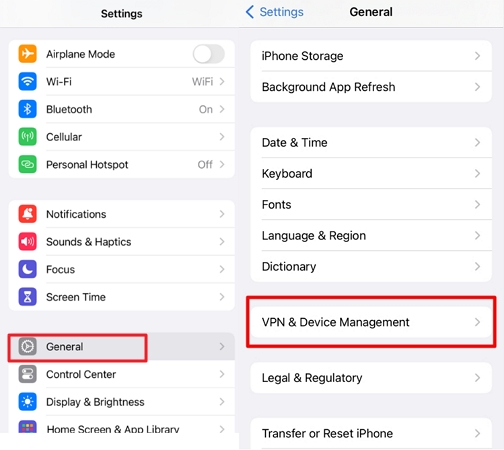
Step 2: Tap Remove Management. Enter the device passcode when required.
Bypass MDM restrictions on your iPhone or iPad without credentials when you can’t contact the admin.
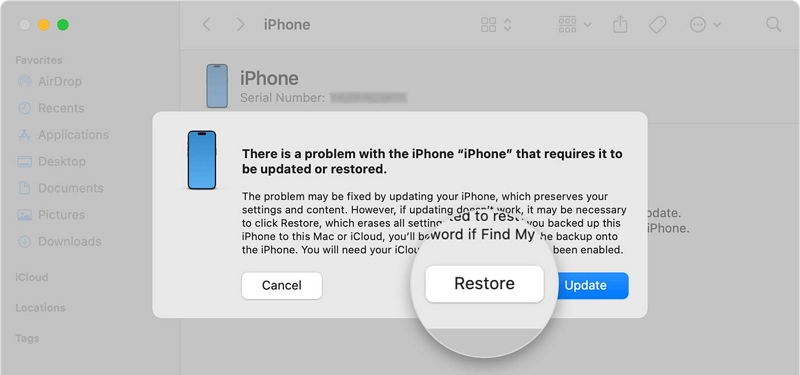
Fix 6. Restore iPhone in iTunes
Restoring iPhone can remove stubborn iOS glitches that lead to the Apple ID being unavailable in Settings. Instead of using the inbuilt Erase All Content and Settings option, it is suggested to use iTunes to complete the restore process smoothly. This is because the greyed-out Apple ID may stop you from turning off the Find My feature when erasing the device via the Settings app.
Restoring your iPhone will wipe all data and settings. If Find My iPhone is enabled, ensure you have the Apple ID used on the iPhone to turn off iCloud Activation Lock after the reset.
Steps to Restore iPhone in iTunes
Step 1: Connect your iPhone to a computer with iTunes installed. You can also use Finder on Mac or Apple Devices on Windows 10 or later.
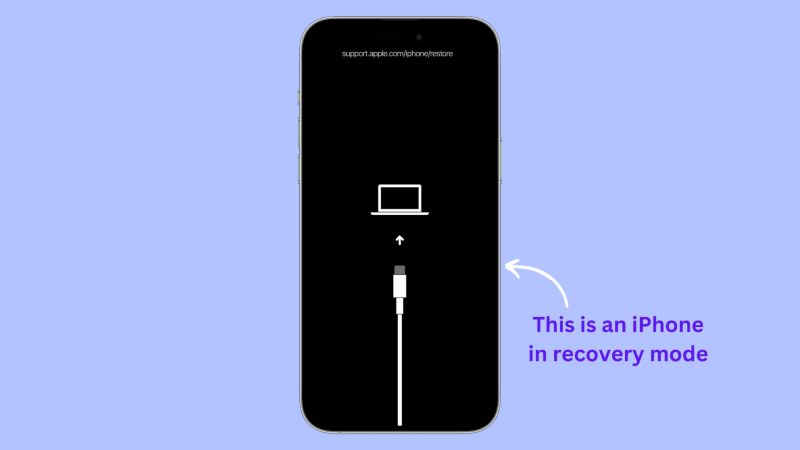
Step 2: Put your iPhone into Recovery Mode by pressing the corresponding buttons.
Step 3: Run iTunes and you will see a Restore or Update pop-up. Choose Restore to restore your iPhone back to factory settings.
Fixed: Apple ID Media and Purchases Greyed Out on Mac
Some users find that the Media & Purchases option under their Apple ID in Mac Settings is greyed out. If you are also stuck with this annoying issue, you can try the following 2 tips to fix it.
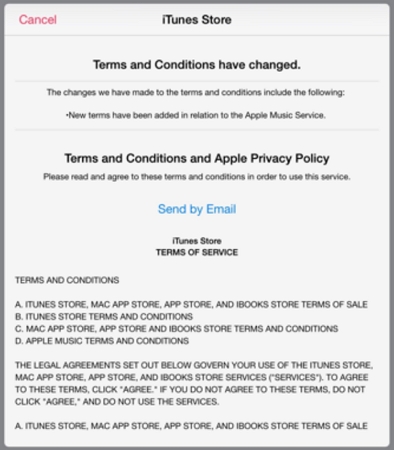
Fix 1. Check Accept Terms & Conditions
Step 1: Access the Apple Music App on your Mac and click the shown Try It For Free banner.
Step 2: A window will pop up, prompting you to sign in with your Apple ID.
Step 3: Enter your Apple ID information, check Accept Terms & conditions and hit Sign in.
Step 4: After a while, run App Store and it will sign in automatically. Now, head back to System Settings. You will find that the “Media and Purchases” feature works again.
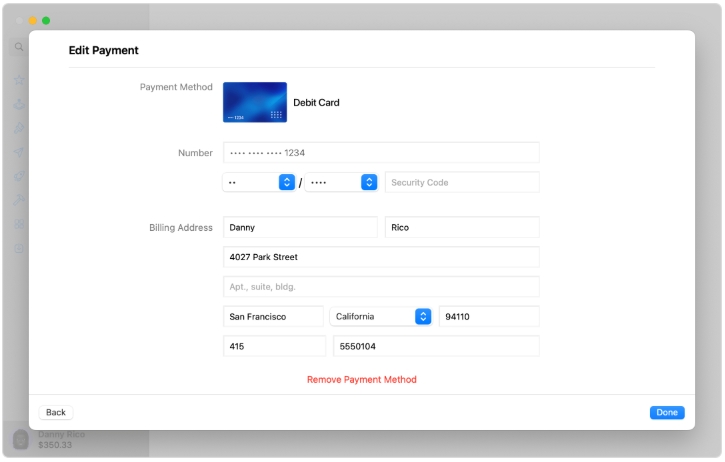
Fix 2. Confirm Billing Information
Step 1: Open System Settings and sign out of iCloud.
Step 2: Sign in to the Apple Music app and confirm some billing information.
Step 3: Open App Store and sign in to it too.
Step 4: Lastly, go to System Settings again and sign into iCloud. Instantly, you will find the Media & Purchases no longer greyed out.
Conclusion
There you have it. We’ve successfully covered the best solutions you can utilize to resolve Apple ID greyed-out problem. As you can see, the process for each solution is pretty straightforward. All you just need to do is to follow the instructions correctly for a smooth process.