
If your iPhone displays the message “iPhone is disabled — connect to iTunes,” you’re probably wondering how to unlock a disabled iPhone quickly and safely. The fastest solution is to restore your device using iTunes or Finder. If your computer has been previously synced with the iPhone, you can back up and restore it directly; otherwise, you’ll need to put the device into Recovery Mode before restoring. Below, you’ll find a step-by-step guide, screenshots, common error fixes, and safer alternatives for unlocking a disabled iPhone.
What “iPhone is disabled” means
When an iPhone is locked after repeated wrong passcode attempts, it shows one of two messages—and the difference matters.
1. “iPhone is disabled, try again in X minutes”
This is a temporary lockout. Your device is giving you another chance after the timer ends. As long as you eventually remember and enter the correct passcode, you can still unlock the phone without losing data. However, each incorrect attempt increases the delay until it eventually locks completely.
2. “iPhone is disabled, connect to iTunes”
This message signals a full lockout. At this stage, you can’t enter the passcode anymore. The only way to regain access is by restoring the device using iTunes or Finder, or erasing it through another method.
During restore, there are two important things to keep in mind:
- You may lose data. Unless you already have a backup in iCloud or iTunes/Finder, restoring the device will wipe everything on it.
- Your Apple ID is still required. A restore does not remove Activation Lock. After the device is erased, you must sign in again with the same Apple ID and password that were previously linked to the phone.
Understanding which message you’re seeing helps you decide whether you can wait and unlock normally—or need to move straight to a reset method.
At-a-glance: Which unlock method fits your situation?
If your iPhone is disabled or showing “connect to iTunes”, there are several ways to unlock it, with or without iTunes. Before you choose how to unlock your iPhone, compare the main methods below.
If your iPhone has previously been synced with a trusted computer, unlocking your disabled iPhone with iTunes is the fastest option. If not, recovery mode is the standard Apple-approved method to restore the device.
Method 1: Unlock iPhone with iTunes Using a Synced Computer
This is the easiest and safest way to unlock a disabled iPhone with iTunes without entering the passcode, as long as the device has previously trusted the computer. When a device is already paired with iTunes or Finder, you may be able to unlock it without losing data—especially if a backup already exists.
When to use this method
- You’ve synced your iPhone to this computer in the past
- iTunes or Finder recognizes the device automatically
- You want the highest chance of restoring with minimal data loss
Step-by-step instructions
Step 1: Open the latest version of iTunes (Windows/macOS Catalina or earlier) or Finder (macOS Big Sur and later).
Step 2: Click the iPhone icon when it appears in iTunes/Finder.
If it doesn’t show up, try a different cable or port.
Step 3. Back up your data if possible.In the Summary (iTunes) or General (Finder) tab:
- Click “Back Up Now”
- Choose “This Computer” for a full backup
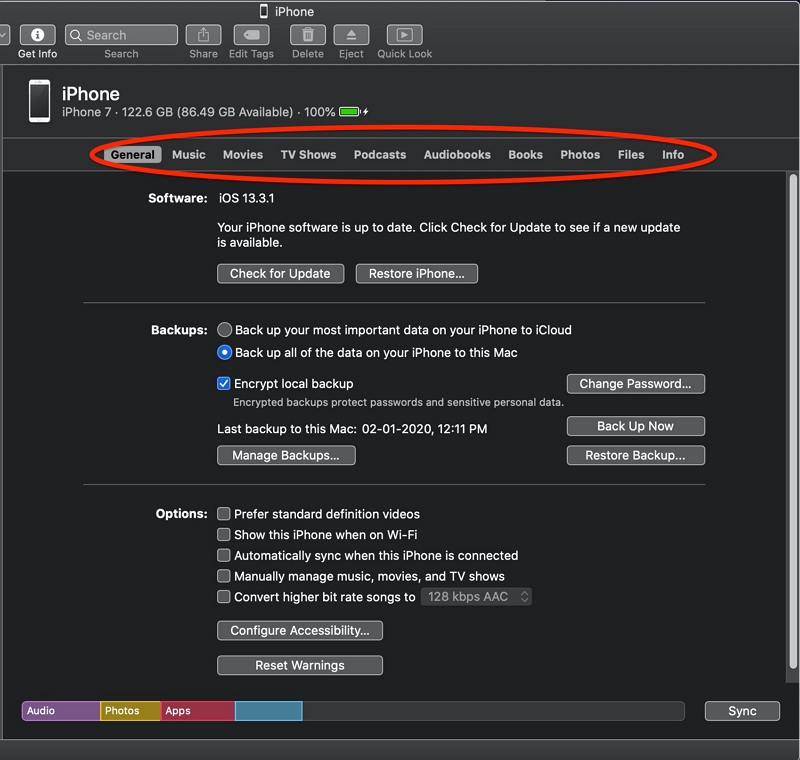
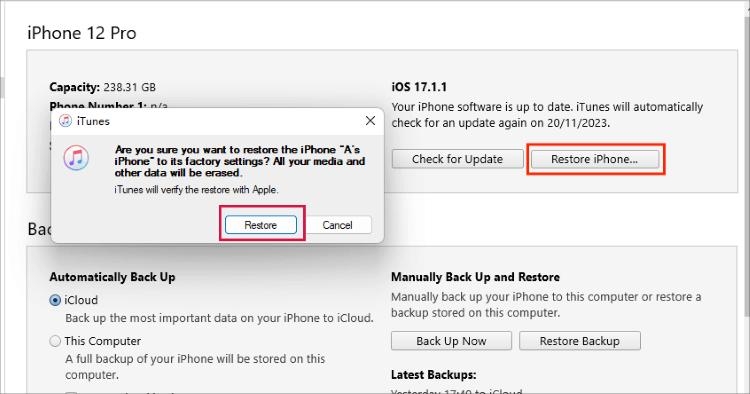
Step 4: Restore your iPhone through iTunes to remove the passcode.
After the backup (or if you skip it), click: Restore iPhone → Confirm with Restore
iTunes/Finder will: Download firmware > Erase the device > Reinstall iOS. Then you’ll see a progress bar.
If iTunes asks for a passcode:
This means the device doesn’t fully trust the computer. Try one of the following:
What happens next
When the restore finishes, you’ll see the “Hello” setup screen. From here, you can:
- Restore from your iTunes/Finder backup
- Restore from iCloud backup
- Set up as a new device
After restoring, the passcode is removed and you can unlock your iPhone again using setup options.
Restoring with iTunes will erase the passcode, but it does not remove the Apple ID or Activation Lock. You’ll need your Apple ID credentials during setup.
Method 2: Unlock iPhone with iTunes via Recovery Mode Restore
If your iPhone is disabled or shows “connect to iTunes,” and you don’t have a trusted computer, Recovery Mode is the most common Apple-approved way to unlock an iPhone without the passcode and reinstall iOS.
Recovery Mode vs DFU Mode
- Recovery Mode: Standard restore, recommended for most users
- DFU Mode: Deeper repair, only needed if Recovery Mode fails
Stay with Recovery Mode unless you hit repeated errors.
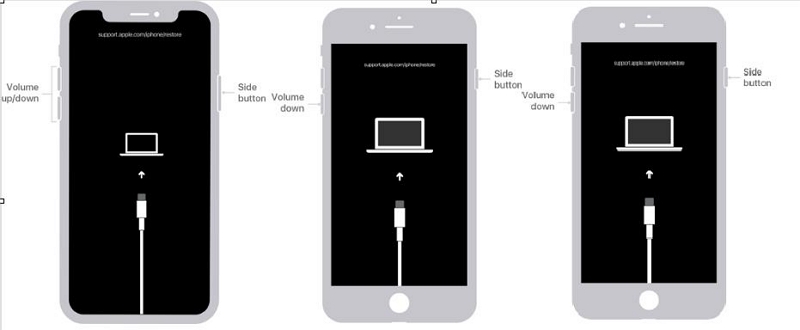
Step-by-step: Enter Recovery Mode by model
Turn off your iPhone if possible, then follow the correct button sequence while connecting to the computer.
iPhone 8, X, 11, 12, 13, 14, 15, SE, 16, 17 (2nd/3rd gen)
- Press and release Volume Up
- Press and release Volume Down
- Hold the Side button until the Recovery Mode screen appears
iPhone 7 / 7 Plus
- Hold Side button + Volume Down at the same time
- Keep holding until you see the Recovery Mode screen
iPhone 6s, SE (1st gen), and older
- Hold Home button + Top/Side button
- Keep holding until the Recovery Mode screen appears
Restore with iTunes or Finder
Once your device is in Recovery Mode, iTunes or Finder gives you the option to unlock the iPhone by restoring it through iTunes.
Step 1. Connect to the computer (if not already connected)
Step 2. Open iTunes or Finder
A pop-up will appear:“There is a problem with the iPhone…”
Step 3. Select Restore (not Update)
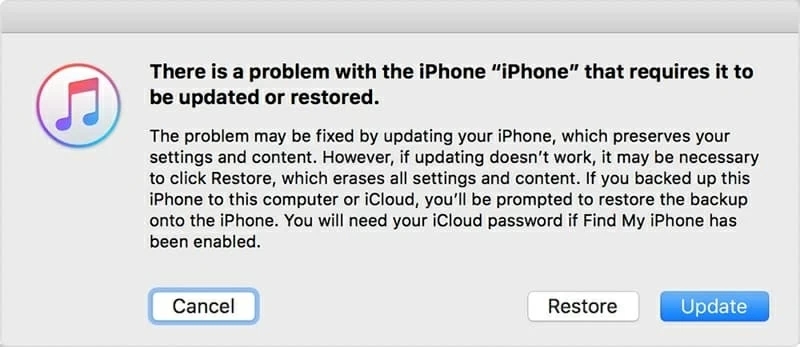
The software will:
Download iOS > Erase the device > Reinstall the system
You’ll see “Extracting software” and “Verifying iPhone restore” messages.
If the process takes more than 15 minutes
Your iPhone may automatically exit Recovery Mode.
If that happens:
- Repeat the button sequence
- Restart the restore
When the restore finishes, complete setup and sign in with your Apple ID.
Method 3: Unlock Disable iPhone without a Computer (via iCloud / Find My)
This option works well if your iPhone is disabled and you can’t use iTunes or a USB connection. If you don’t have access to a computer but you’ve enabled Find My iPhone, you can erase and unlock your device remotely through iCloud.
Requirements
- You can use this method if:
- Find My iPhone is turned on
- You know the Apple ID and password
- The device is online or will connect to Wi-Fi/cellular
Steps to erase your iPhone via iCloud
Step 1. On another device, go to iCloud.com and sign in
Step 2. Click All Devices.
Step 3. Select your locked device from the list

Step 4. Click Erase iPhone
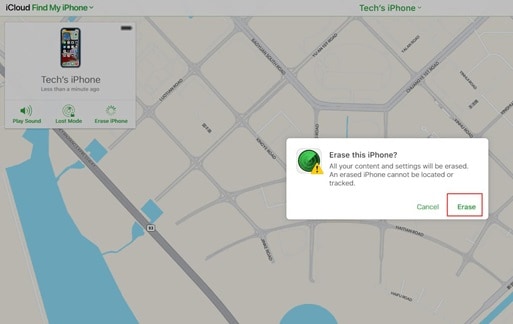
Step 5. Confirm with your Apple ID password
The device will be erased remotely, removing the passcode.
When it restarts:
- You’ll see the setup screen
- You’ll need to sign in with the same Apple ID used before
Erasing with iCloud removes the passcode, but it does not remove Activation Lock or the Apple ID linked to the device.
Best Alternative Method To Unlock iPhone With iTunes
If iTunes can’t restore your iPhone, keeps showing errors, or asks for a passcode you don’t remember, a third-party unlock tool may be the only workable alternative. Among the available options, Passixer iPhone Unlocker offers one of the most reliable solutions for removing a screen passcode without needing your Apple ID or previous access to the device.
When Passixer Makes Sense
- iTunes won’t detect your iPhone
- You see repeated restore errors (3194, 4013, 4010, 9, etc.)
- The device is fully disabled and won’t enter the setup screen
- You don’t remember the lock screen passcode
How to Unlock an iPhone with Passixer (Step-by-Step)
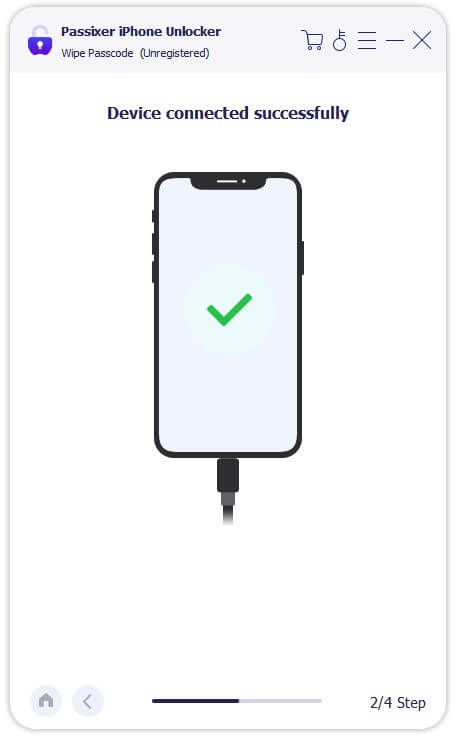
Launch the tool and click “Wipe Passcode” from the main menu.

Use a USB cable to connect the device to your PC or Mac. Once detected, confirm the device details and continue.
Passixer will prompt you to download the correct iOS firmware needed to unlock the device.

Enter the on-screen confirmation code (usually “0000”) and click to begin. The software will erase the passcode and reinstall iOS.

After unlocking, the device restarts and shows the “Hello” screen. You can then restore from backup or set it up as new.

Just like an iTunes restore, Passixer removes the lock screen, not the Apple ID. If Activation Lock is active, you’ll still need Passixer to bypass iCloud Activation Lock or the correct Apple ID credentials to reactivate the device. Passixer is a practical backup option when Recovery Mode or iTunes doesn’t get the job done—and when you need a direct, guided way to reset a disabled iPhone.
Common iTunes/Finder Errors and How to Fix Them
Even when you follow every step correctly, iTunes or Finder may stop the restore with an error code. Most of these issues are caused by outdated software, bad connections, or network restrictions. Here are the most common ones and how to fix them quickly:
Update iTunes to the latest version and check your computer’s hosts file. Switching to another Wi-Fi network or trying a different computer can also help.
Change the Lightning cable, plug into another USB port, or restart the computer. If possible, use a different Mac/PC.
Use a trusted Apple cable, disable VPN/firewall temporarily, or connect to a different network.
If iTunes still fails after trying these fixes, restart both your iPhone and computer, then try again.
To easily find this guide again, please share it on your social media!
Recovery Mode vs DFU Mode Troubleshooting
If Recovery Mode restores fail repeatedly or the device keeps exiting during the process, DFU Mode is the next step. DFU (Device Firmware Update) goes deeper than standard recovery and can bypass more stubborn firmware issues.
Use DFU Mode if:
- Error codes keep appearing even after switching cables or computers
- The iPhone is stuck in a boot loop
- Recovery Mode restores won’t complete
DFU should only be used when necessary, as it fully erases and reinstalls firmware. But if Recovery Mode keeps failing, it’s the most effective fallback before turning to third-party software.
Let me know if you’d like a mini table or DFU button sequences added!
Aftercare: Restore & Secure Your iPhone
Once your iPhone is unlocked and shows the Hello screen, you’ll need to set it up again. During setup, you can:
How to restore from iCloud:
During setup, choose Restore from iCloud Backup, sign in with your Apple ID, and pick the most recent backup.
How to restore from iTunes/Finder:
Connect your iPhone to the same computer you backed up with and select Restore Backup when prompted.
After setup, secure your device to avoid repeating the issue. Make sure:
- Two-Factor Authentication is enabled for your Apple ID
- Your Apple ID email, password, and recovery methods are written down securely
- A trusted phone number and secondary email are added
For your passcode, use a longer alphanumeric code or combine Face ID/Touch ID with a strong fallback. Avoid simple patterns like 1234, birthdates, or repeated digits.
Taking five minutes now can save hours of recovery later.
FAQs
Conclusion
Unlocking a disabled iPhone is stressful, but the right method makes it manageable. If you’ve synced your device before, Method 1 (trusted computer) is the safest option with minimal data loss. If not, Recovery Mode is the official fallback. iCloud/Find My works well if enabled, while third-party tools like Passixer are worth considering when Apple’s methods fail.