
Undoubtedly, the Apple ID is the passkey to all Apple services, from iCloud to iTunes, App Store etc.,- all of which make Apple devices stand out when compared with other digital technologies. It’s unique to every user, stores only the data you permit, and makes the data readily available on any Apple device you log your details into. However, a time may come when you need to change the Apple ID on your iPhone or iPad. Does this mean you will lose all the data that is linked to your Apple ID? If you find yourself asking this question, this is the right post to get clarification. Here, we will discuss everything you need to know about changing Apple ID without losing data. Read on to learn.
What Happens When You Switch to a Different Apple ID
- For data: You will lose access to your iCloud content if you don’t keep a local copy on your iPhone or iPad when signing out of yourApple ID. Note that the data is still saved in iCloud.
- For apps: The installed apps will remain on your device, whether they are paid or free. However, you will lose access to any paid services and you need to enter the password of the previous Apple ID to update the apps.
- For subscriptions or other paid services: You can’t use them like paid iCloud Storage on your iPhone or iPad after signing out of your Apple ID. To regain access, you’ll need to sign in again with the same Apple ID.
How to Change Apple ID without Losing Data
With the illustrative guide down here, you can change the Apple ID you have on your iPhone or iPad conveniently without data loss:
Step 1: Download Items from iCloud
Prior to changing the Apple ID associated with your iPhone or iPad, we strongly recommend that you export all important items that you have saved up on iCloud so you don’t lose them. To do this, you must have a stable internet connection and ensure that you know the Apple ID details connected to your device. Once you have all of these in place, follow the steps below to download items from iCloud:
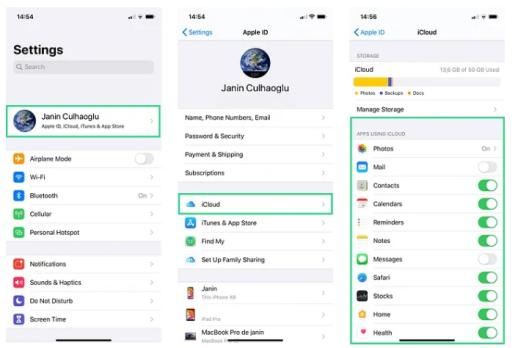
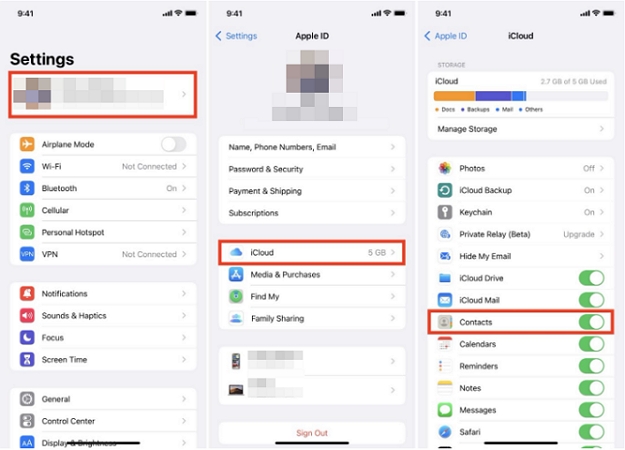
- Open Settings and tap your Apple ID name.
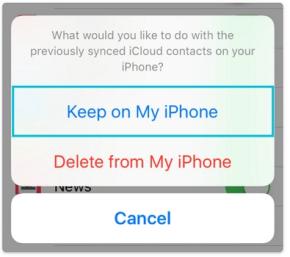
- Choose iCloud and then turn off the apps whose data you want to download and save on your iPhone internal storage.
- Tap Keep on My iPhone.
Step 2: Backup iPhone via iTunes/Finder
After downloading your crucial items from iCloud, the next thing to do is backup the data to iTunes so you can recover it in the future when you need it. To backup your iPhone to iTunes, follow the steps shared below:
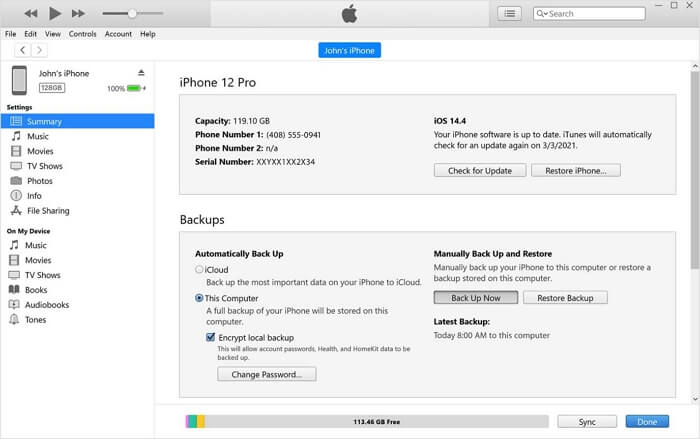
- Open the most recent version of iTunes on your computer.
- Connect the iPhone or iPad you want to change Apple ID to your computer using a workable USB cable.
- Proceed to the top left corner of your screen and click on the Device icon.
- Select Summary from the left sidebar.
- Go to the right hand panel and check the icon beside This Computer so iTunes can backup to there.
- After that, click Back Up Now to copy and paste your data safely from iPhone/iPad internal storage to your computer.
Step 3: Switch Apple ID to a New One
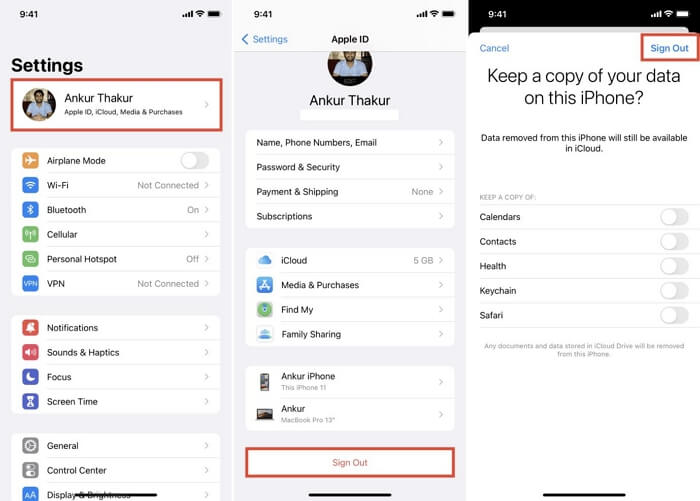
Once you’ve completed the data backup, then you can proceed to sign out the current Apple ID on your device and sign in to another one. To sign out of the current Apple ID:
- Go to Settings and click on the profile ID icon.
- Swipe to the bottom of the subsequent interface and hit the red Sign Out button.
- Enter the Apple ID password and your profile will be disconnected from the device.
- Head to the Settings menu again and click on Sign in to your iPhone to login with your new Apple ID.
Step 4. Transfer Everything to Different Apple ID
After logging into your iDevice with a different Apple ID, here are a few things you need to do to use your iPhone as you did with the previous Apple account:
- Sync content to the current Apple ID: Go to Settings > your name > iCloud > See All and toggle on the items you want to sync.
- Check your iCloud Storage plan: If you had upgraded iCloud Storage on your old Apple ID, you’ll need to subscribe to the same plan on the current Apple ID. Go to Settings > your avatar > iCloud > Manage Your Plan and select a suitable plan. Don’t forget to cancel the iCloud Storage plan on your old Apple ID if you no longer use it.
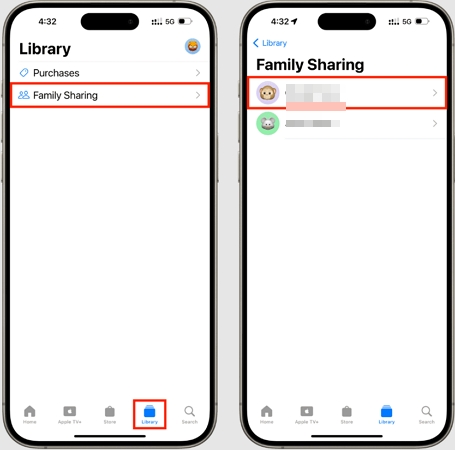
- Download apps again: To conveniently update apps, it’s recommended to install them again with the new Apple ID. For purchased apps, the Family Plan organizer can add your new Apple ID to the plan, allowing you to download the paid apps on your iPhone without additional cost.
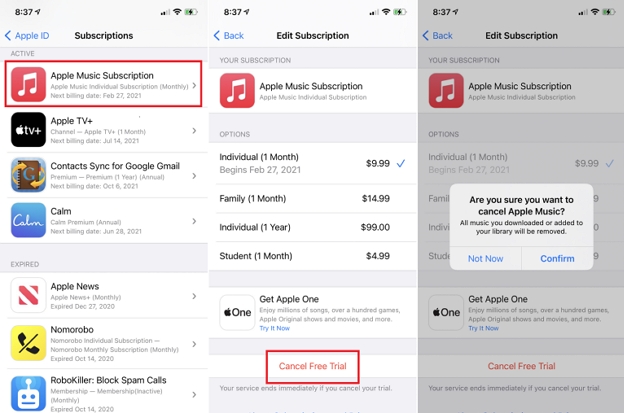
- Re-subscribe previous services with the new Apple ID: If you are a premium user of Apple Music or other Apple services, cancel the old subscription and subscribe to them using the new Apple ID.

How to Change Apple ID Without Password
If you don’t have the password to sign out of the Apple ID connected to your iPhone/iPad, then one of the following solutions down here should assist you with that:
Way 1. Reset Apple ID Password
Resetting your Apple ID password is the first step if you need to unlink your Apple ID from your iPhone when the password is forgotten. You can easily do this on the iforgot.apple.com website if you have access to a trusted device or trusted phone number. Here, we will show you the steps to reset your Apple ID password using a trusted device.
- Go to iforgot.apple.com and hit the blue Reset icon at the bottom of the main interface that comes up.
- Input the email address linked to the Apple ID whose password you want to reset and fill in the captcha field with the correct character.
- Hit Continue to proceed.
- Next, type the complete phone number displayed on your screen, then click Continue.
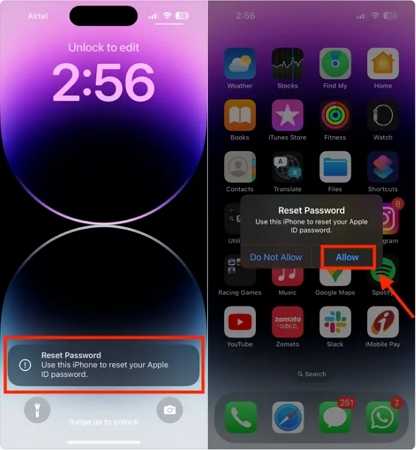
- A password reset prompt will be sent to one of the devices linked to your Apple ID.
- Click on the prompt and follow the onscreen guide to reset your Apple ID password.

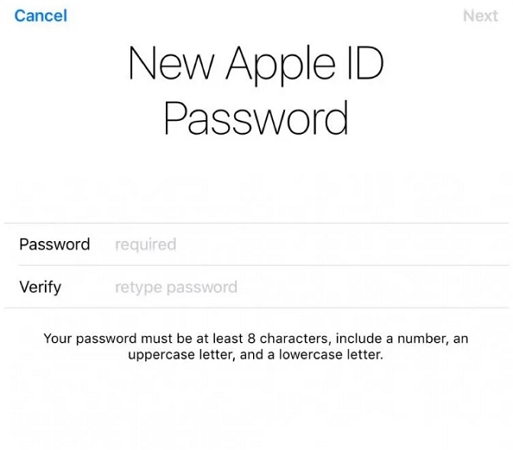
Now, it’s time for you to log out of Apple ID on your iPhone and login with a new Apple account.
If you can’t access a trusted device, using a trusted phone number is also a good option to reset your Apple ID password. Read this post to learn more about the steps.
View PostWay 2. Remove Apple ID with Passixer
Supposedly you cannot reset your Apple ID password or you use a secondhand iPhone or iPad whose Apple details are unknown and the previous owner can’t be reached, an iOS Unlocker like Passixer could be your savior to remove the Apple profile connected to the device. This software is the go-to option for anyone looking for an effortless approach to unlink the Apple ID registered on his or her iDevice without providing any login information. It removes the Apple ID you have on your iPhone/iPad regardless of the status of Find My. So whether Find My is enabled or not, Passixer is in control. Aside from Apple ID removal, Passixer is also great for screen unlock, iTunes backup encryption bypassing, Screen Time restrictions removal and more.
Stepwise Guide to Remove Apple ID with Passixer
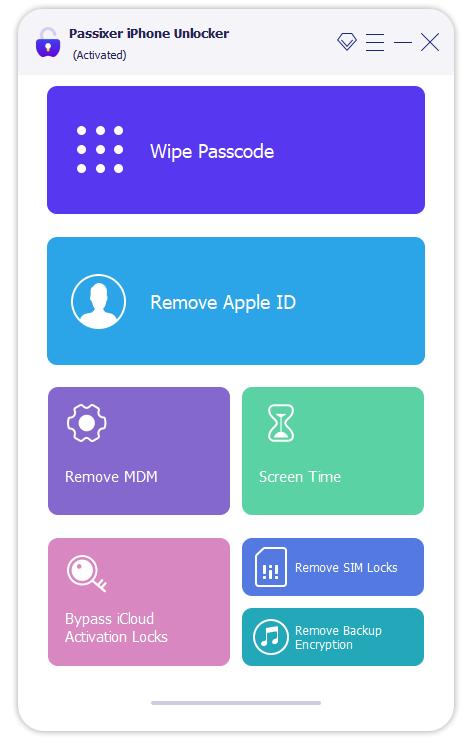
Install Passixer on your PC/Mac and launch it. On the home screen that comes up, click on Remove Apple ID from the options displayed.
Connect the iPhone/iPad you want to remove Apple ID from to your computer with the aid of a certified USB cable. Click on Trust when the corresponding prompt appears on your screen, then proceed to the next stage of the guide.
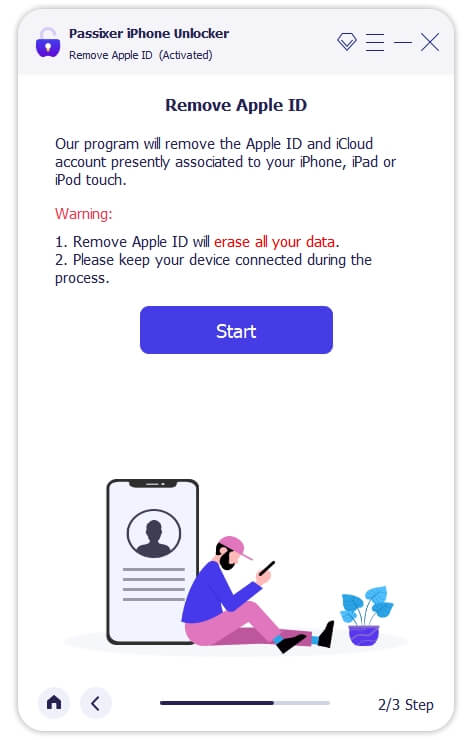
Hit Start on the subsequent screen and Passixer will begin the Apple ID removal from your iPhone/iPad once it detects that Find My is disabled.
If Find My is ON, then one of the following guide should help you complete the Apple ID removal.
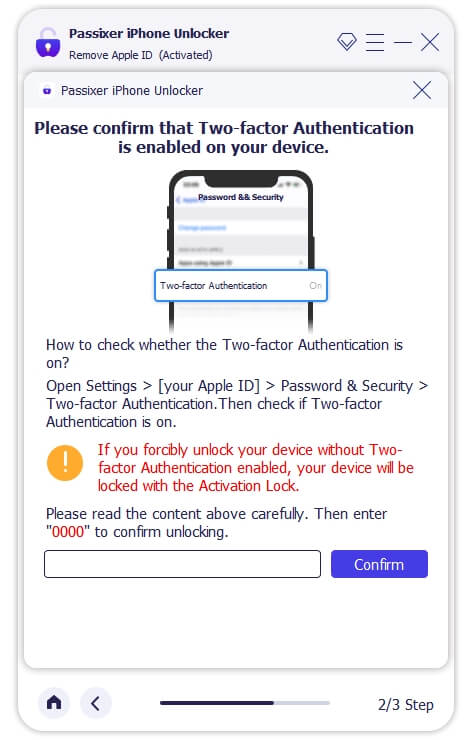
1. Confirm two-factor authentication and screen passcode request are both enabled on the device.
2. Once Passixer detects this, it will direct you to the screen shown below. Type 0000 and click on Confirm to proceed.
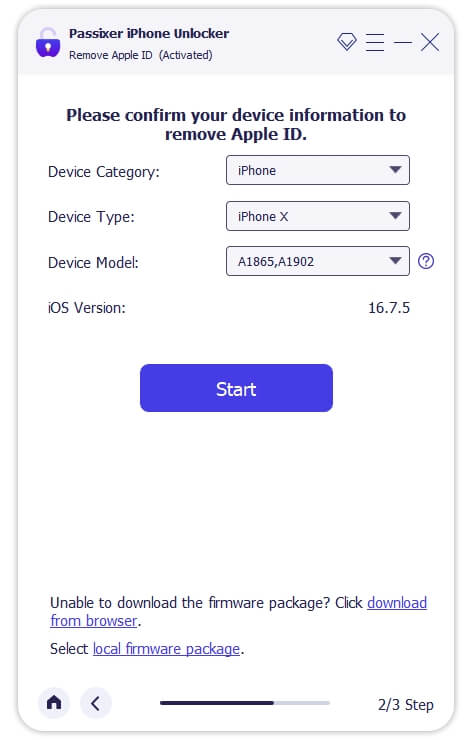
3. Passixer will run a quick scan on the connected iPhone/iPad and suggest a suitable firmware to remove the Apple ID you have on it.
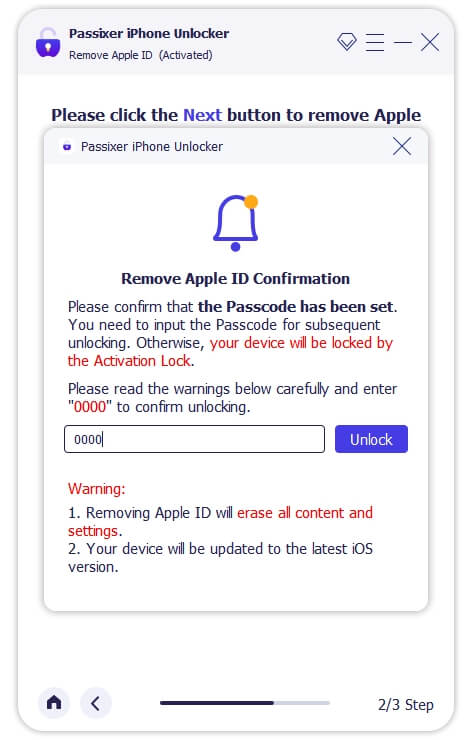
4. Click Start and wait for the download to finish. Now, input 0000 and hit the Unlock button and Passixer
Run the Settings app on your iPhone/iPad and choose General on the subsequent interface. Then, click on Reset > Reset All Settings. Once all the custom settings are erased, Passixer will commence the Apple ID removal.
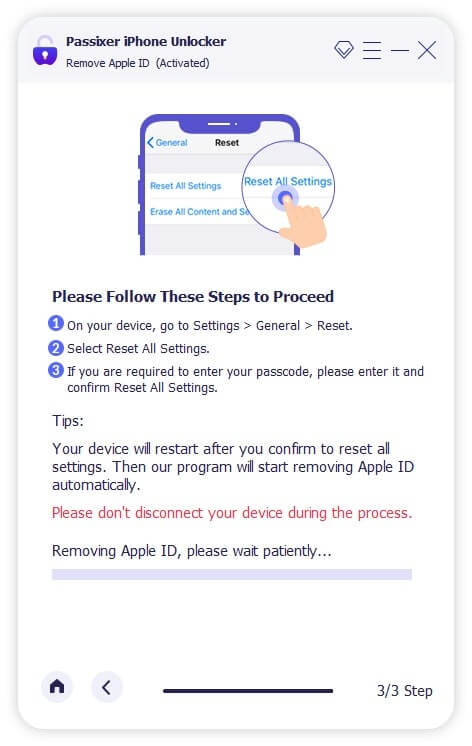
Without delay, Passixer will start the Apple ID removal. Once completed, disconnect your iPhone/iPad from the computer and create or sign in to another Apple profile.
Way 3. Erase All Content and Settings
If you haven’t turned on Find My iPhone before, you can factory reset your iPhone in Settings to delete the linked Apple ID. Here are the steps you can follow to get it done.
You may be wondering why this method works when Find My iPhone is disabled. This is because the iCloud Activation Lock will appear after erasing an iPhone with Find My iPhone on. To remove the iCloud lock, the corresponding Apple ID password is required. However, you cannot provide the password because you have forgotten it and cannot reset it.
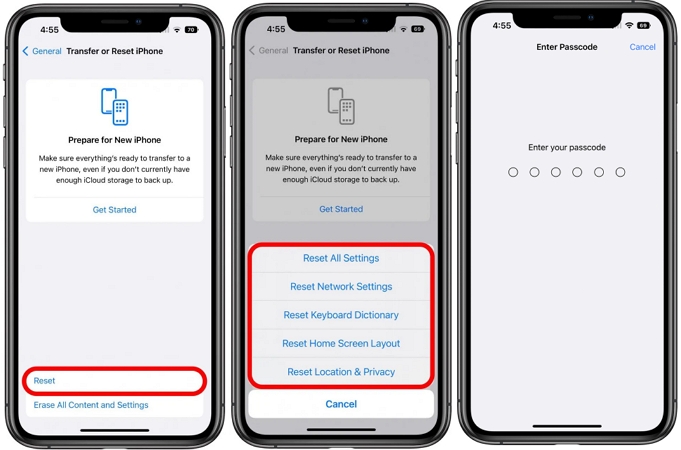
Step 1. Open Settings and choose General.
Step 2. Scroll down and tap Transfer or Reset iPhone.
Step 3. Select Erase All Content and Settings. Then, enter the screen passcode when prompted. Finally, hit Erase iPhone to begin restoring your iPhone to factory settings.
Can I Change My Apple ID Email Without Losing Everything
If you want to change the primary email address of your Apple ID, which is also your account name, it’s happy to tell you that your data will not be lost.
Option 1. Change Apple ID Email Address in Settings
Step 1. Tap your name in Settings and choose Sign-In & Security.
Step 2. Tap Edit at the top right corner. Then, find the Primary email, tap the minus icon and hit Delete.
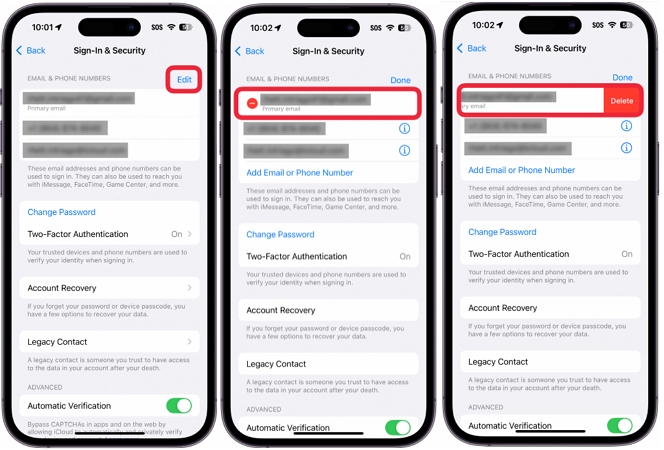
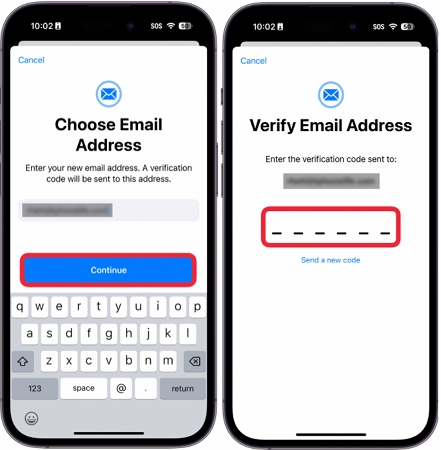
Step 3. In the pop-up, select Choose Another Email. Input your device passcode when required.
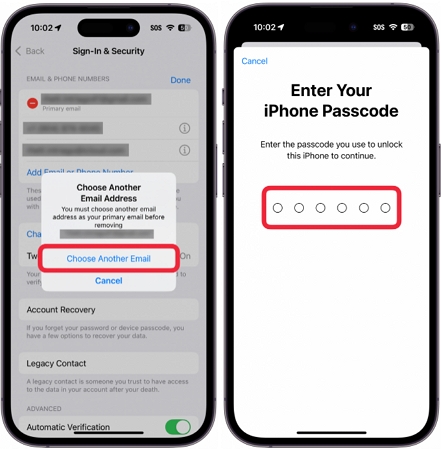
Step 4. Input a new email address and confirm your email change via the verification code.
Option 2. Change Apple ID Email Address Online
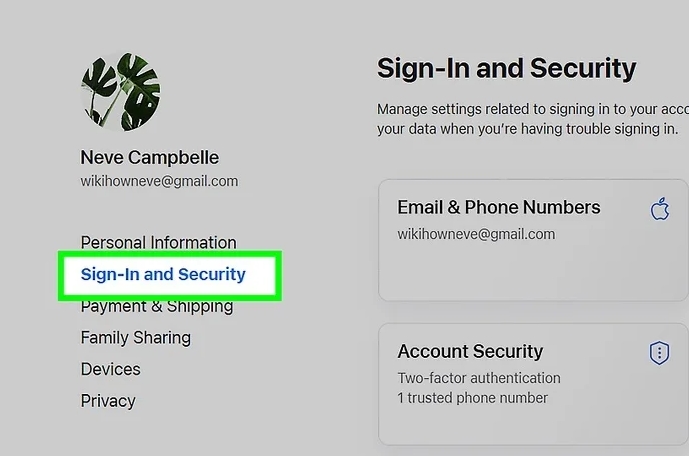
Step 1: In your device browser, sign into account.apple.com.
Step 2: Select Sign-In and Security from the left pane.
Step 3: Choose Email & Phone Numbers in the Sign-In and Security screen.
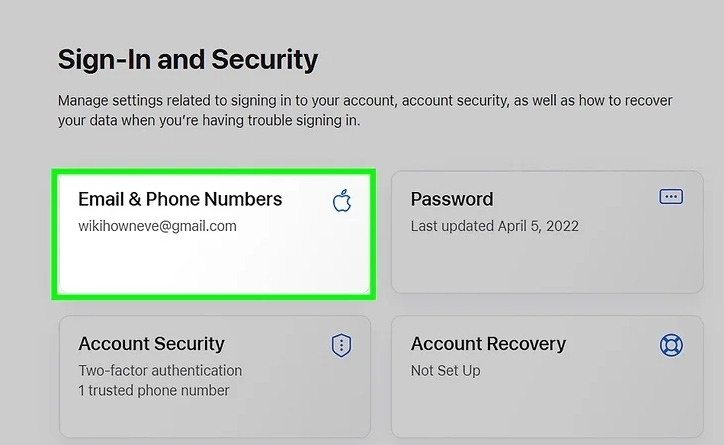
Step 4: Locate your primary email and click the minus icon next to it.
![]()
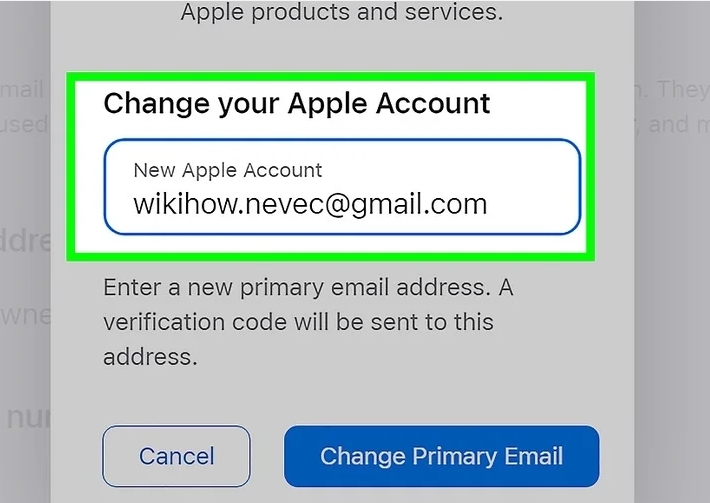
Step 5: Input your new email address and hit Change Primary Email. Then, follow the onscreen prompts to verify the new email. During the verification process, you will be asked to provide your Apple ID password and the verification code sent to your new email address.
How to Change Apple ID Password
Changing your Apple ID password will not remove your device data, but you will need to log in with the new password on other devices using the same Apple ID.
Steps to Change Apple ID Password If You Forgot the Original One
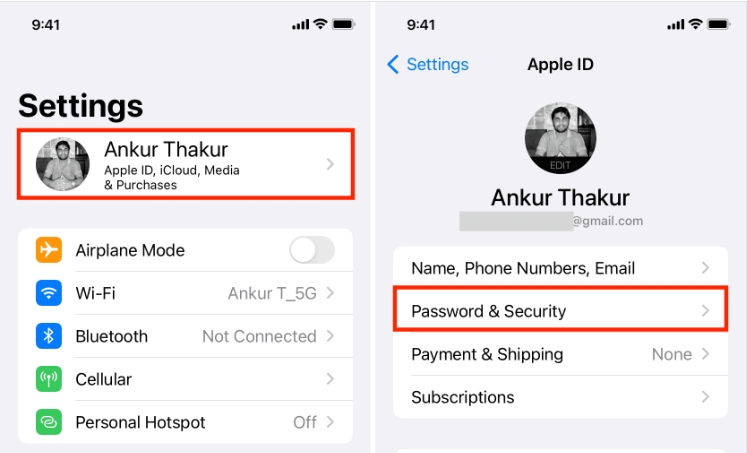
Step 1: Open Settings App on your iPhone and tap your Apple ID name.
Step 2: Choose Password & Security.
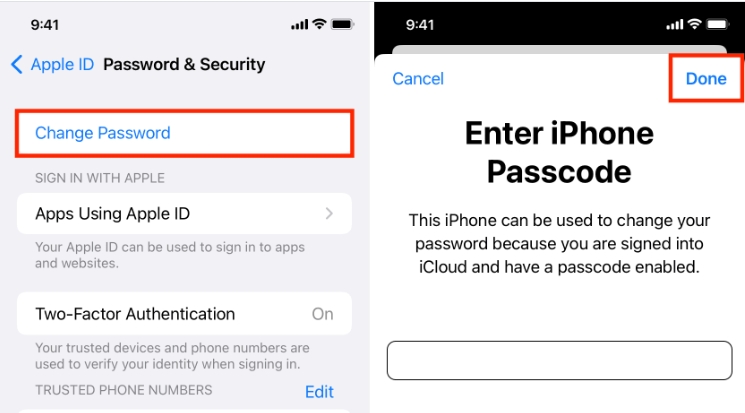
Step 3: Tap Change Password and type in your device passcode.
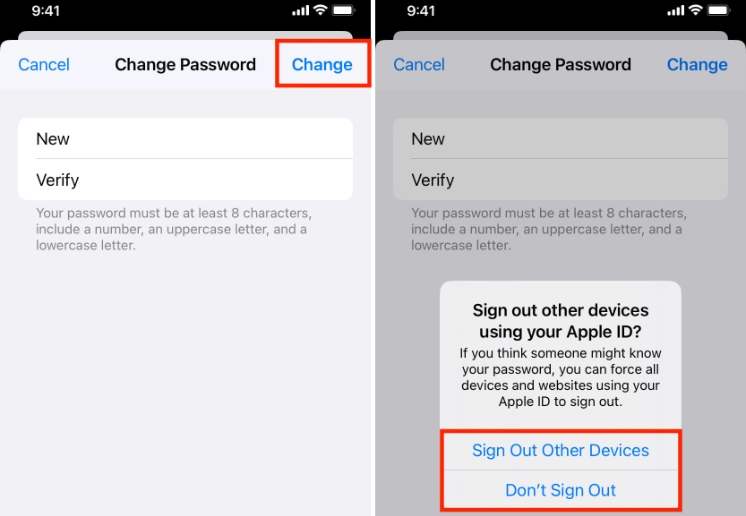
Step 4: Set a new Apple ID password and tap Change to save your modifications.
Steps to Change Apple ID Password If You Remember the Original One
Step 1: Go to Apple ID official site and sign in to it.
Step 2: Click Sign-In and Security in the sidebar and choose Password from the right section.

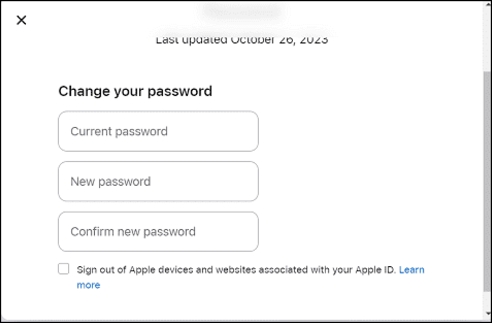
Step 3: In the pop-out, enter your current Apple ID password first. Then input a new one and confirm it. Lastly, hit Change Password to make your changes take effect.
FAQs
Well, the answer depends. Photos that are synced to iCloud will remain in iCloud. If you choose to keep a copy of your iCloud photos when signing out of your Apple ID, you can still access them on your iPhone as before. If you don’t, then the photos will disappear on your iPhone and you will need to sign in again with the same Apple ID to access them.
No, you can’t. Instead, you can create a new Apple ID and try to transfer the data from your original account to the new one. However, keep in mind that paid services, such as upgraded iCloud storage plans and Apple Music subscriptions, cannot be transferred.
Conclusion
There you go with everything you need to know about changing the Apple ID you have on your iPhone or iPad without losing data. We discussed how to complete the operation without losing data so far you have your Apple ID password. In case you don’t have the Apple ID password, you can try any of the three solutions suggested. However, Passixer is our best bet if you know your Apple ID is disabled or you have no access to the mailing address/phone number connected to your profile. The software gets rid of the Apple profile you have on your iPhone or iPad without a password.