
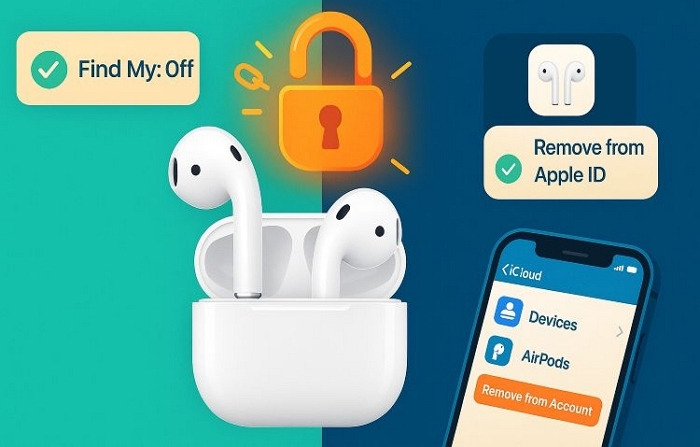
There are plenty of times when you need to remove AirPods from Apple ID. For example, you might be switching Apple accounts, passing a pair to a sibling or parent or setting up a second-hand set from the market. That’s where this guide comes in. You’ll see how you can remove AirPods from Apple ID, whether you’re using an iPhone, a Mac, or a browser on Android or Windows. You’ll also learn how to connect AirPods to a new Apple ID like yours. So, whatever your situation is, this guide has you covered for every AirPods model.
How to Remove AirPods from Apple ID with iPhone
To disassociating AirPods from the iPhone, you need to make both of the devices sign in with the same Apple ID.
Just make sure of a few things before you start. Your AirPods should be inside their case with the lid left open and they should already be connected to the iPhone while you do this. Here’s how to carry it out:
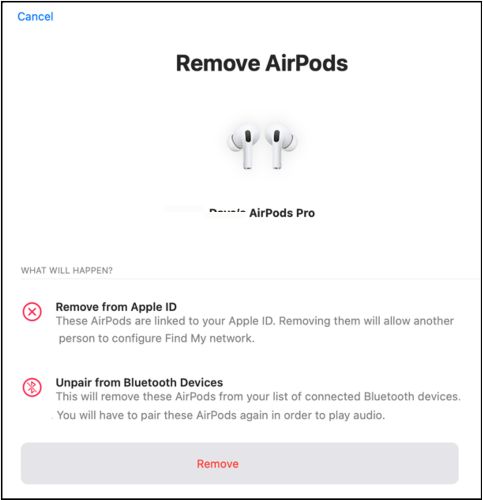
Step 1. Open the Find My app on your iPhone. Once you’re in, tap the Devices tab at the bottom.
Step 2. From the list of your devices, select the target AirPods.
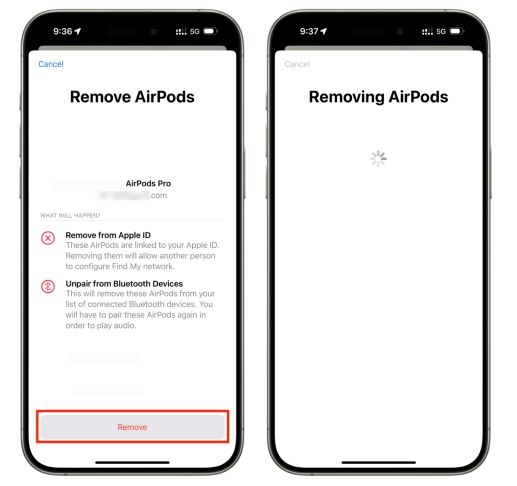
Step 3. Scroll down and look for the Remove This Device option. Tap it.
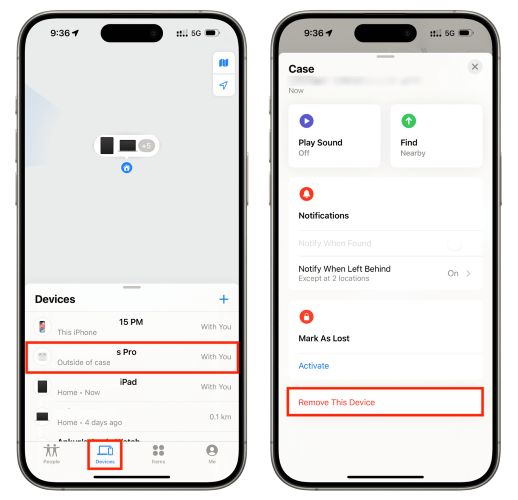
Step 4. A confirmation message will appear. Tap Remove again. Wait for 15 to 20 seconds.
And that’s it. Your AirPods are now free from your account. You’ll have to pair them again to play audio.
How to Remove AirPods from Apple ID Without iPhone
You can also disconnect and remove your AirPods from your Apple account using a Mac or any standard browser on an Android phone, an iPad, or a regular computer. Here’s how you can do it.
Way 1. Via Mac
On Mac, the process is the same as iPhone. When you use Find My app and it will also lead to the same result: your AirPods will be removed from your Apple ID and unpaired from every other Apple device under the account. Still, here’s how to do it clearly, step by step:
Once again: make sure your AirPods are within Bluetooth range, place them inside the case and keep the lid open.
Step 1. Launch the Find My app on your Mac. Select the Devices tab from the top bar.
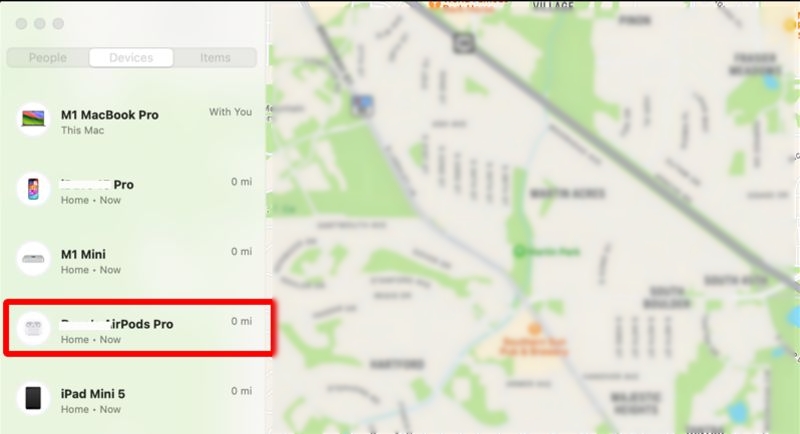
Step 2. Control-click on the AirPods whose Apple ID you want to delete. A context menu will appear. Choose Remove This Device.

Step 3. In the usual warning message, hit Remove at the bottom to continue.
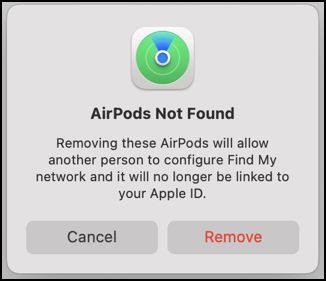
Step 4. The screen will briefly switch to a “Removing AirPods” loading state. In testing, this part took up to two minutes. Be patient and let the process finish completely.

Step 5. Once done, another message might appear: AirPods Not Found. Don’t worry. This just confirms that your AirPods were removed and can now be set up by someone else. Tap Remove again.
From here, your AirPods will no longer show up on any other device. You’ll need to pair them again if you want to reconnect and anyone else can now add them to their own Find My network.
Way 2. Via iPad/Android/Browser
Unlike removing AirPods using your iPhone or Mac, the iCloud method comes with its own catch: you can’t remove AirPods from your Apple ID while they’re actively online and connected. To make your AirPods offline, you must first forget the AirPods from every Bluetooth device they’re linked to. This includes iPhone, iPad, Mac or devices that’s still remembering the AirPods.
Follow these steps to unpair AirPods from all connected devices and remove them from your Apple ID using iCloud.
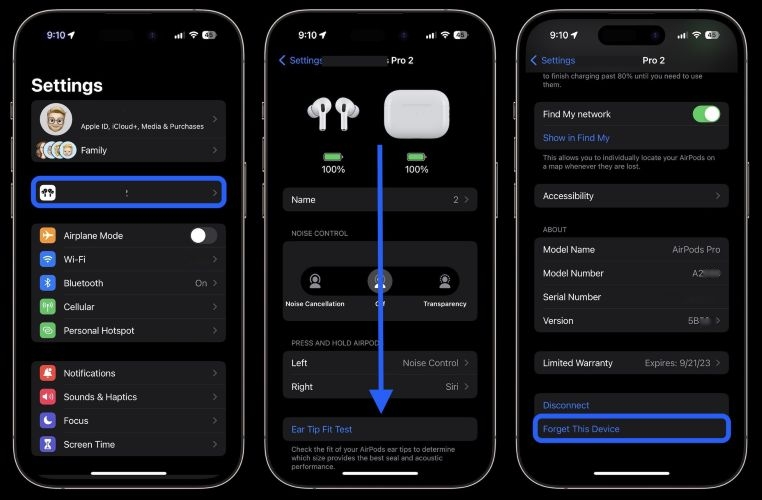
Step 1. Go to Settings on your iPhone, tap the AirPods banner that appears right below your name. Scroll down and select Forget This Device.
On Mac, you can do the same from System Settings > Bluetooth, click the (i) and then forget.
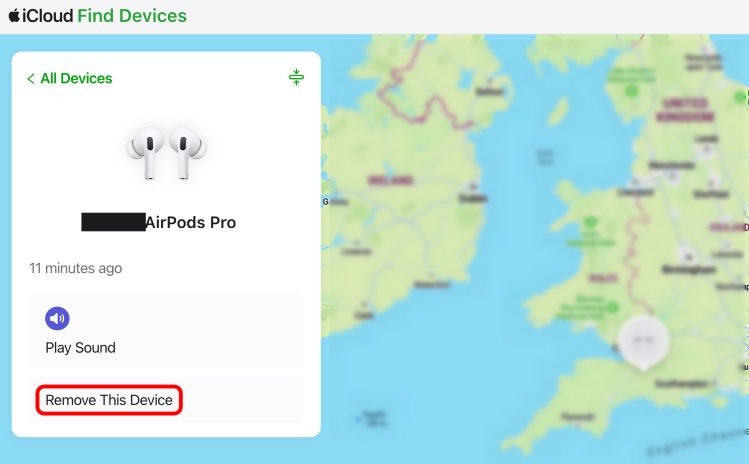
Step 2. Head to iCloud.com/find on your computer or mobile browser. Enter your Apple ID and password to login.
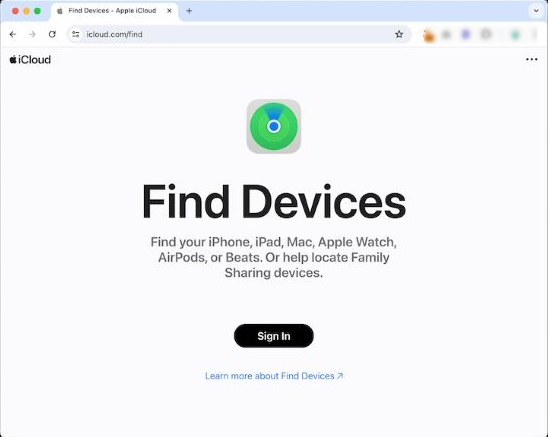
Step 3. Click All Devices at the top-left to expand the list. Then, select the AirPods name to open the detail screen.
Step 4. Click Remove This Device. iCloud will ask for a final confirmation. Even though the AirPods are offline now, this action removes them from your Apple ID entirely. Confirm by clicking on Remove on any prompts.
The AirPods are now free. They’ll no longer show under your Apple account. Anyone else can pair them as new or you can set them up again on your own device.
Can You Remove AirPods from Apple ID Without Previous Owner?
Well, the answer depends. If Find My AirPods is on, you need to ask for its previous owner to remove the second-hand AirPods from their Apple ID by following the steps above. If Find My AirPods is off, then you can directly factory reset the used AirPods without concerning about iCloud Activation Lock. Next,we will show you how to restore AirPods step by step.
Steps to Factory Reset AirPods
Here’s a breakdown that covers every model group. Let’s start with the classic ones first.
AirPods 1, 2, 3 and AirPods Pro (1st & 2nd Gen)
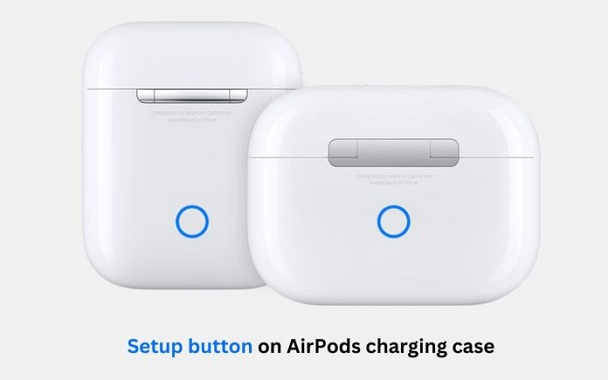
Make sure the AirPods are resting inside the case and keep the lid open.
- Now, flip the case around and find the small circular button on the back.
- Press it down and hold on about 15 seconds.
- The status light should first blink in amber and then switch to white.
You’ve successfully removed the previous owner’s Apple ID. And your AirPods are free to pair with any device like they were brand new.
AirPods Pro (USB-C), AirPods 4 (All Models)
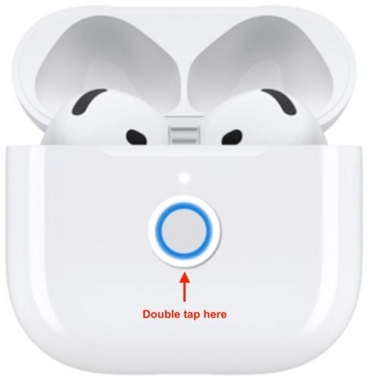
Start by opening the lid of your charging case while keeping the AirPods inside. Make sure the case has some charge and the status light is visible.
- Now, when the white light flashes, gently double-tap the front of the case.
- Wait for the light to change. Then double-tap again when the white light flickers.
- And finally, tap a third time as soon as it blinks amber. Once it fades back into a steady white glow, you’ll know the reset is done. Your AirPods are now ready to be paired like new.
Reset AirPods Max to Factory Settings
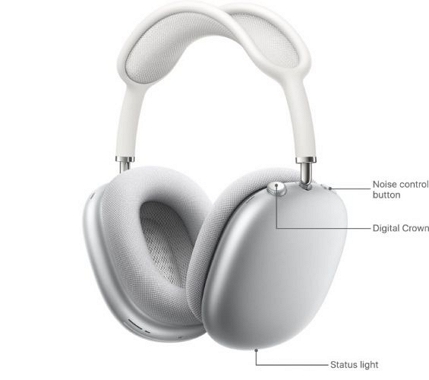
Start by giving your AirPods Max a short charge—just enough to wake them up. To reset:
- Press and hold the noise control button and the Digital Crown button on the left earcup at the same time.
- Within a few seconds, the status LED will flash amber. Keep holding the buttons until it shifts to a flashing white. That’s your signal: the reset is complete.
This process wipes out the previous iCloud pairing and returns the headphones to factory state.
Bonus One: How to Remove iPhone/iPad from Apple ID Without Previous Owner
If you bought a used iPhone or iPad but found that it’s still signed in with its previous owner’s Apple ID, you can check whether Find My is enabled in the Settings app first. If Find My iPhone/iPad is disabled, then you can restore your iDevice to remove the current Apple ID from it. If Find My feature is on, then you need to contact the old owner for help. This is because iCloud Activation Lock will appear after resetting an iDevice with Find My on.
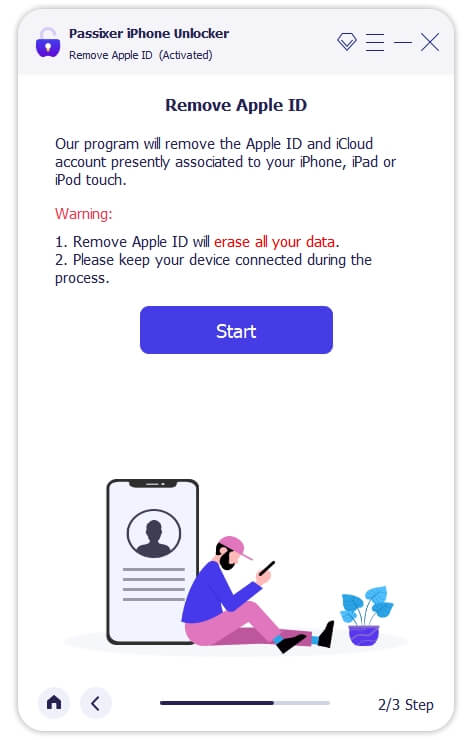
However, you aren’t always lucky enough to reach the previous owner. At this time, you can try Passixer iPhone Unlocker, a multifunctional iPhone unlocking tool. It can remove Apple ID from a second-hand iDevice without Apple ID and even when Find My feature is enabled. After removal, your iDevice won’t be stuck on iCloud Activation Lock. Instead, you can sign into your device with a new or your own Apple ID.
Steps to Remove iDevice from Apple ID Without Password and Previous Owner
Step 1: Get Passixer iPhone Unlocker on your Windows or Mac device and then run the software. Then use a USB cable to connect your iPhone or iPad to the computer.
Step 2: Choose Remove Apple ID from the software screen.

Step 3: Hit Start. The following steps are vary, depending on your iOS versions and Find My status.
Case 1. Find My is off
If Find My is disabled on your iDevice, Passixer will begin Apple ID removal after clicking Start.
Case 2. Find My is enabled [iOS 11.4 Earlier]
Reset your device settings by following the steps on the software screen. After that, the Apple ID removal process will start itself.
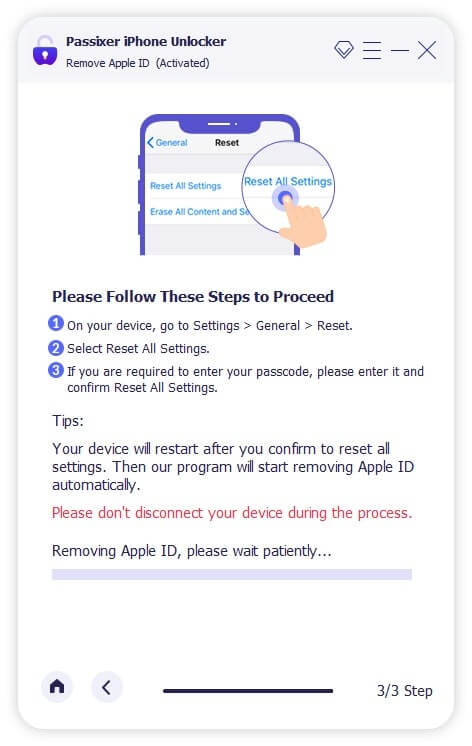
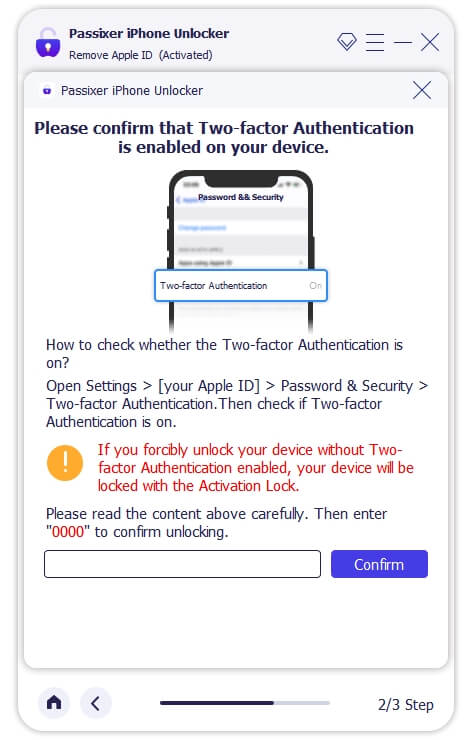
Case 3. Find My is enabled [iOS 11.4 and Later]
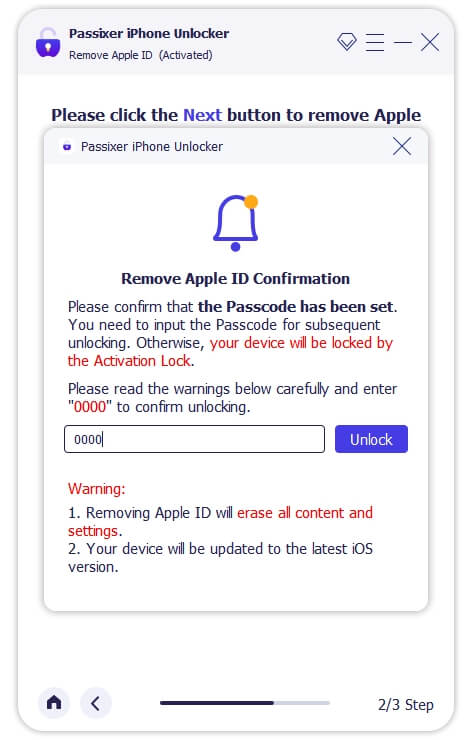
- Follow the onscreen guide to set a screen passcode and enable 2FA for your Apple ID. Once you are done, type 0000 and click Confirm to move on.
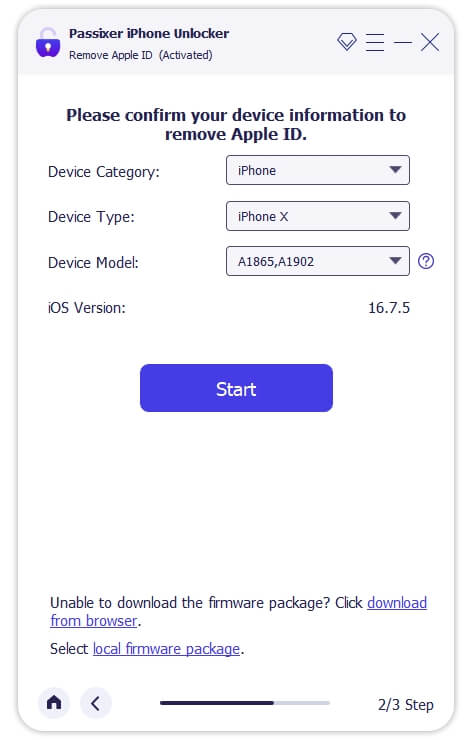
- Ensure the device info is correct on Passixer screen and click Start to download the required firmware package.
- Finally, enter 0000 and hit Unlock to make Passixer remove the Apple ID from iDevice for you.
Bonus Two: How to Connect AirPods to Apple ID
There are two ways to connect your AirPods to your account.
First is the pop-up animation method: when you use the setup card that appears on your iPhone screen, the AirPods get linked to your Apple ID directly. So, they will be added to your iCloud account and register with your Find My network automatically.
Or, you can connect them through the manual Bluetooth method. However, this method doesn’t register them to iCloud. It works more like regular headphones (like how you’d pair it with an Android phone).
Here’s how to start the pairing process with your iPhone or iPad using the setup card:
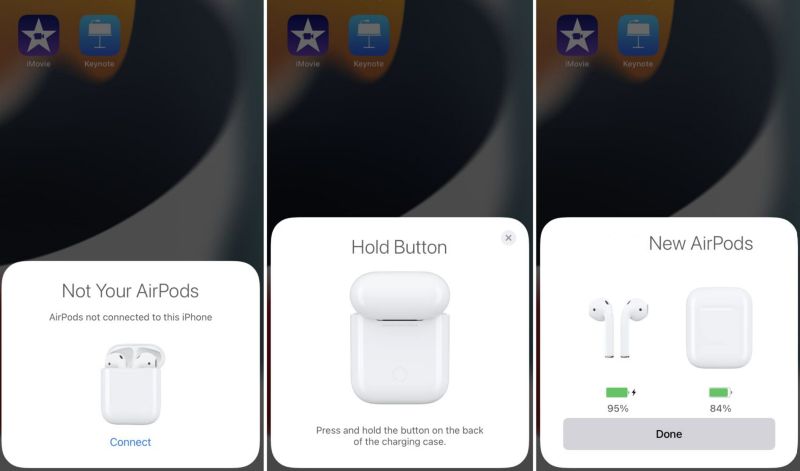
Step 1. Place your AirPods inside the charging case and open the lid. There should be a white light on the case.
Step 2. Unlock your iPhone and turn on the Bluetooth. In a moment, you should see a setup card slide up on your screen, tap the big Connect button when it does.
Step 3. Your iPhone will detect the AirPods shortly and show a screen to walk you through the rest.
Step 4. Tap Done to finish.
That’s about it! Your AirPods are officially paired with your Apple ID. And they will start working seamlessly across your other Apple devices.
FAQs
A lot of users have confusions when it comes to pairing second-hand AirPods. So, here are a few FAQs to tackle the most common questions.
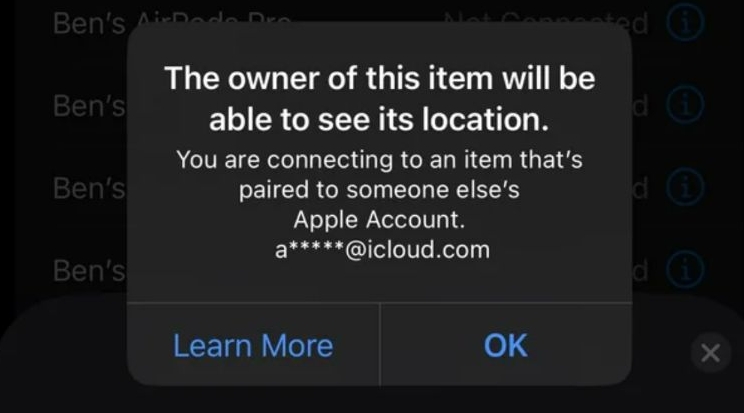
If I Connect to Someone Else’s AirPods, Can They See My Location?
If you connect the AirPods to your device via Bluetooth and the AirPods are already linked to an Apple ID with Find My enabled, then your location may be visible to the owner of that Apple ID.
Can’t Remove AirPods from Apple ID, How to Fix?
When you try pairing the AirPods after a factory reset and see a message like “This device is linked to another Apple ID” instead of a connect button. This means they’re still locked under the old Apple ID. This usually happens when the previous owner hasn’t properly removed the AirPods from their Find My network. At that time, you need to require help from its previous owner to completely disconnect the AirPods from their Apple ID.
Wrap Up
Now that’s a complete guide: you’ve learned how to remove AirPods from your own or someone else’s Apple ID and they’re out for good, no matter the device you want to use for the process. We also share you Passixer iPhone Unlocker that enables you to remove second-hand iPhone/iPad from Apple ID without previous owner and password.