
Updating your app in the iPhone App Store but being asked to enter the password for a different Apple ID? You might be wondering why the App Store is using the wrong Apple ID at that moment. The most common reason is that the app was installed with an Apple ID different from the one currently signed in to the App Store. This could happen when you’re using a second-hand iPhone or a new Apple ID. Regardless of your case, you can find workable solutions in this troubleshooting guide.
Tip: Apple ID has been renamed to Apple Account.
Way 1. Sign into App Store with Wrong Apple ID
Sometimes, the wrong Apple ID might be the old one you used before. If you still have access to that Apple ID, you can sign in to the App Store with it and update the app. Here’s how to change the Apple ID in the App Store to update apps.
Step 1: Access Settings on your iPhone.
Step 2: Tap your Apple ID name at the top screen.
Step 3: Next, select Media & Purchases.
Step 4: Select Sign Out from the pop-up.
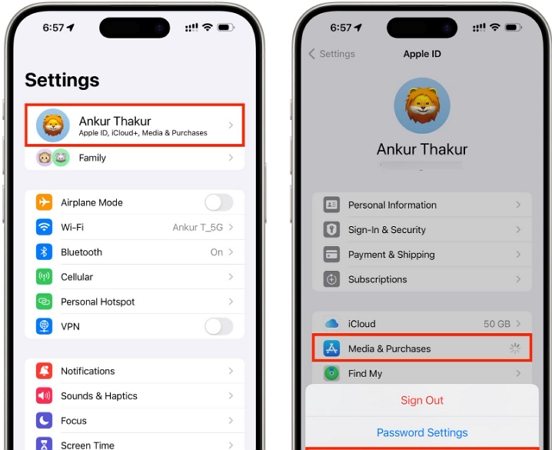
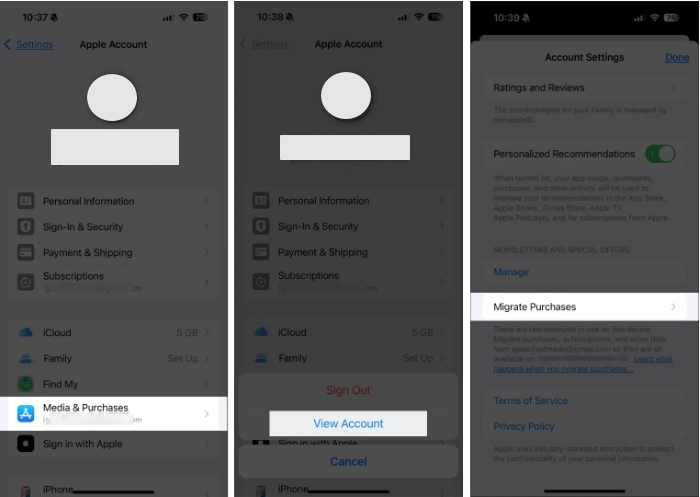
Step 5: Tap Media & Purchases again. Next, choose Not [the current acount name] and enter the old Apple ID email. Now, you can update the app without any problems.
Way 2. Reinstall Apps with New Apple ID
It’s inconvenient to repeatedly sign in to Media & Purchases with your old Apple ID just to update apps. Instead, consider reinstalling the app using the current Apple ID signed in to the App Store or Settings.
Below, we have some of the basic and advanced solutions to fix the wrong Apple ID error message you are seeing when updating an app on your iPhone:
- Ensure your App Store is signed in with the Apple ID you want.
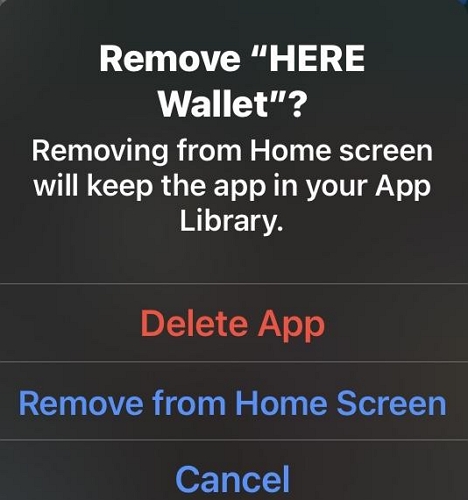
- Long press the app you want to remove until your screen starts to wiggle. The following screen will come up:
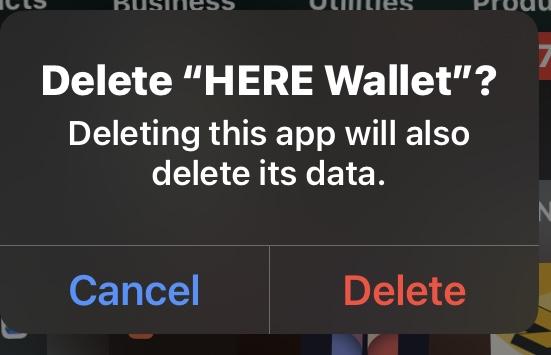
- Tap on the – sign next to the app you want to delete and select Delete App.
- Next, click on Delete to confirm and proceed with uninstalling the app from your iPhone.
- Launch App Store and search the name of the app you recently deleted.
- Click on the Download icon to install the app and then wait patiently until the download is completed. Once completed, the app will be updated.

Way 3. Remove Wrong Apple ID from iPhone
If the app you want to update was installed with the same Apple ID as the one in Settings, you can sign out of it in entire Settings. This way, you can install it again with a new Apple ID. The steps are different depending on whether you have access to the wrong Apple ID or not. Next, we will introduce these two situations separately.
Option 1. With Apple ID Password
If you have the Apple ID password, simply follow the steps below.
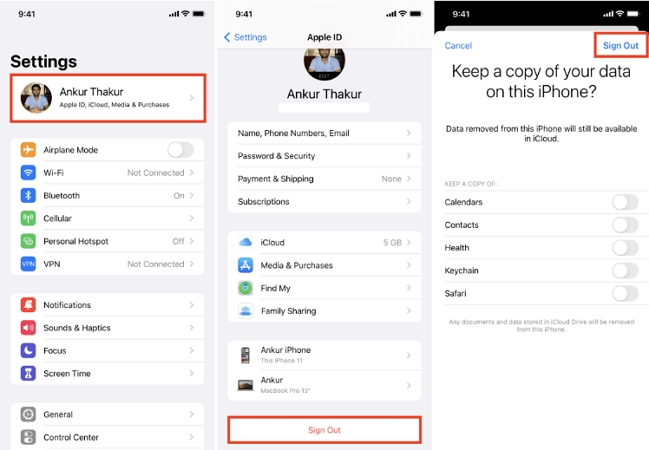
- Go to Settings.
- Tap your Apple ID name.
- Scroll down to the bottom screen. Next, tap Sign Out and follow the onscreen guide to complete the log out process.
Option 2. Without Apple ID Password
If you don’t know the Apple ID password because your device is a second hand one or you fail to reset your forgotten Apple ID password. You need a professional iOS unlocker like Passixer iPhone Unlocker to come to your rescue in this case. This software offers the ultimate solution to remove an Apple ID from iDevices without needing the Apple ID credentials, regardless of whether Find My is enabled or not. After removal, you can sign in to your iPhone with a new Apple ID and install apps without encountering update issues. In addition to Apple ID removal, it can also help you remove a forgotten screen passcode, malfunctioning Face ID, unknown Screen Time passcode, and more from your iPhone, iPad, or iPod.
Key Features
- Unlock your iDevice without passcode, Face ID or Touch ID.
- Bypass iCloud Activation Lock from your second hand iPhone without previous owner and Apple ID password.
- Remove Screen Time Restrictions within a few clicks without losing data.
- Get into your MDM-locked iPhone/iPad without user name and password.
Steps to Remove Apple ID Using Passixer
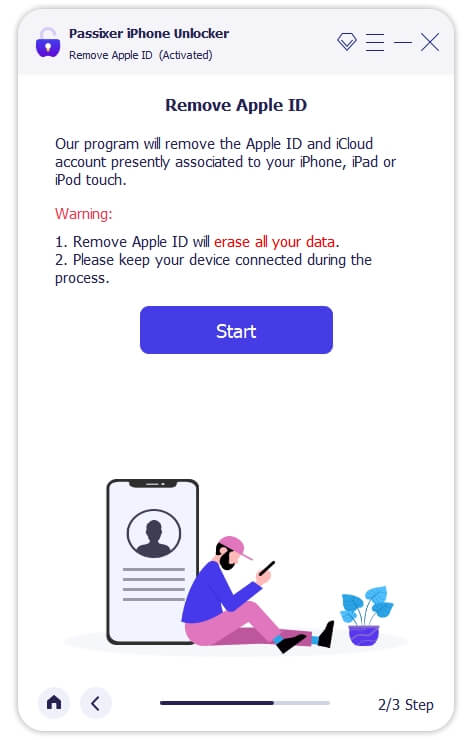
Run the Passixer software after installing it from the official website and then follow the steps below to remove Apple ID from your iPhone/iPad:
Step 1: Select Remove Apple ID to proceed.

Connect the iPhone with Apple ID problems to your computer with the help of a certified USB cable. Once the device is detected, you get the confirmation screen below:

Step 2: Click on the Start button on the subsequent screen and Apple ID removal will start if your device has Find My disabled for it.
However, if Find My is turned on, then you have to apply the stepwise guide underneath the conditions below:
Condition 1. Find My is ON (iOS 11.4 or Older)
You have to perform a quick reset on the device and that can be completed using the guide below:
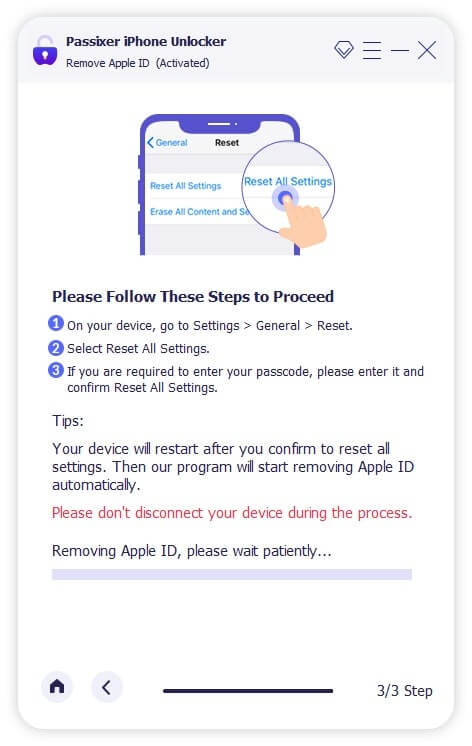
- Hit the Settings icon, then tap on General on the next screen that appears.
- Select Reset to proceed.
- Now, click Reset All Settings. After that, Passixer will begin the Apple ID removal from your device.
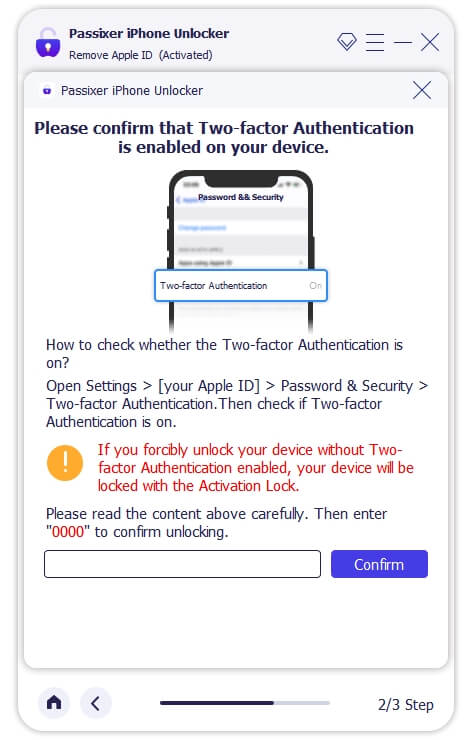
Condition 2. Find My is ON (iOS 11.4 or Later)
- Make sure you have 2FA and screen passcode enabled on your iPhone. Once confirmed, the following screen will come up:
- Next, enter 0000 in the empty space provided and click on Confirm.
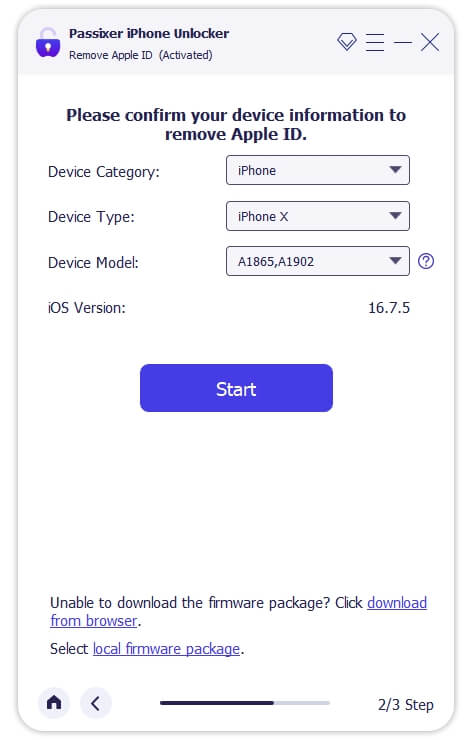
- On completing the above, Passixer will display some information about your device, just like below:
- Tap on the Start button to download the right firmware to remove Apple ID from the iPhone.
- When the download is successful, proceed to the empty space provided on the subsequent screen and input 0000, then click Unlock.
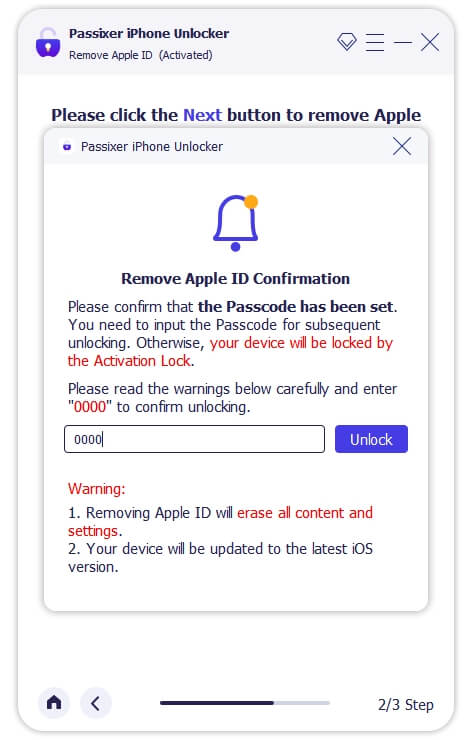
Passixer will commence the Apple ID removal from the device with the underlying issue.
Way 4. Factory Reset iPhone
Restoring your iPhone to factory settings will erase all your personal data and settings from the device, including the wrong Apple ID. However, it’s recommended to use this method only if you know the Apple ID password or Find My iPhone is disabled. This is because iCloud Activation Lock will be triggered after factory resetting an iPhone with Find My enabled.
Option 1. Use Erase All Content and Settings Feature
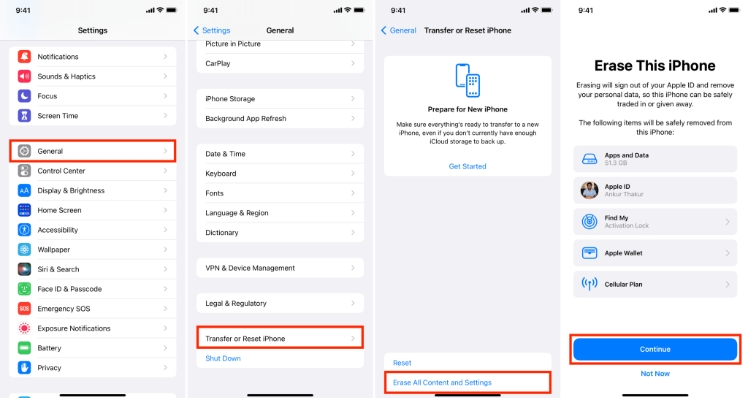
Step 1: In the Settings app, choose General and select Transfer or Reset iPhone.
Step 2: Choose Erase All Content and Settings.
Step 3: Tap Continue.
Step 4: Input your iPhone passcode if asked. Then, confirm your operation by hitting Erase iPhone.
Option 2. Use iTunes/Finder/Apple Devices App
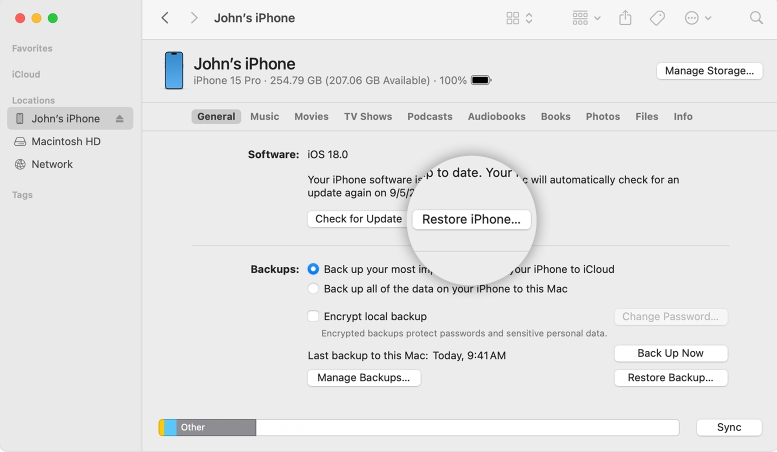
Step 1: Run iTunes or Apple Devices on your Windows PC or open Finder on your Mac.
Step 2: Connect your iPhone to the computer with a certified USB cable and locate your iPhone in the iTunes/Finder/Apple Devices app.
Step 3: Click Restore iPhone.
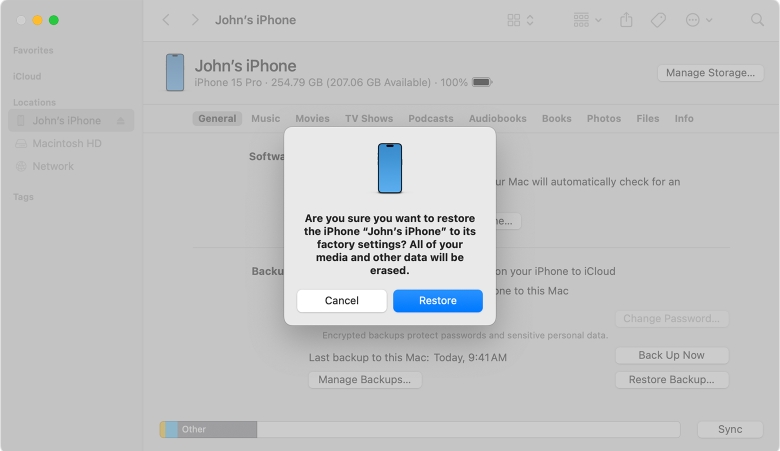
Step 4: Hit Restore to begin the restoration.
Way 5. Update iOS
If you are running your iPhone on an older iOS, it may trigger the wrong Apple ID verification prompt to appear. Performing a quick update on the iOS version would help resolve the issue and that can be done following the stepwise guide below:
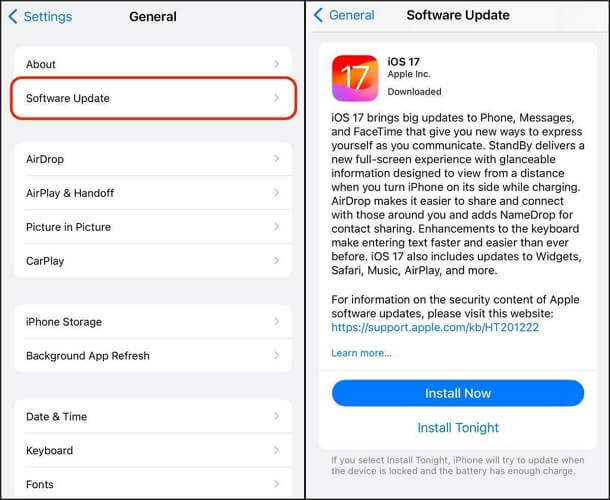
- Tap on the Settings icon on your home screen.
- Scan through the options displayed and hit the General icon once found.
- Select Software Update on the subsequent screen.
- Wait for your iPhone to confirm if there’s an update to install. Once done, click on Download and Install to update your iOS to the most recent version.
Note: Make sure you are connected to a stable and reliable internet service before performing this update to avoid interruption.
Conclusion
Now you can tell why your iPhone or iPad displays the wrong Apple ID when updating an app, plus the best solutions to resolve the issue. We did look at the reason why the error could pop up on your iPhone and the top 5 ways to resolve it. Select the technique that suits you and start updating apps without hassles. When you want to remove Apple ID from your iOS device without password, don’t hesitate to try Passixer iPhone Unlocker, a specialized Apple ID remover.