
Based on our testing, the iCloud DNS bypass method only works on iOS 8–10, with a success rate of around 30%. Therefore, if you are using an iPhone from the iPhone 4s to the first‑generation iPhone SE, you could give this way a try.
When searching for ways to bypass iCloud Activation Lock on iPhone, DNS bypass often appears as a popular way. So, does it actually bypass iCloud Activation Lock and how does it work? More importantly, is iCloud DNS bypass compatible with your iPhone? In this real‑world test guide, we break these questions down step by step and share a more stable and effective alternative for bypassing iPhone Activation Lock. Let’s dive in.
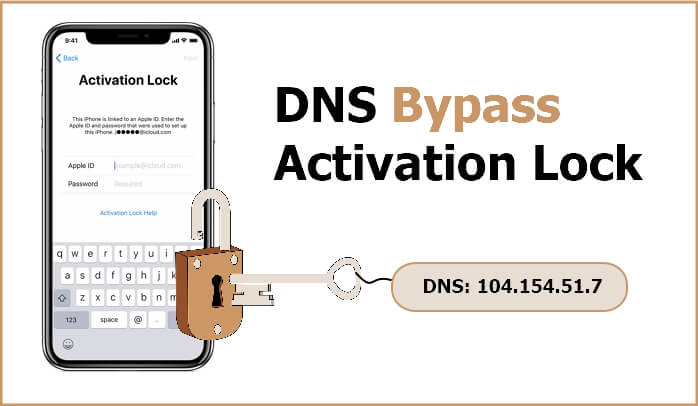
Overview of iCloud DNS Bypass
Before checking whether iCloud DNS bypass works on your iPhone, it is recommended to first understand how this method works and whether it is safe to use.
How Does DNS Bypass Activation Lock
DNS bypass is a clever trick that redirects your iPhone connection from Apple’s servers to a third-party server. This allows you to temporarily access a device stuck on iCloud Activation Lock, even if you don’t have the Apple account and password. However, after bypassing, you will only be able to access the browser on your iPhone and will not be able to reach the home screen.
Is It Safe to Bypass iCloud Lock via DNS
The answer depends. Actually, the security largely depends on the DNS address used for iCloud bypass. Since these DNS addresses are public and managed by third parties, they may be maliciously modified and redirect you to unsafe websites through the browser accessed after the iCloud bypass. In addition, the DNS provider may be able to see your browsing history through DNS requests.
Does iCloud DNS Bypass Still Work in 2026: Answer Based on Real Tests
Now let’s move on to the part you may be most concerned about: is iCloud DNS bypass still working today? Simply put, does DNS bypass work on the latest iPhone models? We are also curious about the answer. Therefore, we tested it across different iPhone models and iOS versions and here are the results.
Our Testing Experience
As you can see from the testing results above, this method does not work on recent iPhone models or iOS versions. When we tried it, the iPhone remained on the Activation Lock screen without any changes. Also, although we succeeded once on an older iPhone 5c, the process was somewhat troublesome.
Our Summary and Recommendations
If you only want to check whether your old iCloud‑locked iPhone can connect to the network, you may use iCloud DNS to access the browser and perform a simple online test. However, if your goal is to bypass iCloud Activation Lock on your iPhone, DNS redirection is not recommended for the following reasons.
- It is only a temporary way to access the iPhone browser, not the home screen or other features.
- The process is lengthy.
- It is not safe to use and only works on older iPhones, with a low success rate.
- Once you power off or lock the screen, you need to repeat the entire process again.
How to Perform DNS Bypass iCloud Activation Lock on Older iPhone
If you still want to give iCloud DNS bypass a try, you can follow the steps below.
After accessing the iPhone browser through the bypass, do not sign in to websites that involve personal information or enter any sensitive data, such as credit card numbers.
DNS Bypass Step-by-Step
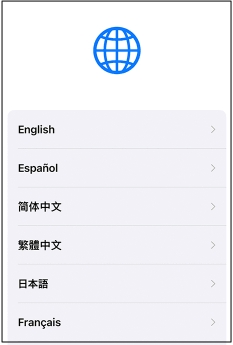
Step 1: Turn on your iCloud-locked iPhone and start the setup process by selecting your language and country.
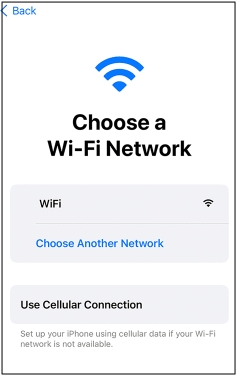
Step 2: When prompted to connect to a Wi-Fi network, choose the network.
Step 3: Tap the “i” icon next to the WiFi. Select “Forget this Network” to disconnect from Wi-Fi.
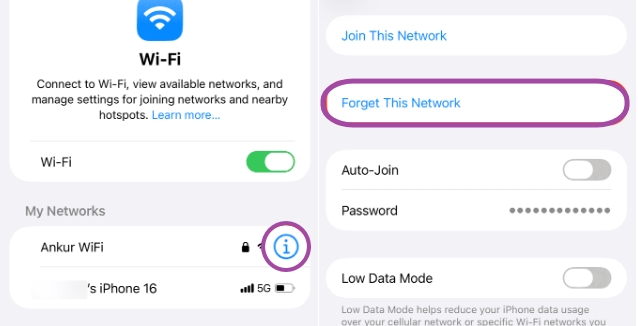
Step 4: Tap the “i” icon again, then select “Configure DNS”.
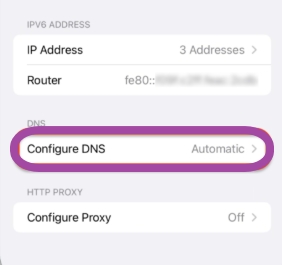
Step 5: Choose “Manual” and enter a DNS server IP according to your region:
- USA: 104.154.51.7 (Status when we test: Active)
- Europe: 104.155.28.90
- Asia: 104.155.220.58
- Australia & Oceania: 35.189.47.23
- Other regions: 104.155.28.90 (Status when we test: Active)

Step 6: Tap “Save” and reconnect to Wi-Fi. When the activation screen appears, press “Back” to avoid entering iCloud credentials.
Step 7: Scroll to the bottom and tap “Activation Help” to access apps, music, and internet functions.
Alternative Ways to Bypass iCloud Activation Lock Without DNS
In this section, we introduce three methods to bypass iCloud Activation Lock without using DNS. You can try the method that suits your situation best. Before proceeding, make sure to understand the pros and cons of each method.
If you can’t use your Apple ID or password to bypass iCloud Activation Lock because your Apple account is locked or the password is forgotten, it’s recommended to unlock your account and reset the password first. Here are two posts for your reference.
Reset Apple ID Password
Unlock Apple ID
Way 1: Unlock Using Screen Passcode
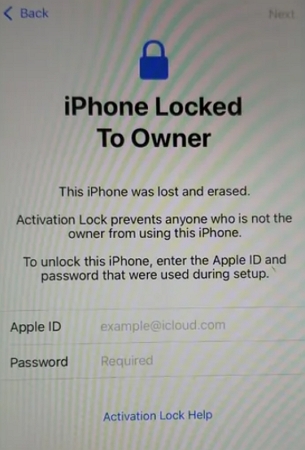
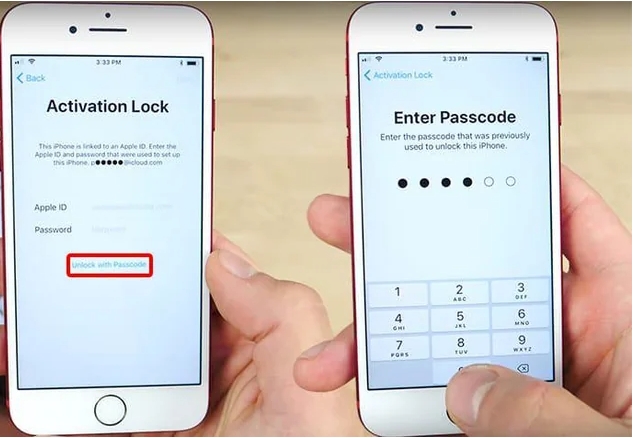
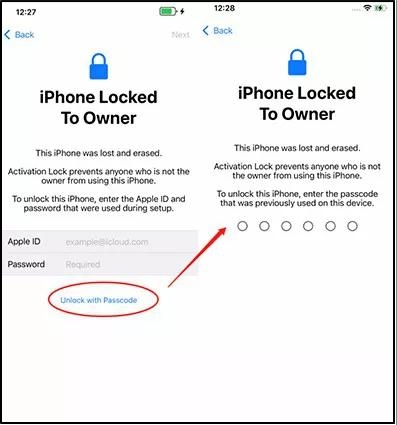
If your device displays the “Unlock with Passcode” option on the iCloud lock screen, you can bypass the Activation Lock using your screen passcode. Simply tap “Unlock with Passcode” and enter your device passcode.
On older iOS versions, the interface looks like this:
On newer iOS versions, the Activation Lock screen displays the option as follows:
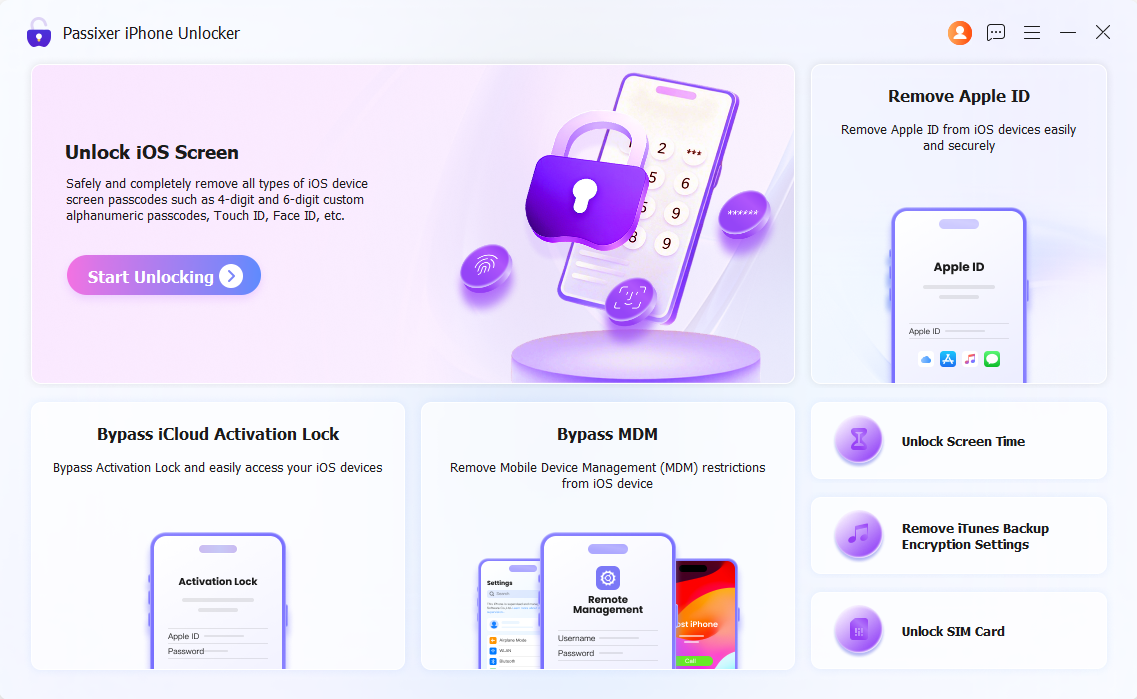
Way 2: Bypass with Desktop Software
If you don’t have the Apple ID credentials or screen passcode required to remove Activation Lock, you can choose to bypass iCloud Activation Lock with Passixer iPhone Unlocker. Compared with the DNS bypass way, Passixer offers a click-through bypass process that allows you to access your iPhone and use features such as web browsing, app downloading and taking photos after the bypass. Moreover, Passixer helps you avoid potential security risks associated with DNS bypass, such as browser hijacking or malicious redirection. The table below provides a detailed comparison between the iCloud DNS bypass method and Passixer iPhone Unlocker.
Steps to Bypass iPhone Activation Lock with Passixer
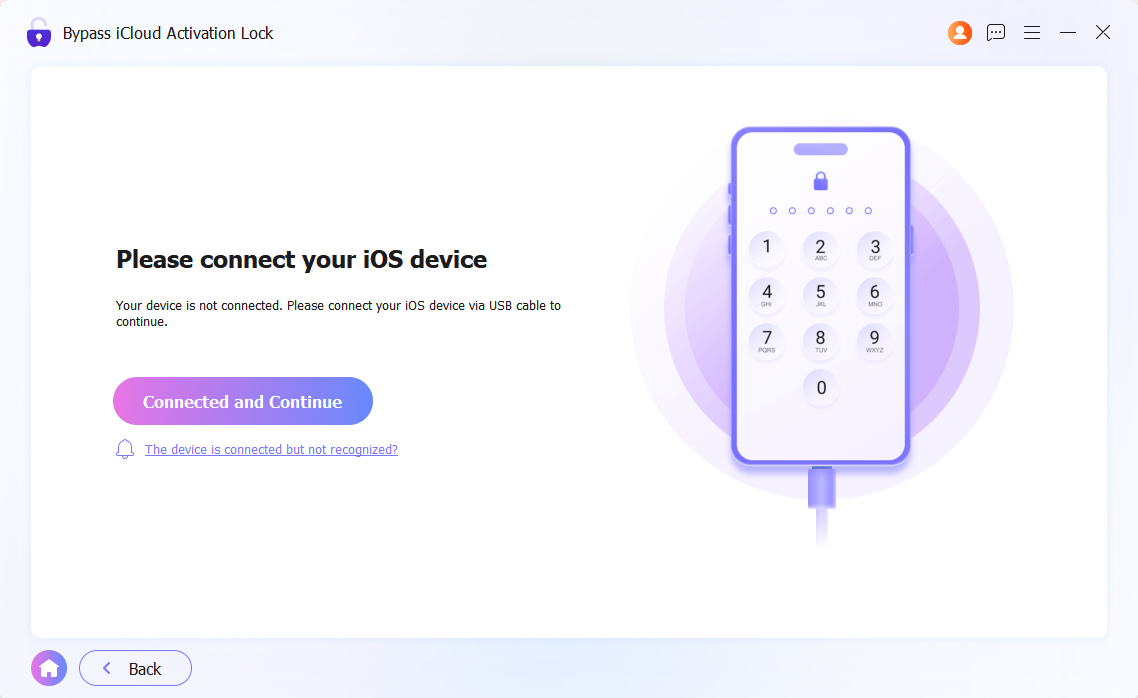
Download and install Passixer iPhone Unlocker on your Windows PC or Mac. Open the program and choose the Bypass iCloud Activation Lock option from the main interface. Then connect your iPhone or iPad to the computer using a USB cable.
Once your device is connected, Passixer will automatically detect and display the device information. Check the details and click Connected and Continue to proceed with the iCloud Activation Lock bypass process.
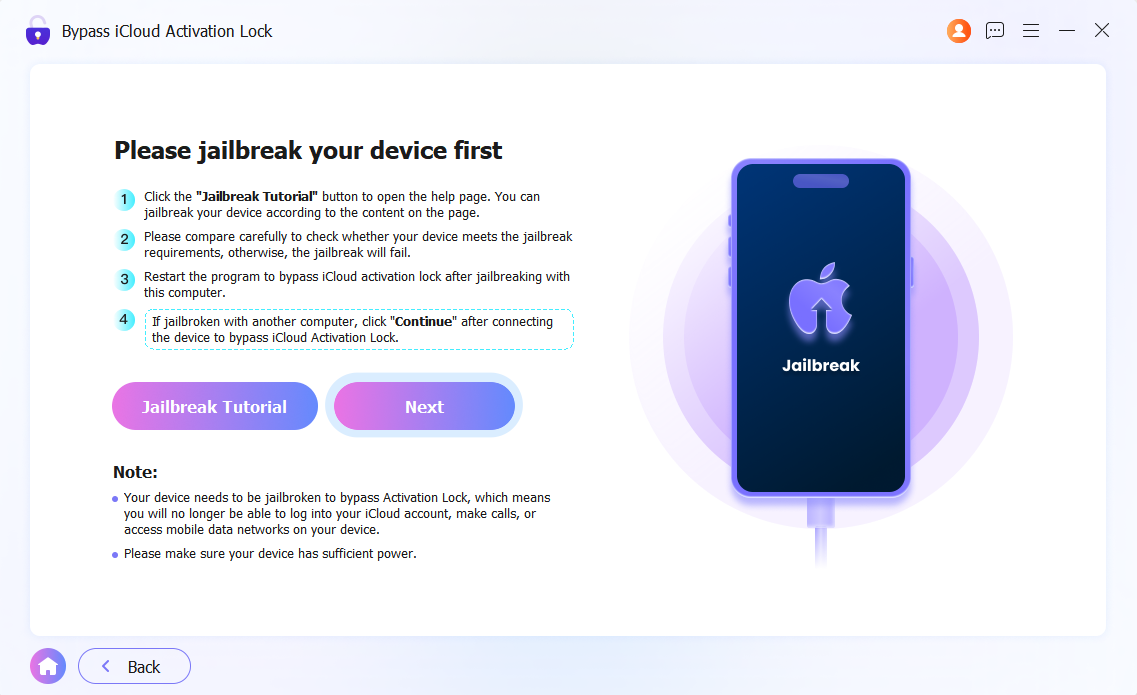
Follow the on-screen instructions to jailbreak your iPhone or iPad. Passixer provides a step-by-step tutorial to guide you through the jailbreak process. Once the jailbreak is completed, click Next to continue.
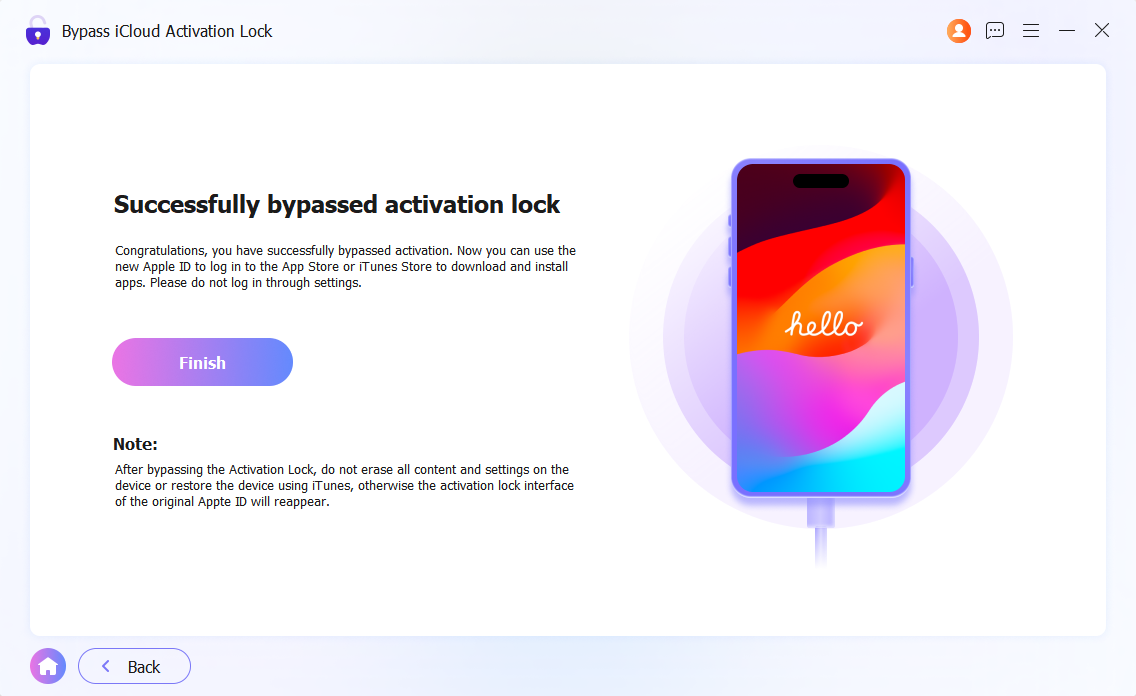
After the jailbreak is finished, Passixer will automatically start bypassing the iCloud Activation Lock. Keep your device connected during the process. Within a few minutes, you will see a success message indicating that the activation lock has been removed.
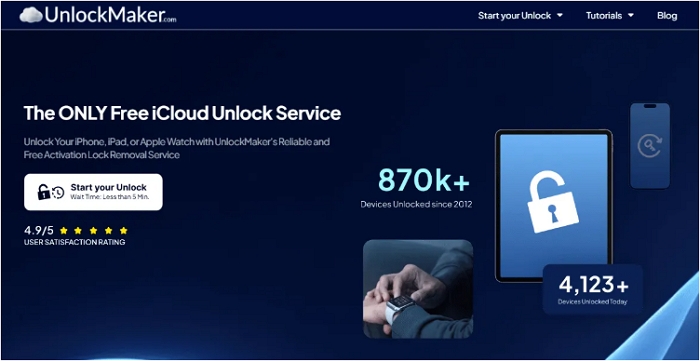
Way 3: Use UnlockMaker Online Tool
UnlockMaker is an online tool that can unlock various locks on iOS devices, including iCloud Activation Lock. It claims to work quickly and is compatible with all iPhone, iPad, and Apple Watch models.
Conclusion
After reading the guide above, you’ll find that DNS bypass is not a true way to remove iCloud Activation Lock. It only allows you to access a limited browser interface on an iCloud‑locked iPhone, rather than the home screen or full features. If you need to bypass Activation Lock on your iPhone, you can use the screen passcode or a dedicated unlocking tool like Passixer to regain access to your device.
This is all fake !
I understand how you feel, it can be frustrating when the issue isn’t solved. The methods we shared are meant to help in most common situations, but they may not work for every case. Could you share more details about your specific issue? We’ll do our best to provide a solution that works for you.