
Forgetting your iPad or iPhone password or simply wanting to change it is very common — especially with multiple Apple IDs and layers of security. In this complete 2025 guide, we’ll show you how to reset iPad password, reset iPad/iPhone passcode, and how to change it safely. Whether you’ve forgotten your passcode or want to change iPad/iPhone password to a stronger one, this guide covers every official and alternative solution.
Understand the Difference: Passcode vs. Apple ID Password
Before jumping into methods, it’s important to clarify what you’re trying to reset:
If your iPad shows “iPad Unavailable” or “Security Lockout,” you’re dealing with a passcode issue, not Apple ID.
Part 1. Forgot iPad/iPhone Passcode — How to Reset It
If you can’t remember your iPad’s passcode, you’ll need to erase the device to remove the lock. This section explains how to reset iPad password step by step, including both official Apple methods and professional unlock tools.
Method 1. Reset Forgotten iPad Password via iCloud (Find My)
Use this method if Find My iPad was enabled before your device was locked and you have access to a stable internet connection. iCloud lets you erase the iPad remotely without connecting to a computer.
What you need:
- Find My iPad enabled before it was locked.
- Stable Wi-Fi or data connection.
- Apple ID credentials.
Steps:
Step 1. On another device or computer, go to iCloud.com/find and sign in with your Apple ID.
Step 2. Click All Devices, then select your locked iPad.
Step 3. Choose Erase iPad > confirm.
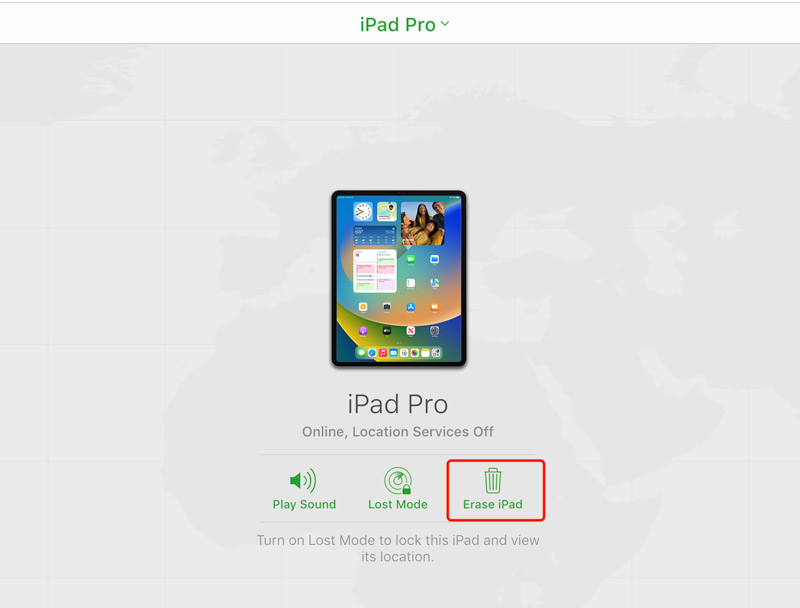
Step 4. Wait for the process to complete. You can then set up your iPad as new or restore from backup.
If your iPad doesn’t appear in iCloud, it means Find My wasn’t enabled — try Recovery Mode instead.
Method 2. Reset iPad Passcode via iTunes (Windows & Older macOS)
If you prefer using a computer, iTunes can reset iPad passcode even without internet.
What you need:
- A computer that has iTunes installed.
- USB cable to connect your iPad.
- Optional: previous sync with iTunes (for smoother detection).
Steps:
Step 1. Connect your iPad to the computer and open iTunes.
Step 2. When your iPad appears, click it > go to the Summary tab.
Step 3. Click Restore iPad > confirm to erase and reinstall iOS.
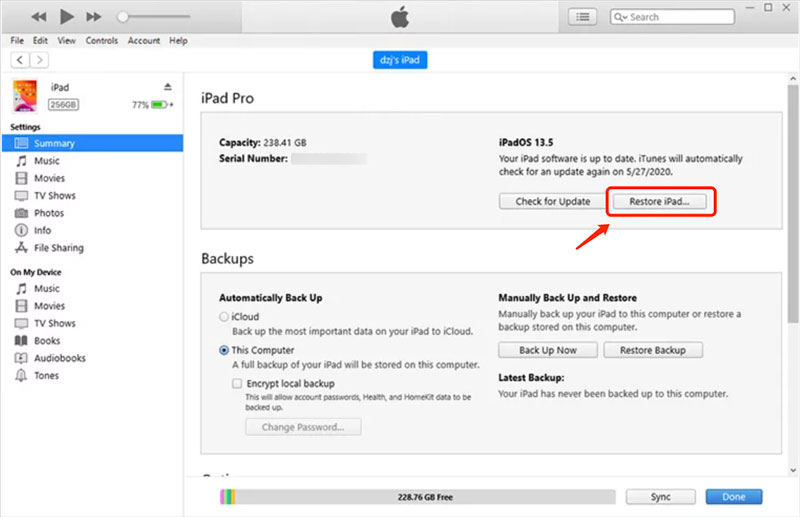
Step 4. Once complete, set up your iPad as new or restore from backup.
Update iTunes to the latest version before connecting. This prevents common “device not recognized” errors.
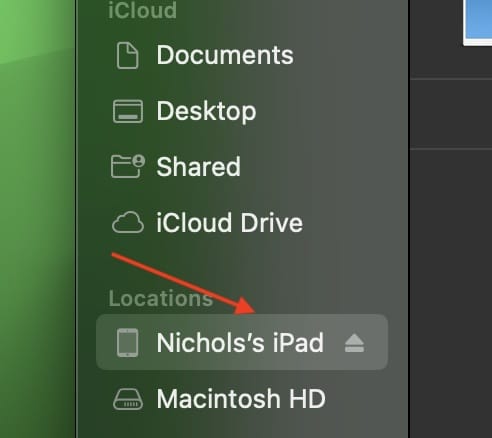
Method 3. Reset iPad Using Finder (macOS Catalina and Later)
For Mac users running macOS Catalina or later, Finder replaces iTunes for restoring your iPad. This method is fast and stable, but requires a trusted Mac connection and “Find My” to be disabled.
What you need:
- A Mac running macOS Catalina or later.
- Finder access and Lightning/USB-C cable.
- “Find My” disabled beforehand (for full restore).
Steps:
Step 1. Connect your iPad to the Mac and open Finder.
Step 2. Under Locations, select your iPad.
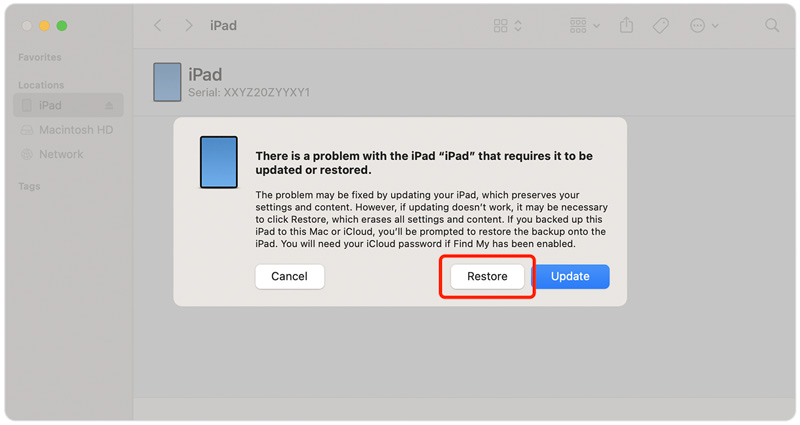
Step 3. Click Restore iPad > confirm to reset it.
Step 4. Wait for the process to complete and re-set up your device.
If Finder doesn’t show your iPad, use a different cable or restart your Mac and try again.
Method 4. Reset iPad via Recovery Mode (No iCloud or iTunes Sync Needed)
Recovery Mode is a reliable choice when your iPad wasn’t previously synced or “Find My” is off. It allows you to restore the device using any computer with iTunes or Finder.
What you need:
- A computer (Mac or Windows) with iTunes or Finder.
- Lightning/USB-C cable.
- The correct button combination for your iPad model.
Steps:
Step 1. Turn off your iPad completely.
Step 2. Enter Recovery Mode:
- Face ID models: Press and hold Top + Volume Up/Down until Recovery screen shows.
- Home button models: Hold Home + Top buttons until the Recovery screen appears.
Step 3. Connect the iPad to your computer.
Step 4. iTunes/Finder will detect it and show a pop-up — choose Restore.
Step 5. Wait until your iPad resets to factory settings.
If you accidentally exit Recovery Mode, restart the process. The screen should show a cable icon pointing to a computer.
Method 5. Use a Professional Unlock Tool (e.g., Passixer iPad Unlocker)
If official methods fail or feel too technical, a reputable iOS unlocker like Passixer iPhone Unlocker can automate recovery mode actions, download the correct firmware, and wipe the screen passcode for you. This approach is user-friendly and often faster, but it requires a computer and will erase the device.
What you need:
- A computer (Windows/Mac).
- Passixer installed.
- Stable connection for firmware download.
Step-by-step: Wipe passcode with Passixer:
Open the app on your computer and select Wipe Passcode (or Unlock iOS Screen) from the main menu.

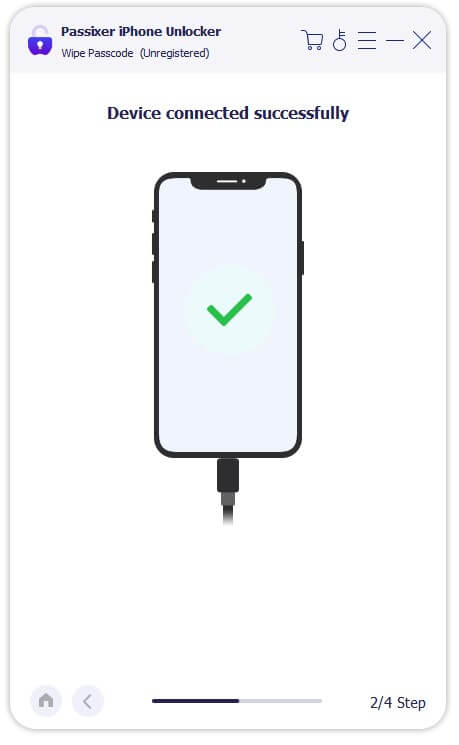
Use a certified cable to connect the iPad. Allow the computer to trust the device if prompted.
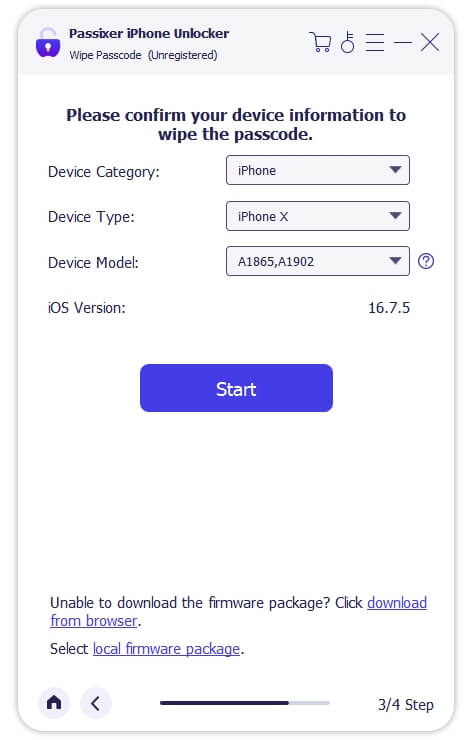
Carefully check the displayed device model and iOS version — they must match. Click Start (or Download) to fetch the correct firmware package. The tool will download the IPSW file automatically.
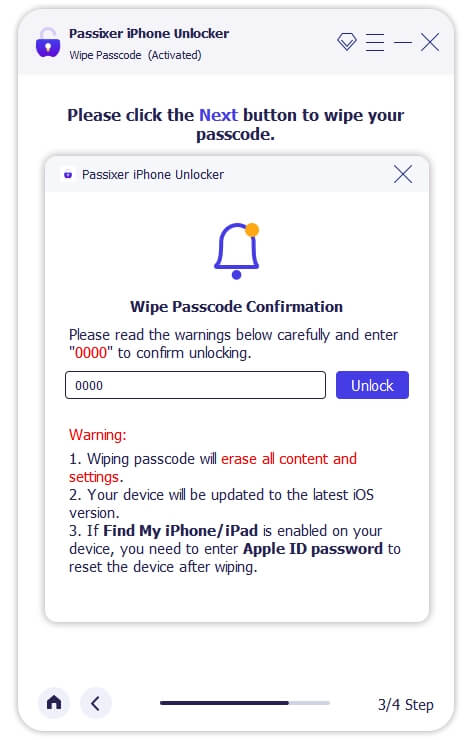
When the firmware is ready, click Next (or Unlock). Enter the confirmation code if prompted (e.g., 0000) and confirm. The tool will flash the firmware and erase the passcode. Do not disconnect the device during this process.
Once complete you should see a success message (e.g., “Wipe passcode successfully”).
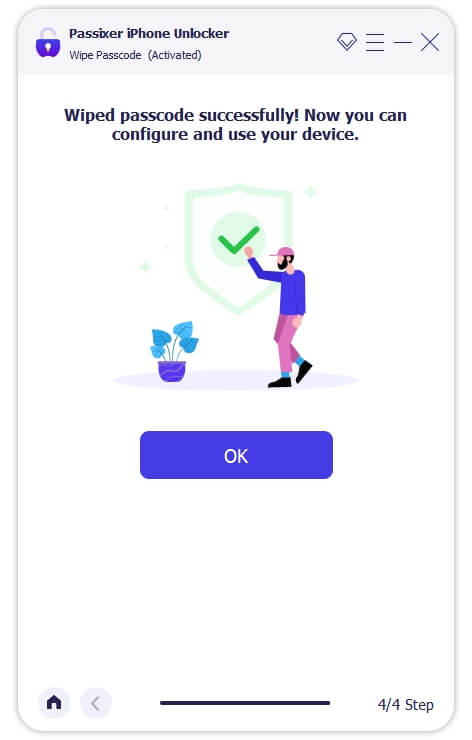
The iPad will reboot to the setup screen. You can now set it up as new or restore from backup.
If Activation Lock appears during setup, follow Apple’s prompts to sign in with the original Apple ID.
If you’re unable to access the original credentials, you may explore Passixer’s “Remove Activation Lock” feature as an advanced solution for supported devices.
Always use the official download from Passixer’s site to avoid fake unlock tools or malware.
Method 6. Contact Apple Support
If your device is activation-locked or none of the above methods succeed, contact Apple Support.
They can help verify your ownership and guide you through unlocking or scheduling an Apple Store visit.
Part 2. Want to Change iPad Passcode (You Still Remember It)
If you remember your current passcode but want to change or strengthen it, there are a couple of ways to do so. The first is through the Settings app (Way 1), which is straightforward and works on almost all iPads. For newer iPads running iOS 17 or later, you can also change the passcode directly from the lock screen (Way 2) if certain conditions are met.
Way 1. Change iPad Passcode in Settings
If you know your current passcode, you can change password on iPad anytime. This strengthens security without losing data.
Steps:
Step 1. Go to Settings > Face ID & Passcode (or Touch ID & Passcode).
Step 2. Enter your current passcode.
Step 3. Tap Change Passcode.
Step 4. Enter your new passcode twice to confirm.
Step 5. Choose Passcode Options to switch between 4-digit, 6-digit, or alphanumeric.
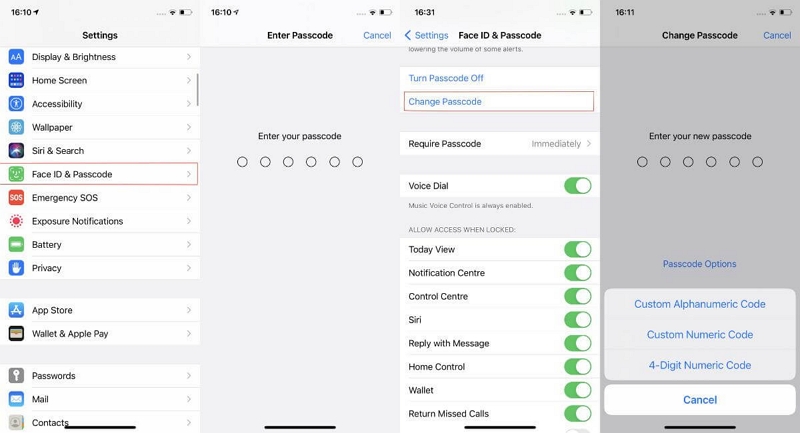
Choose a memorable yet strong combination — avoid birthdays or repeated digits.
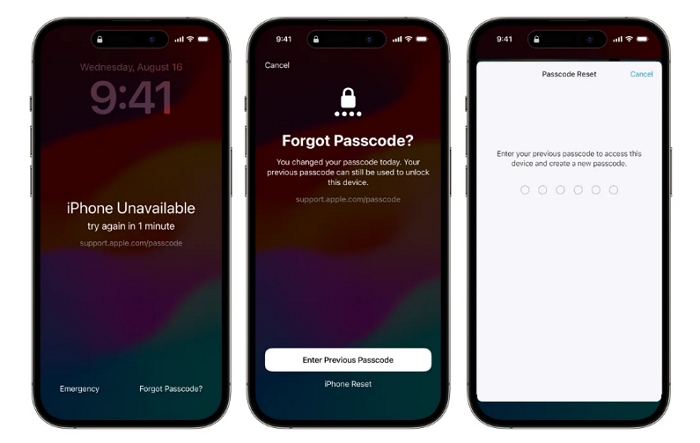
Way 2. Change iPad Passcode from Lock Screen (iOS 17+)
For devices running iOS 17 or later, you can change iPad passcode directly from the lock screen if the passcode was changed within the past 72 hours. You’ll need the previous passcode to proceed. This method is useful if you forgot to update your settings but still remember your old passcode.
Steps:
- Enter the wrong passcode several times until the Security Lockout or iPad Unavailable screen appears.
- Tap Forgot Passcode? at the bottom right corner.
- Tap Enter Previous Passcode when prompted.
- Input your old passcode and follow the on-screen guide to set a new passcode.
Possible Issues & Fixes:
Sometimes, the Change Passcode option may be missing or unavailable. Here are the common causes and solutions:

- iOS glitches or bugs: Reboot your iPad or update iOS to resolve minor issues.
- Screen Time restrictions: Screen Time may prevent changing passcode. Turn off Screen Time to restore the option.
- Stolen Device Protection: If enabled, wait one hour or disable this feature before the Change Passcode option appears.
Part 3. How to Change Apple ID Password on iPad/iPhone
If you want to change my iPad password for Apple ID services:
Steps:
Step 1. Go to Settings > [Your Name] > Password & Security.
Step 2. Tap Change Password.
Step 3. Enter your current passcode, then set a new Apple ID password.
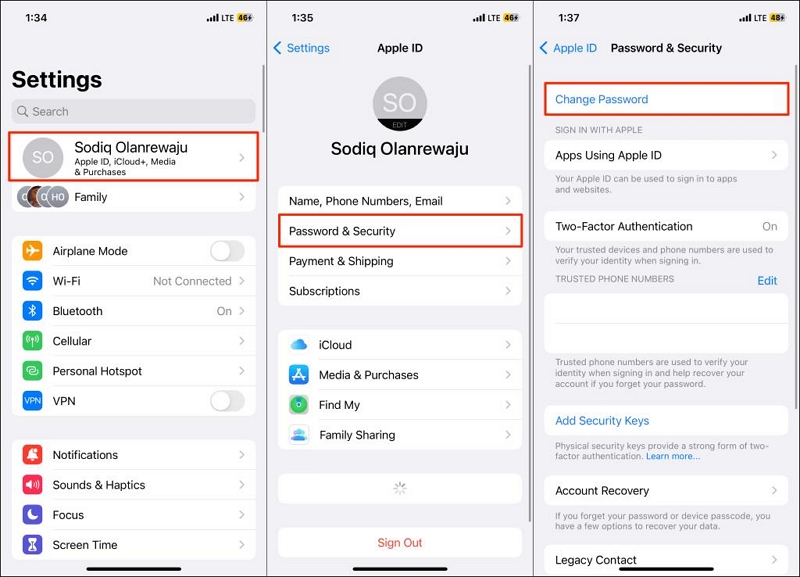
Enable two-factor authentication (2FA) for extra security.
Tips to Avoid Forgetting Your iPad/iPhone Password Again
1. Use Face ID or Touch ID for Convenience and Backup
Enable biometric unlock to reduce the need to type your passcode repeatedly. It speeds up access while lowering the chance of forgetting your password. Remember, always have a strong alphanumeric passcode as a backup in case Face/Touch ID fails.
2. Enable iCloud Backup and Regularly Sync Your iPad
Keeping an up-to-date backup ensures that even if you forget your passcode and need to erase your device, you won’t lose your important data. Schedule automatic iCloud backups or manually back up to your computer to stay protected.
3. Choose a Strong but Memorable Passcode
Avoid simple combinations like 1234 or repeated numbers. Instead, use a mix of letters, numbers, and symbols that you can remember. For example, combine initials of loved ones with a meaningful number. This strengthens security and reduces the chance of forgetting.
4. Store Your Passcode Securely Offline
Write your passcode down and keep it in a safe location separate from your iPad. Avoid storing it digitally on the same device to prevent hackers from accessing it. Consider using a locked physical notebook or a secure personal safe.
5. Enable Two-Factor Authentication for Apple ID
While not directly about passcodes, 2FA ensures that even if you forget your Apple ID password, you can still securely recover your account, preventing lockouts across your devices.
Comparison Table — Reset vs Change iPad/iPhone Password
FAQs
Conclusion
Resetting or changing your iPad password doesn’t have to be stressful. If you simply want to change it, do so safely in Settings. If you’ve forgotten the passcode, choose between iCloud, iTunes/Finder, Recovery Mode, or a professional solution like Passixer iPhone Unlocker for a faster, more intuitive process.
Always back up your data and keep your Apple ID credentials safe — your digital life depends on it.